Server-Side Setup (Windows OS)
Download and install USB for Remote Desktop Server on the remote Windows PC you will be connecting to. Now, every time you connect to the remote desktop session, the program will be available in the tray menu.
Thin Client Configuration
USB for Remote Desktop is already integrated in the operating system on your IGEL endpoint device. Before use, it should be enabled and configured as described below.
IGEL OS 12
-
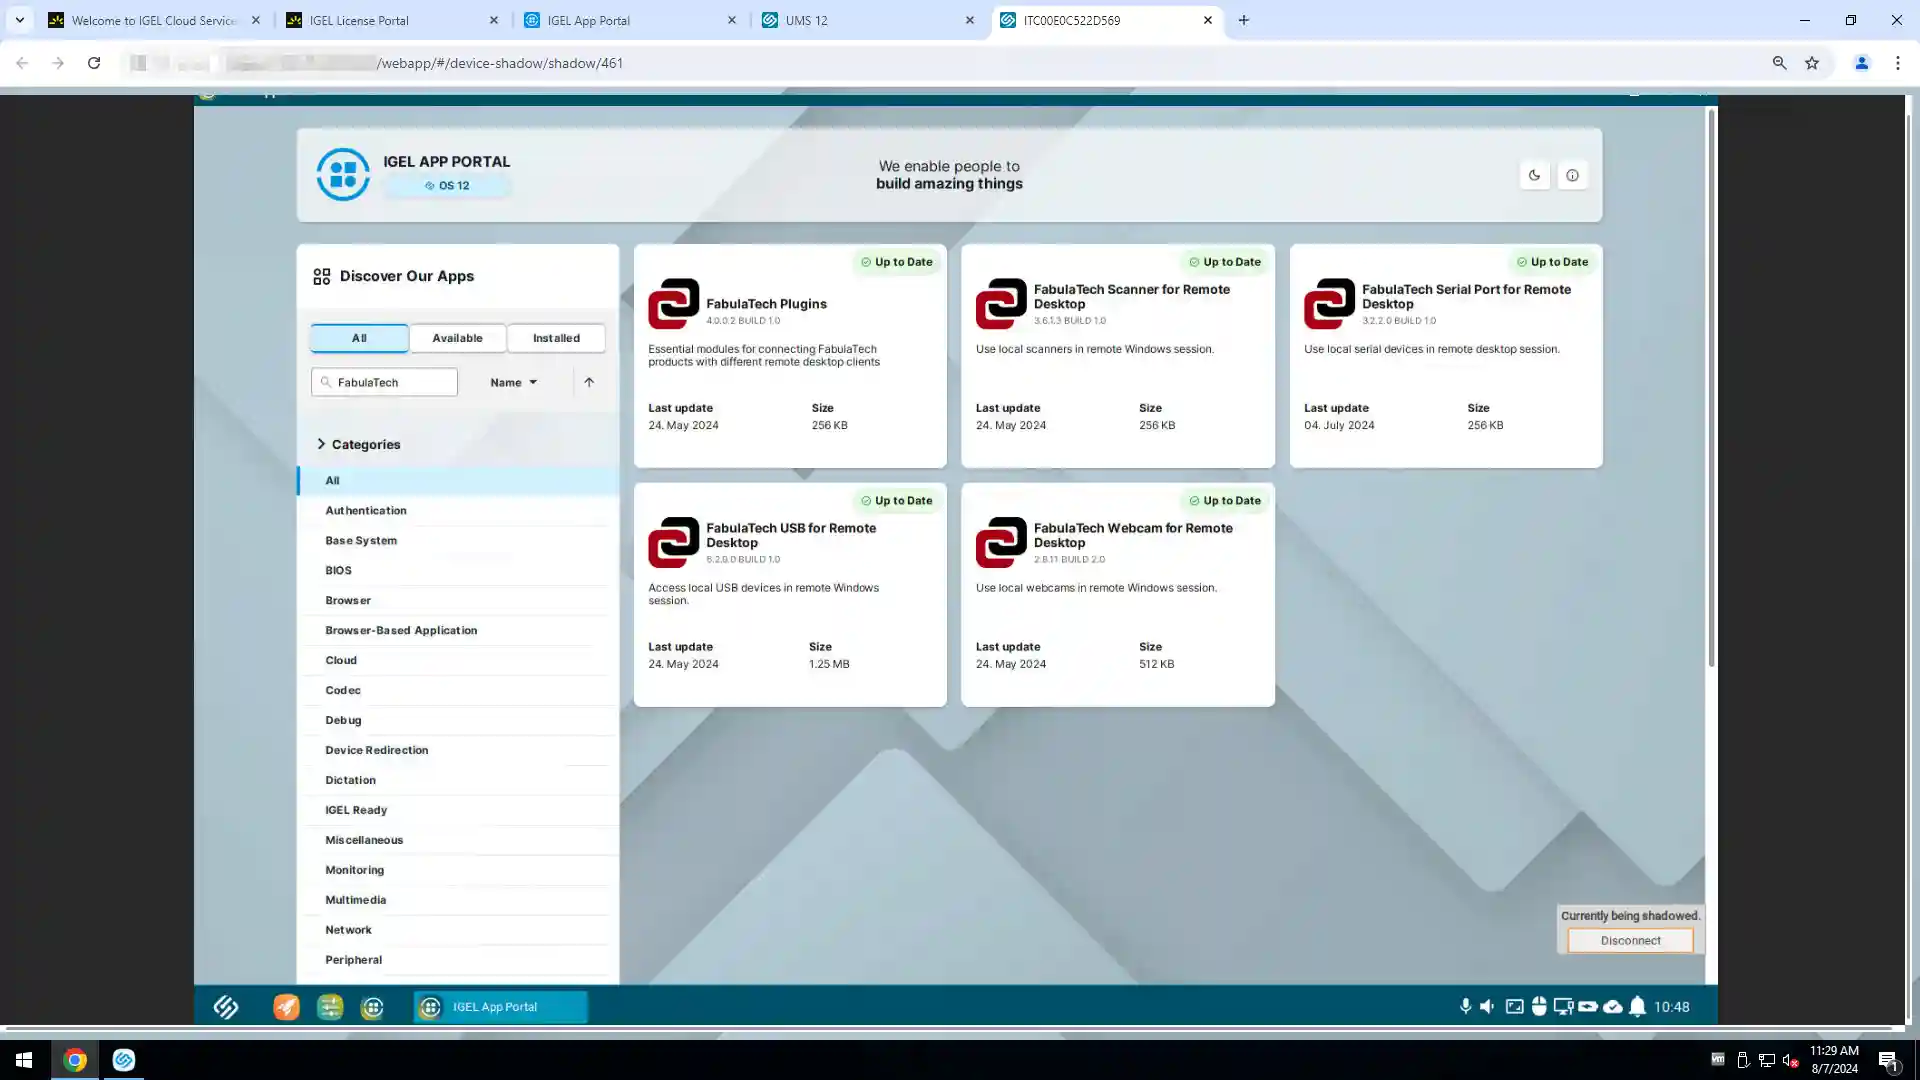
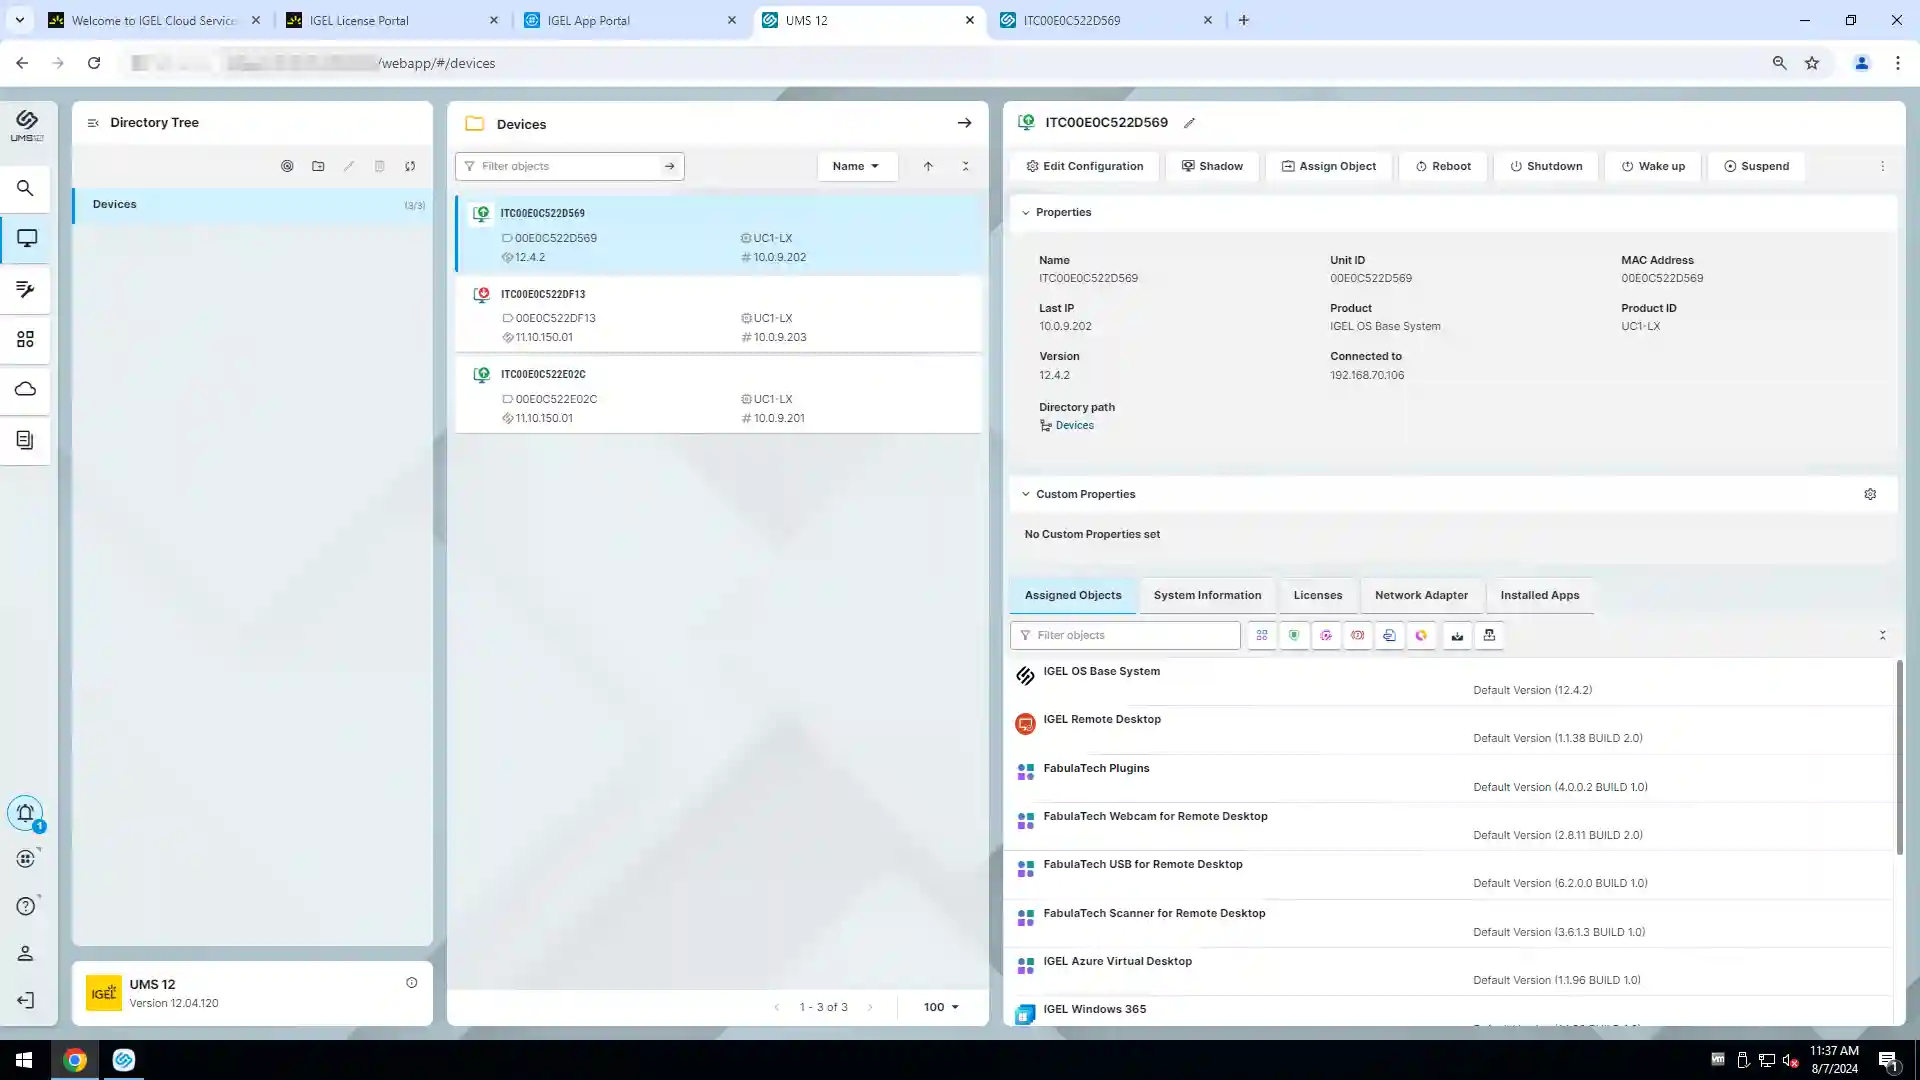
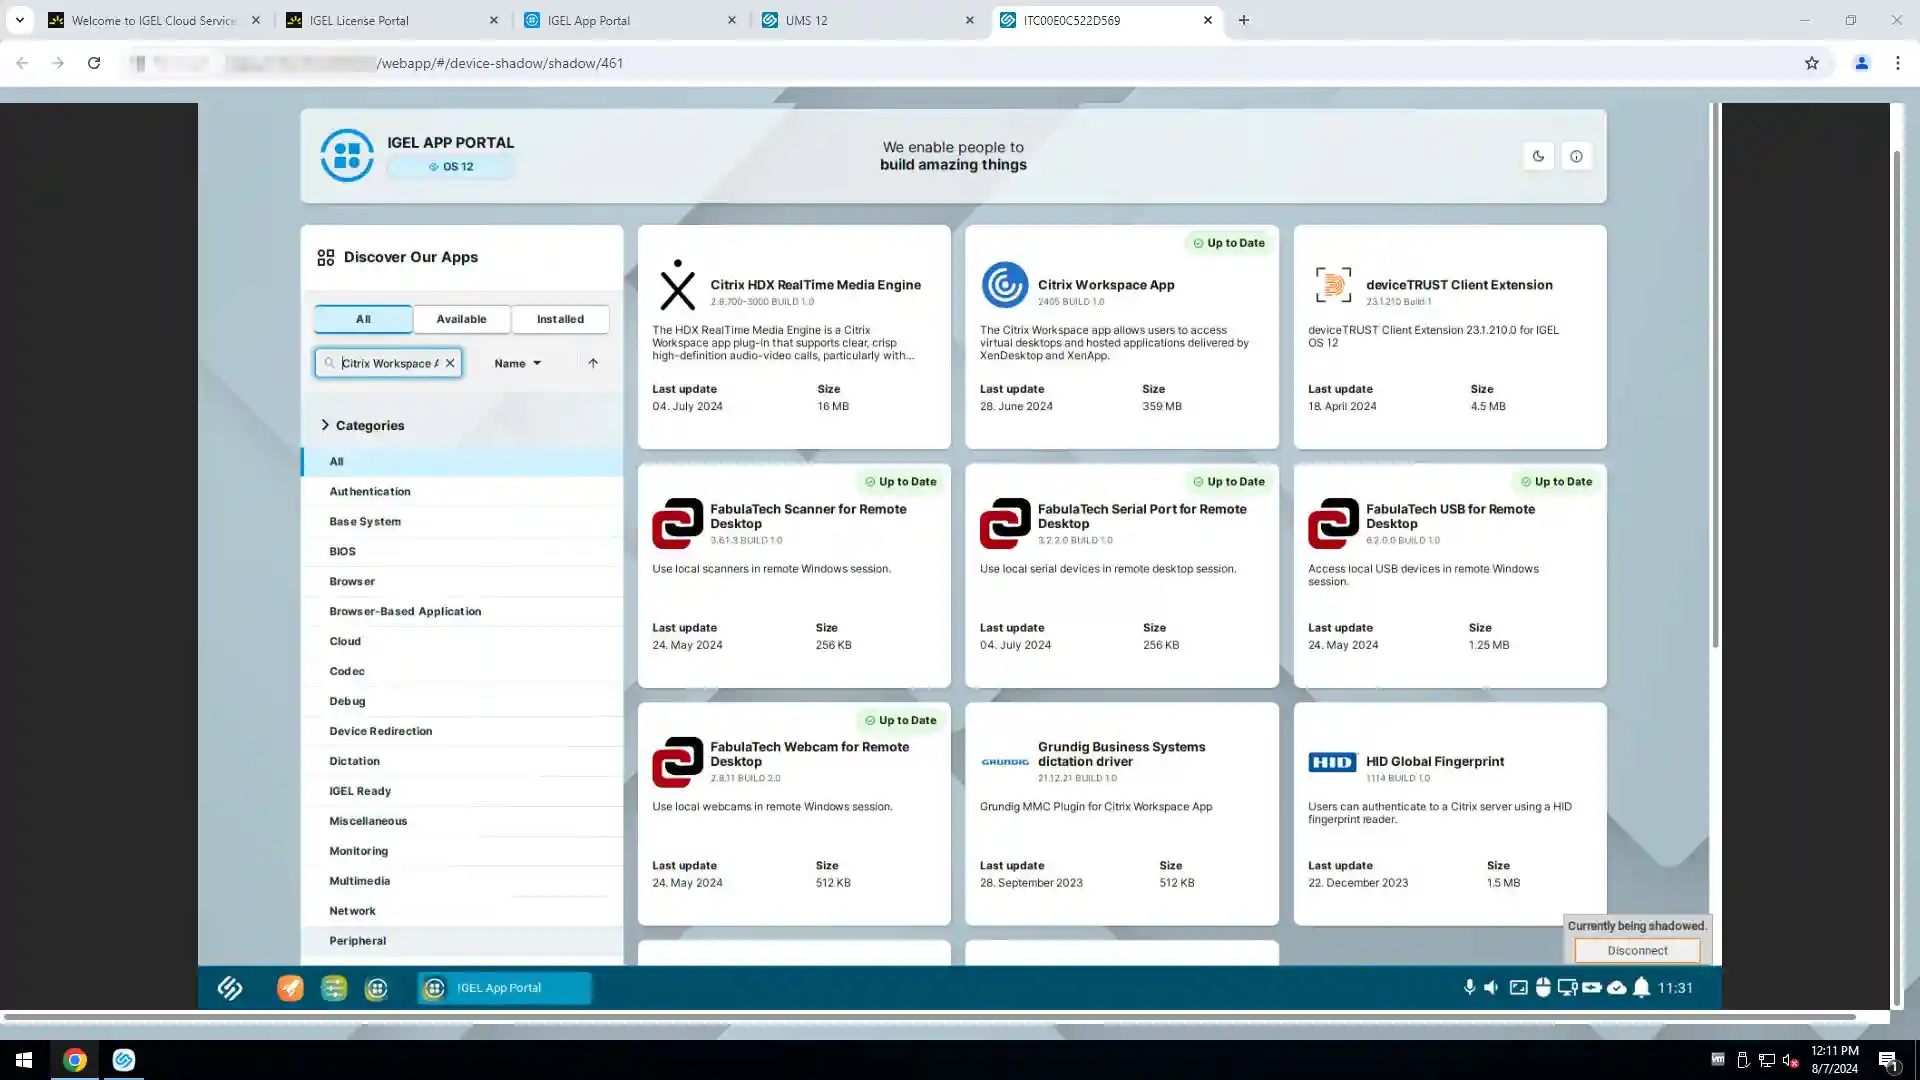
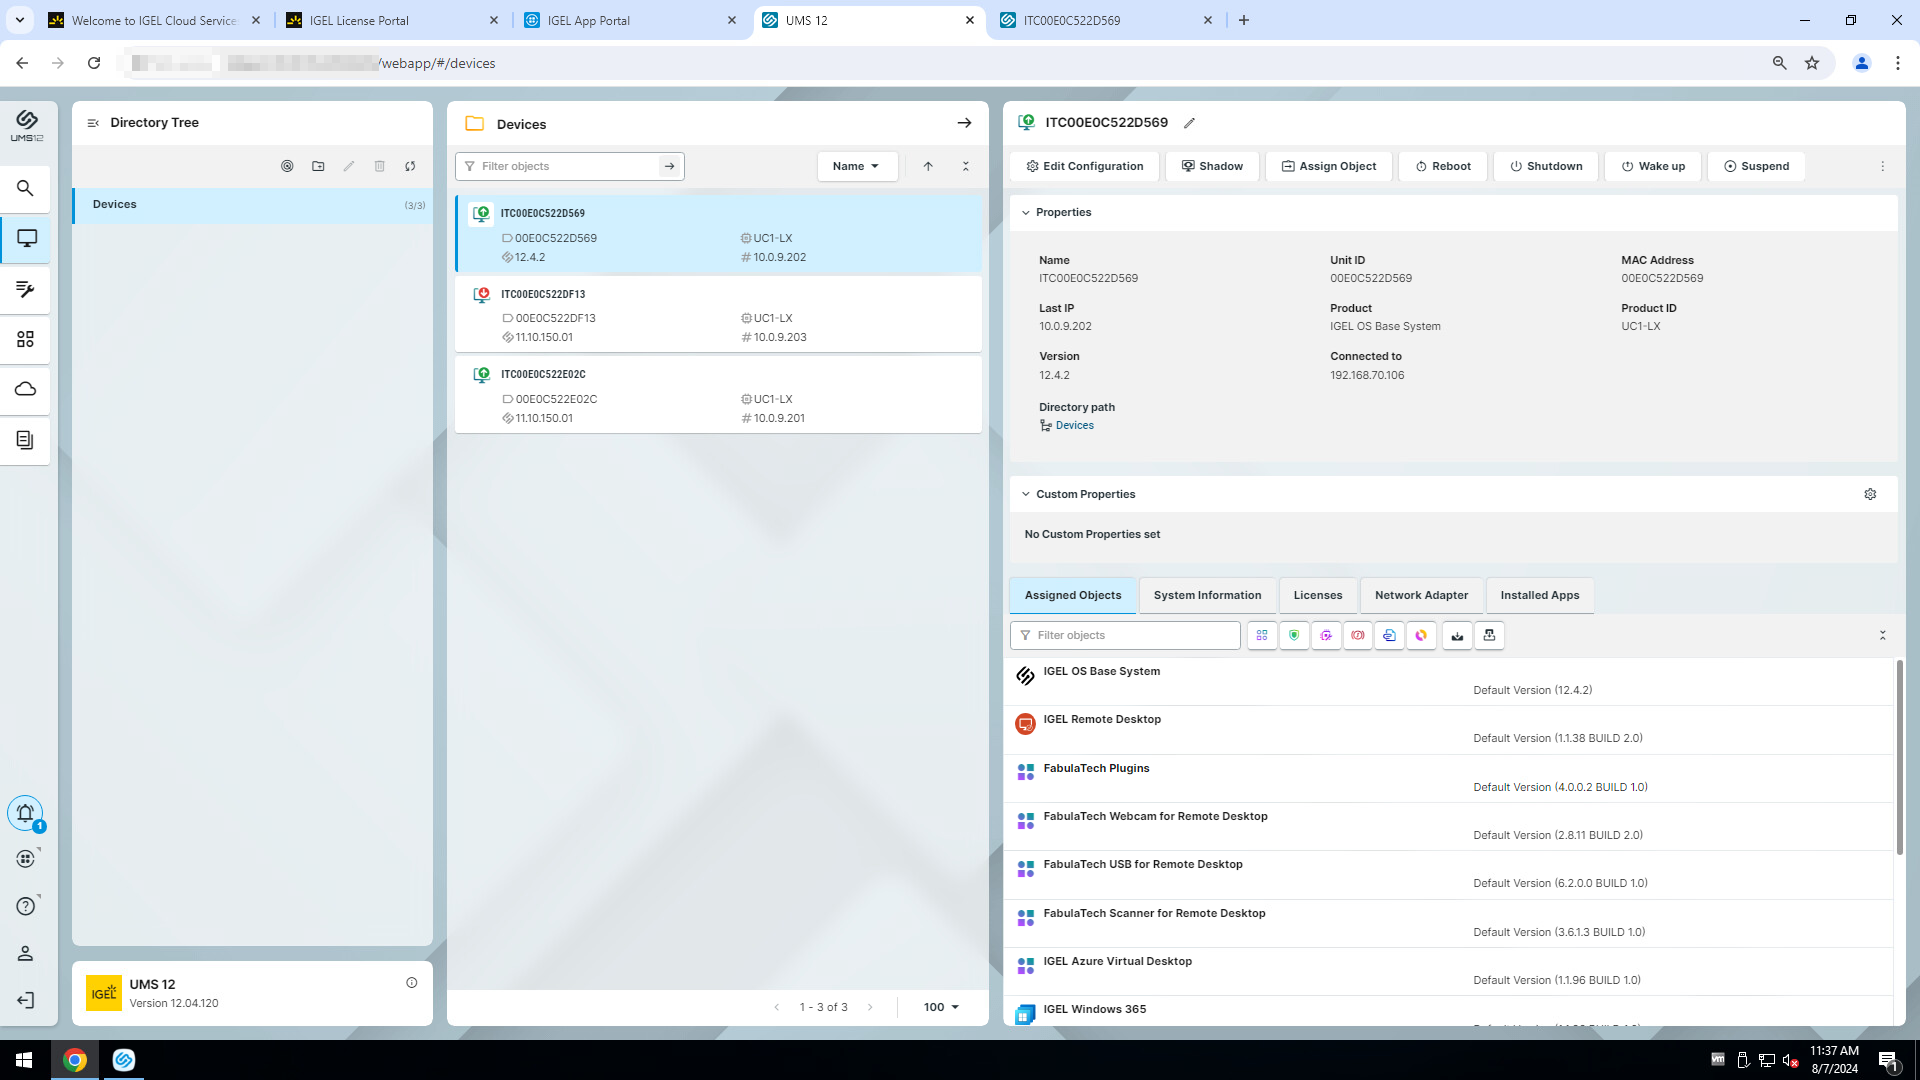
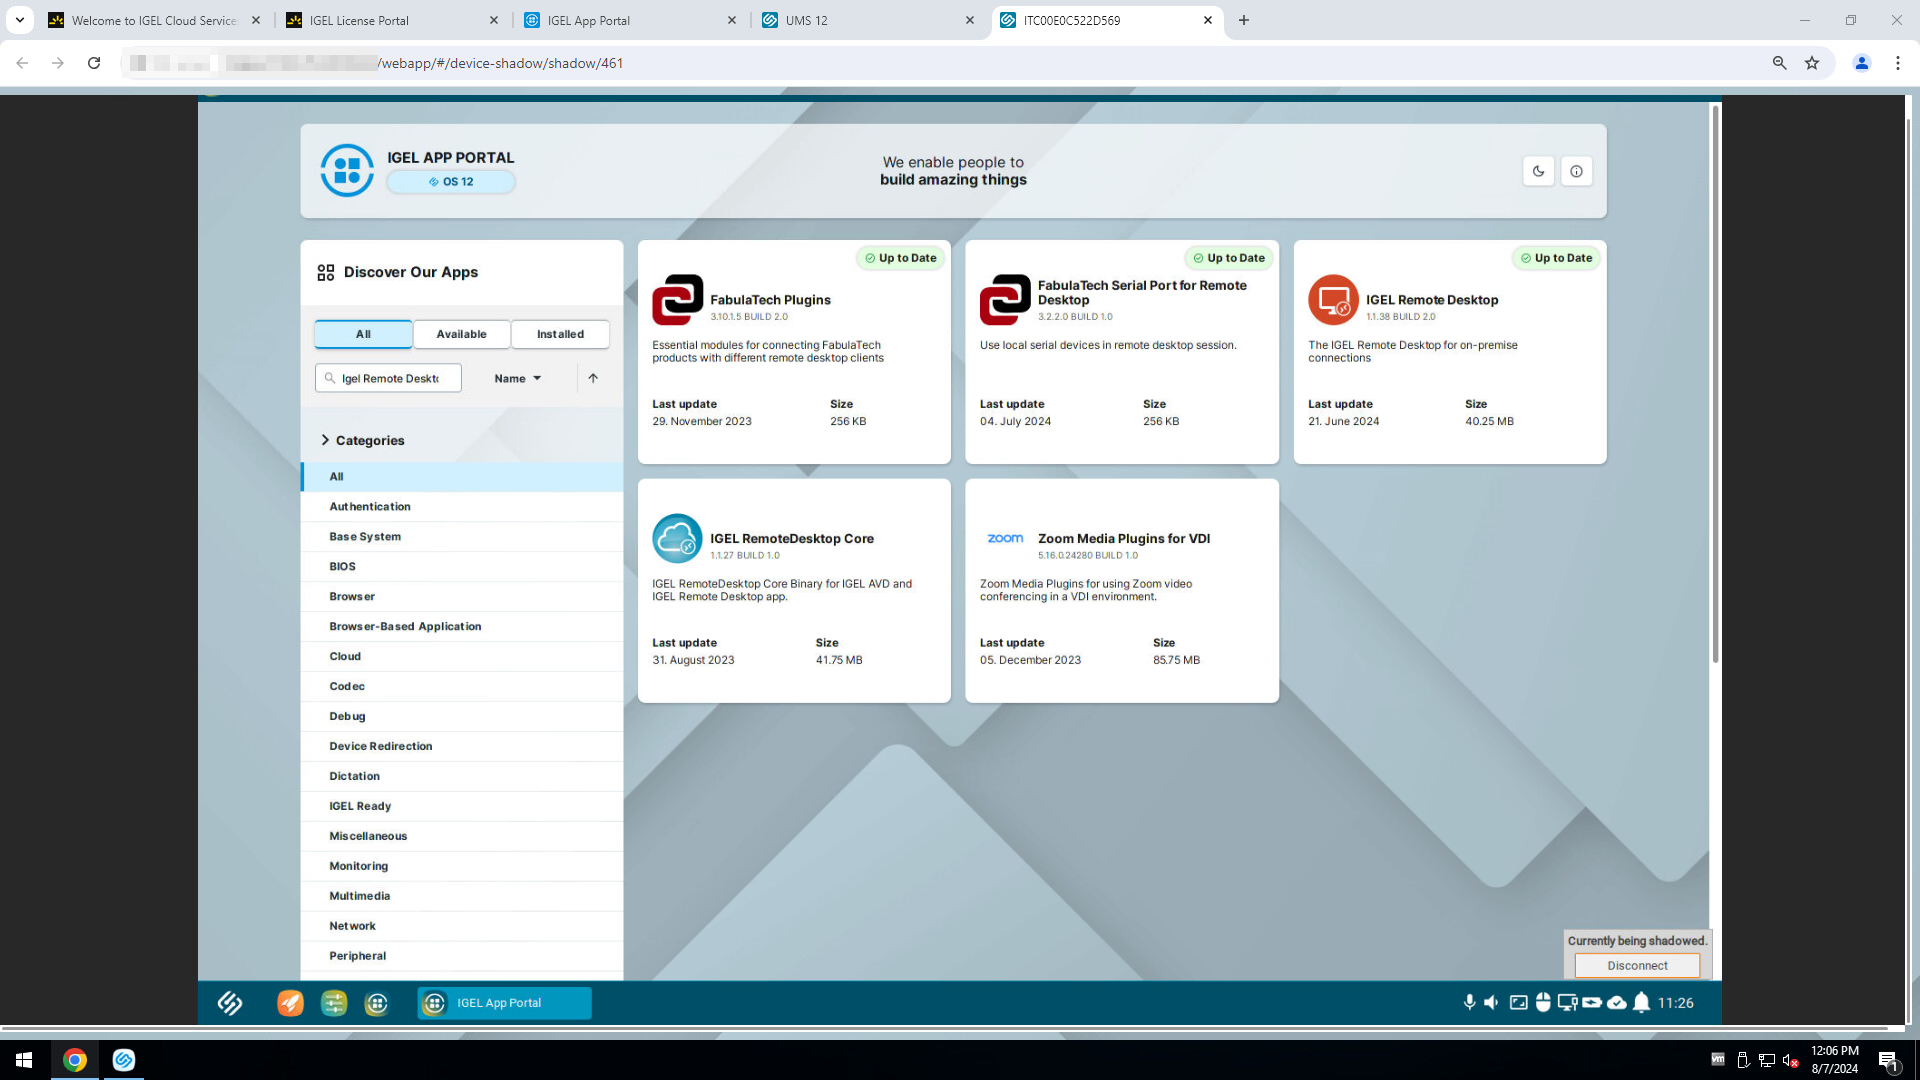
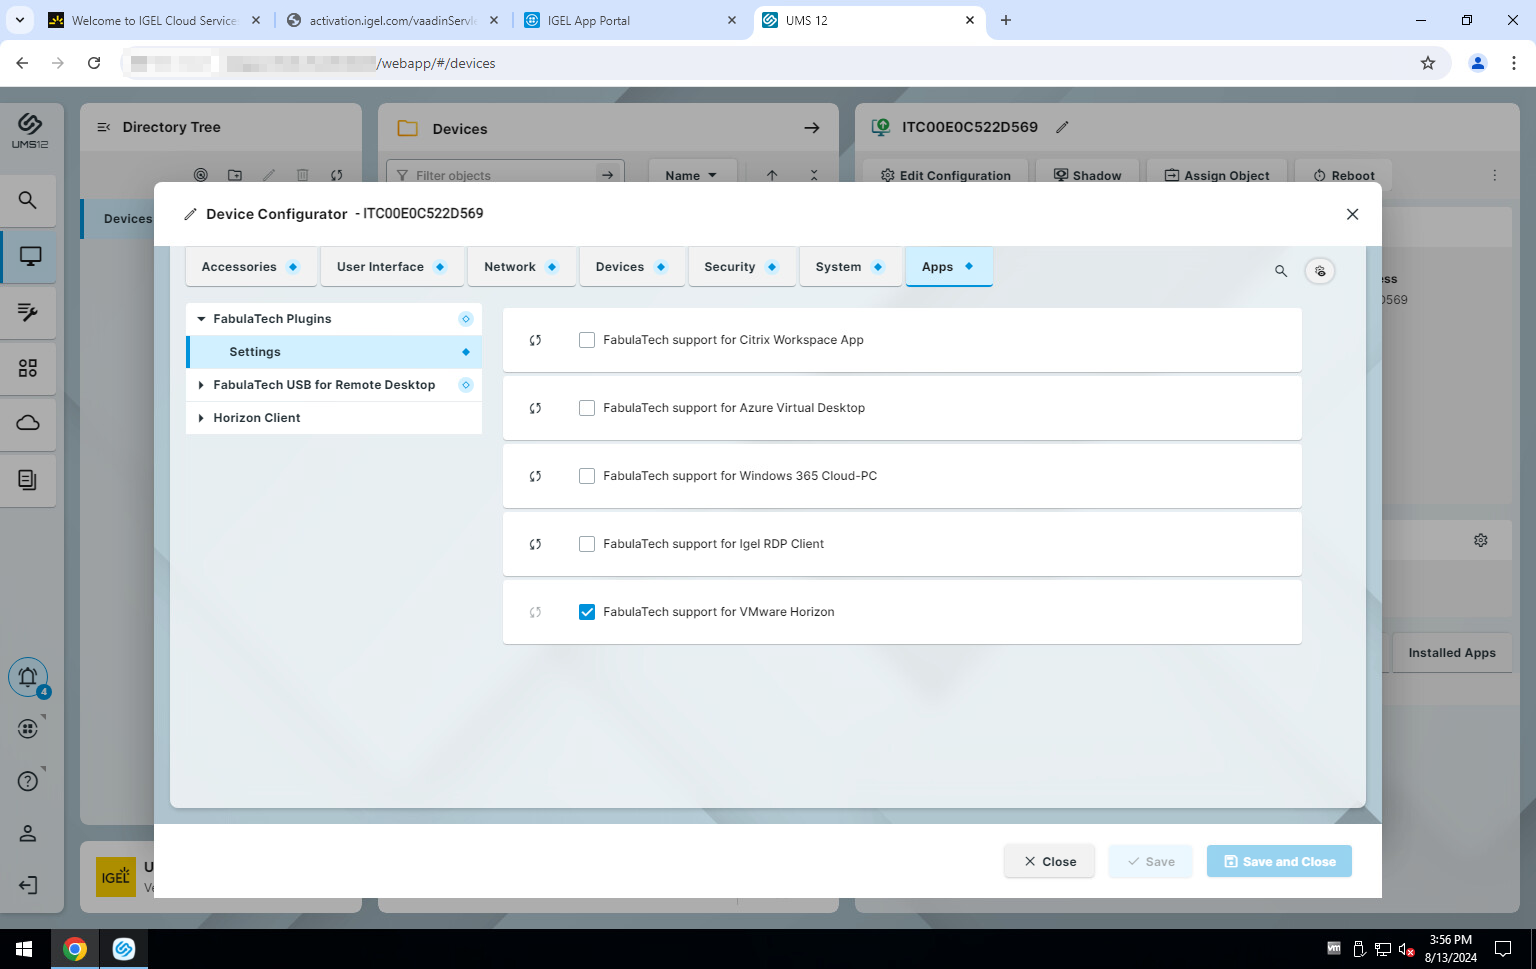
Install FabulaTech USB for Remote Desktop and FabulaTech Plugins from Igel App Portal.
-
Assign them to the Thin Client.
- Upgrade and reboot the Thin Client.
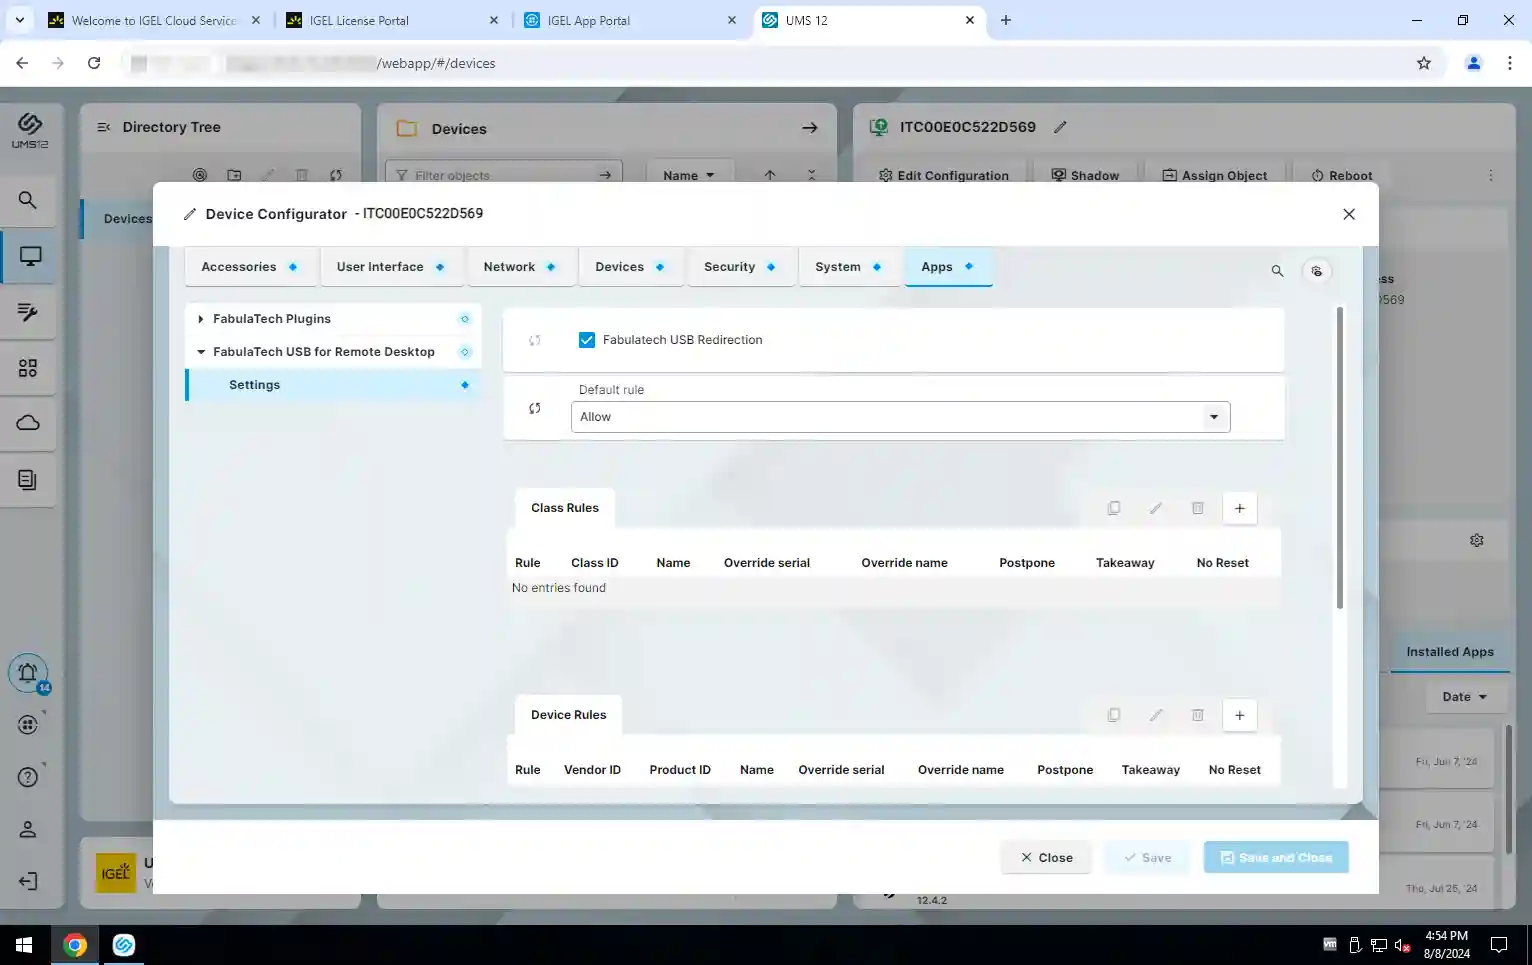
- Go to
Setup > Apps > FabulaTech USB for Remote Desktop > Settings
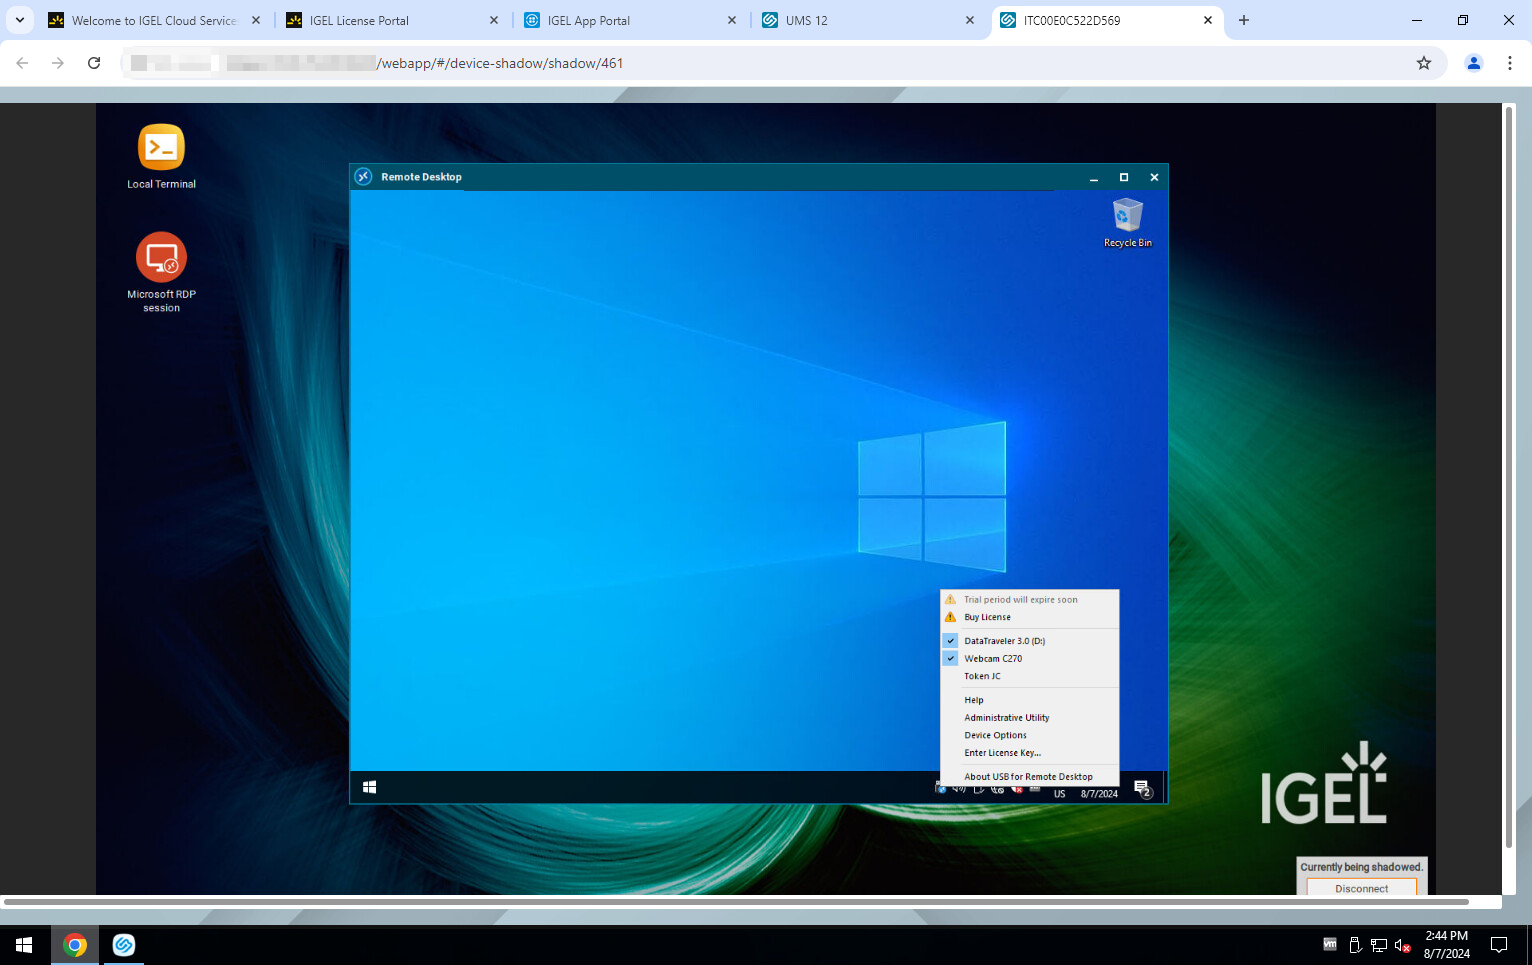
and select the FabulaTech USB Redirection checkbox. Ensure that Default rule option is set to Allow.
- Reboot the Thin Client.
- Install the required remote desktop Client and activate redirection in remote desktop connection configuration:
- RDP
-
Install Igel Remote Desktop from Igel App Portal.

- Assign it to the Thin Client
- Upgrade and reboot the Thin Client.
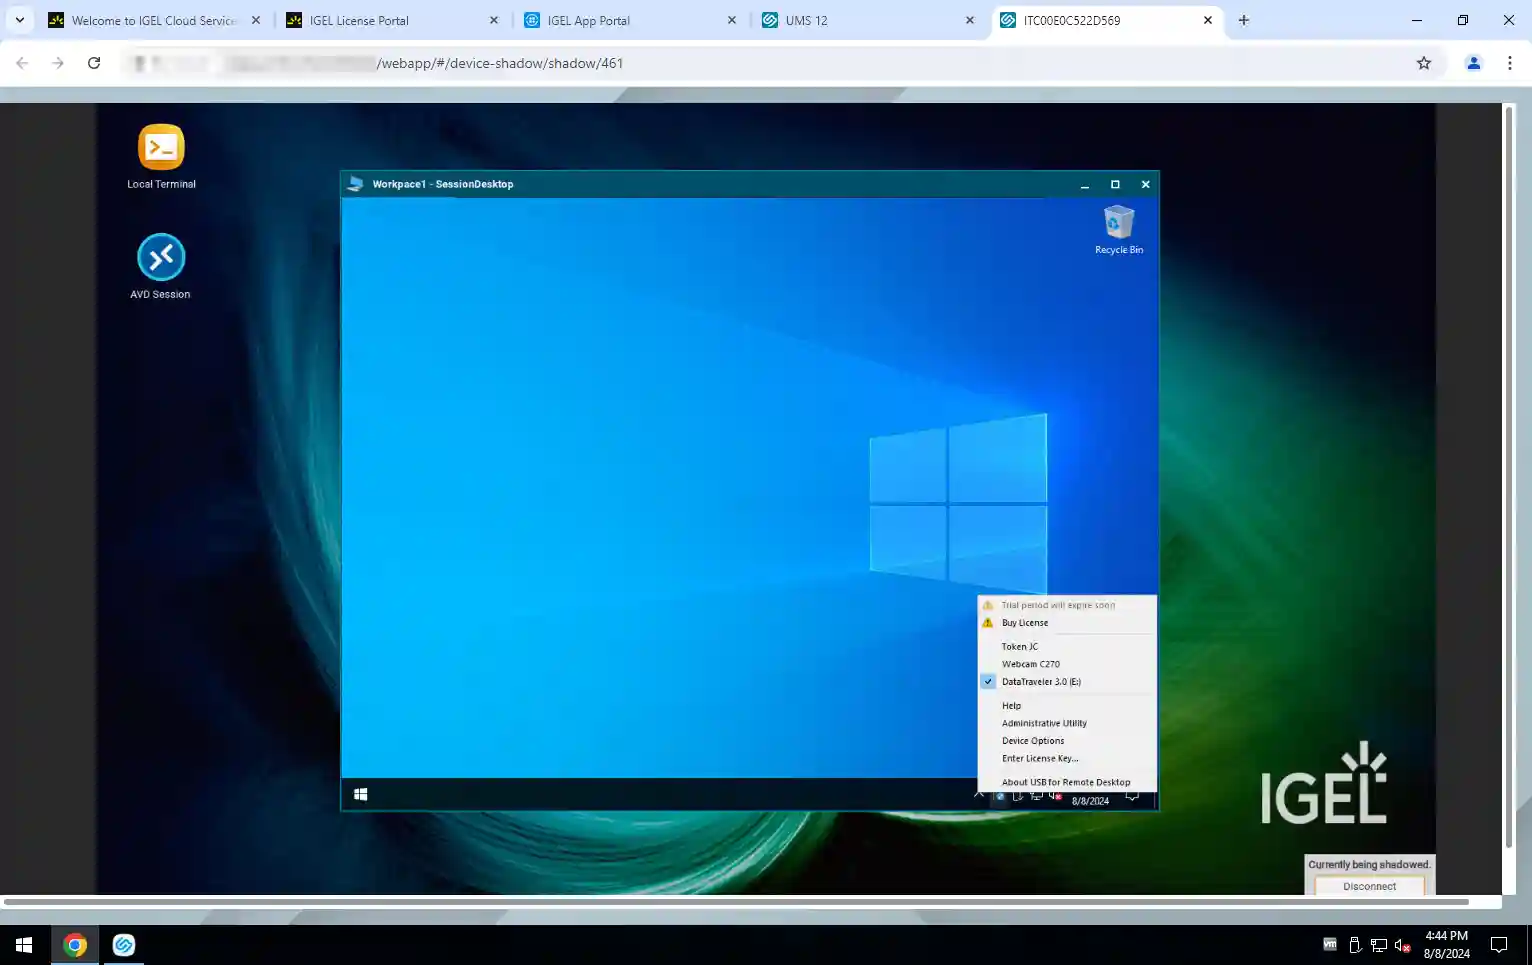
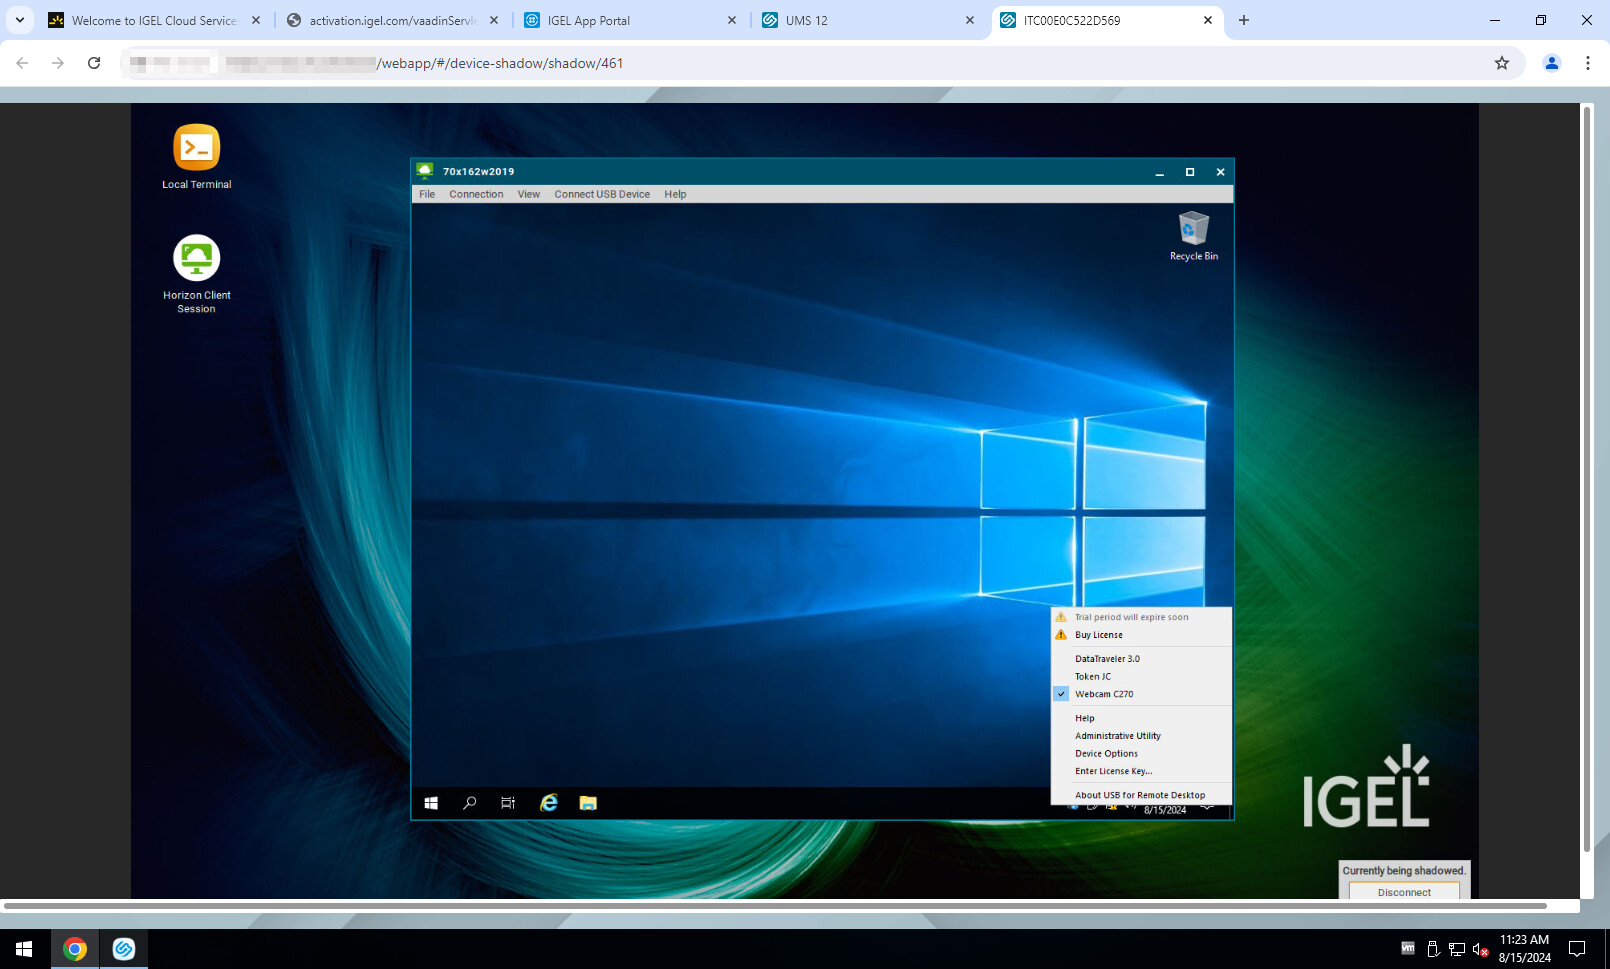
- Check FabulaTech support for Igel RDP Client checkbox:
Setup > Apps > FabulaTech Plugins > Settings

- Reboot the Thin Client.
- Create a new RDP connection profile: Setup > Apps > RDP > RDP Sessions
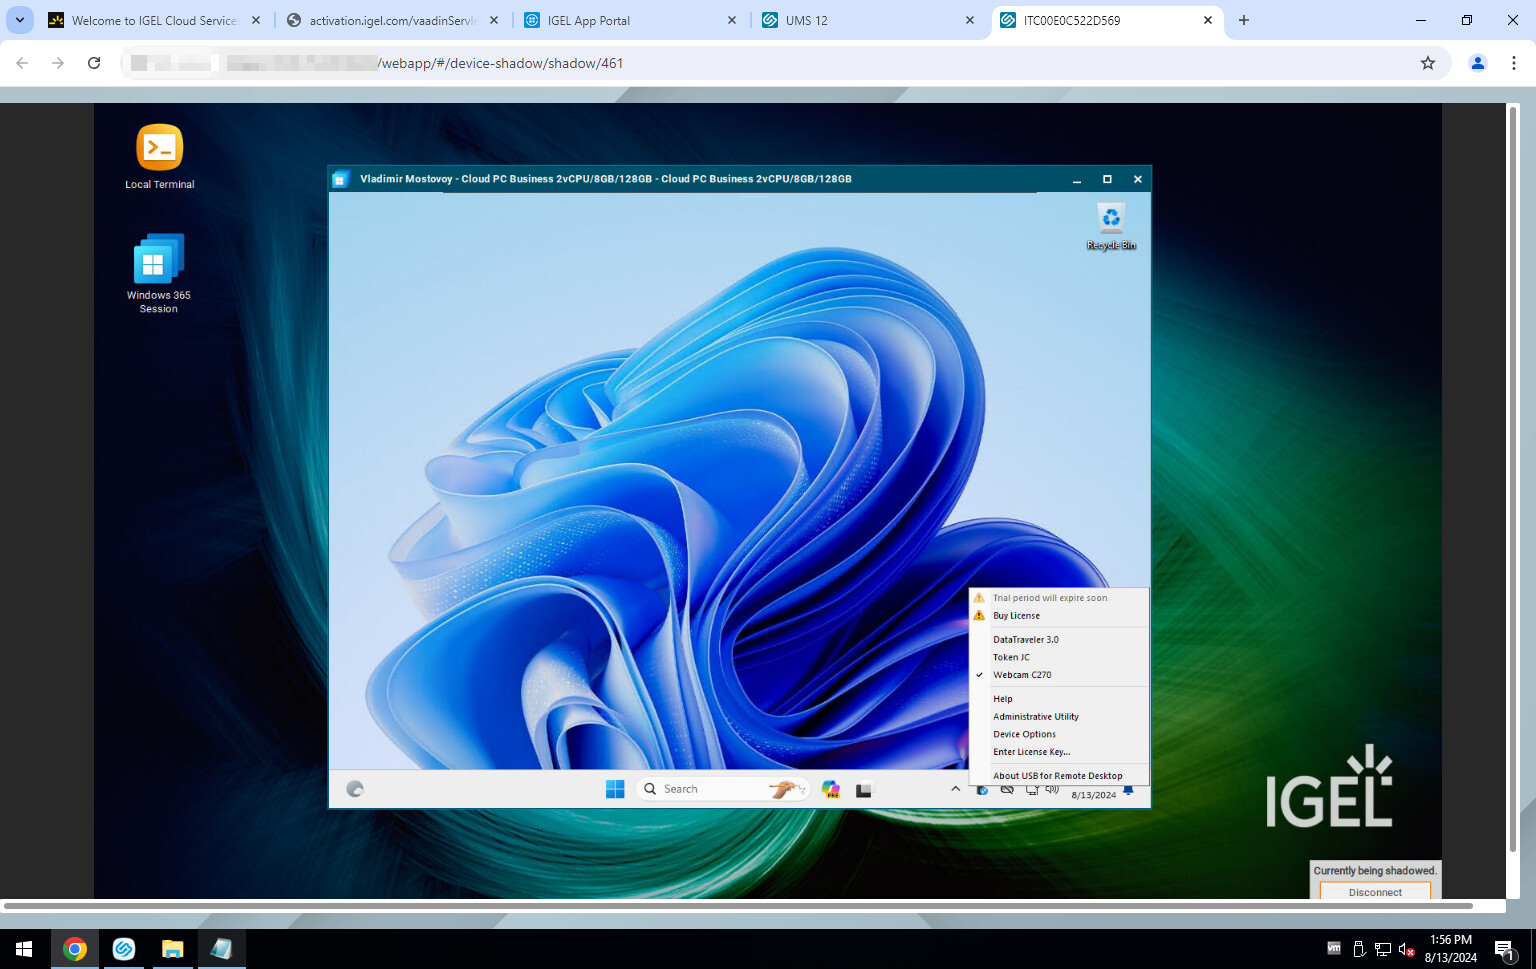
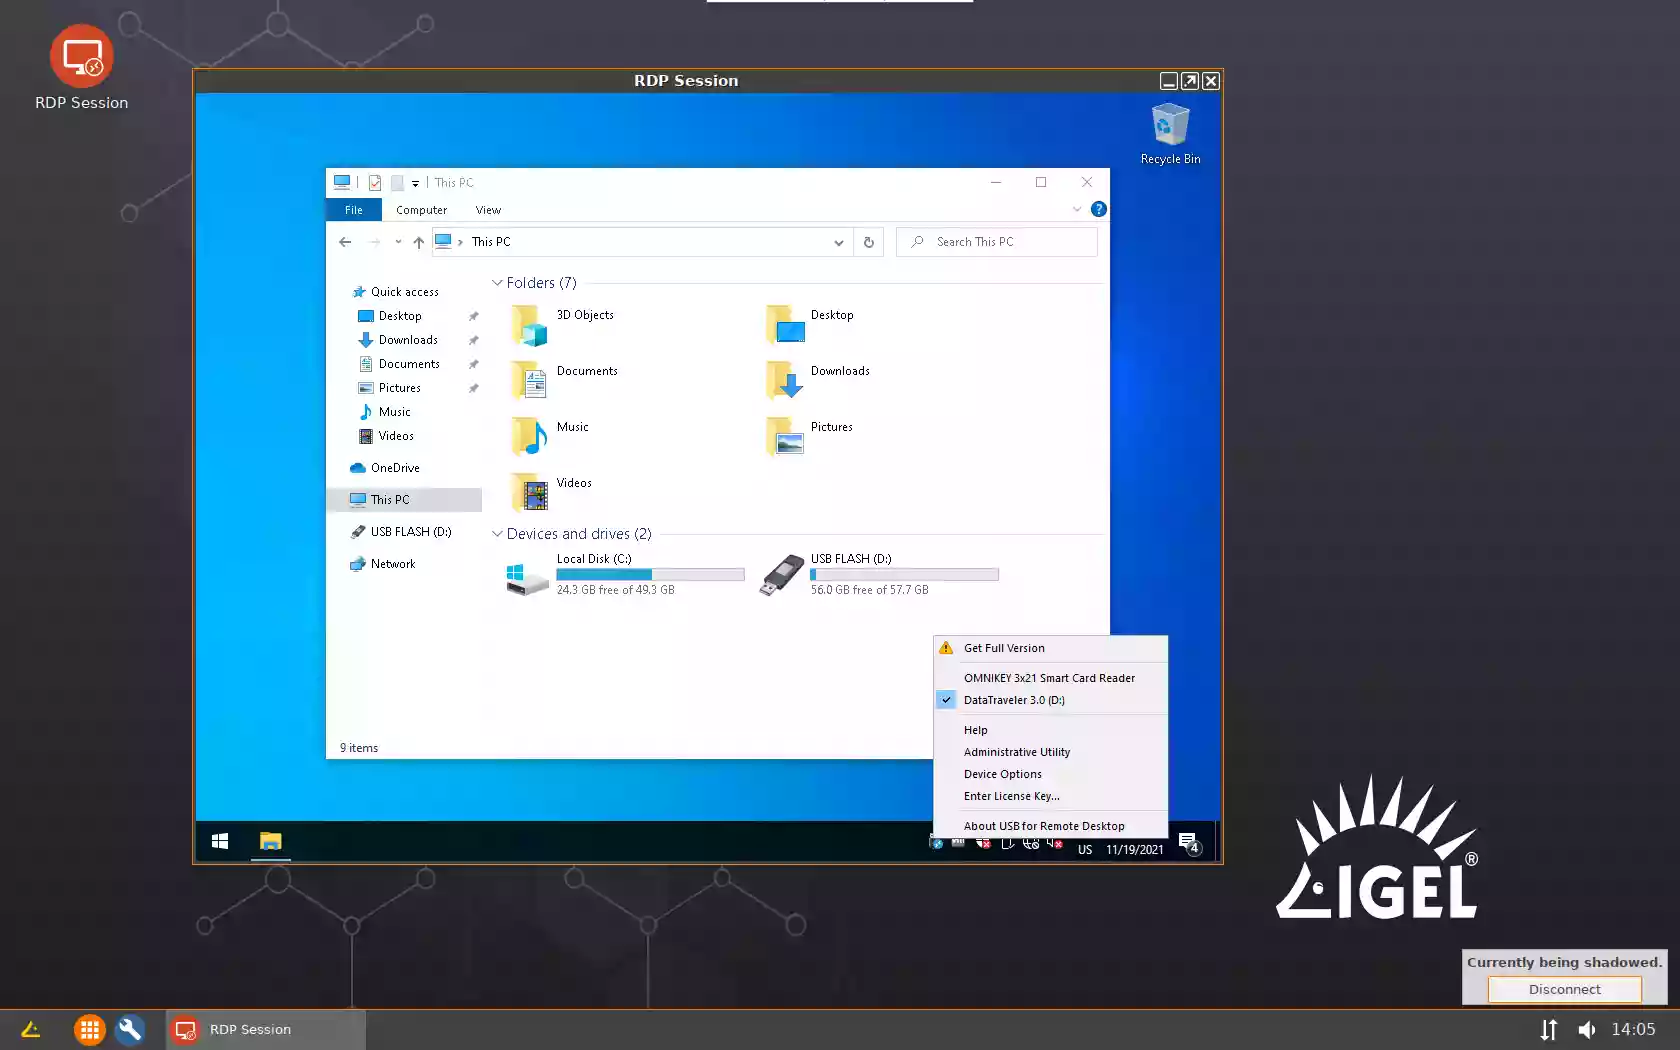
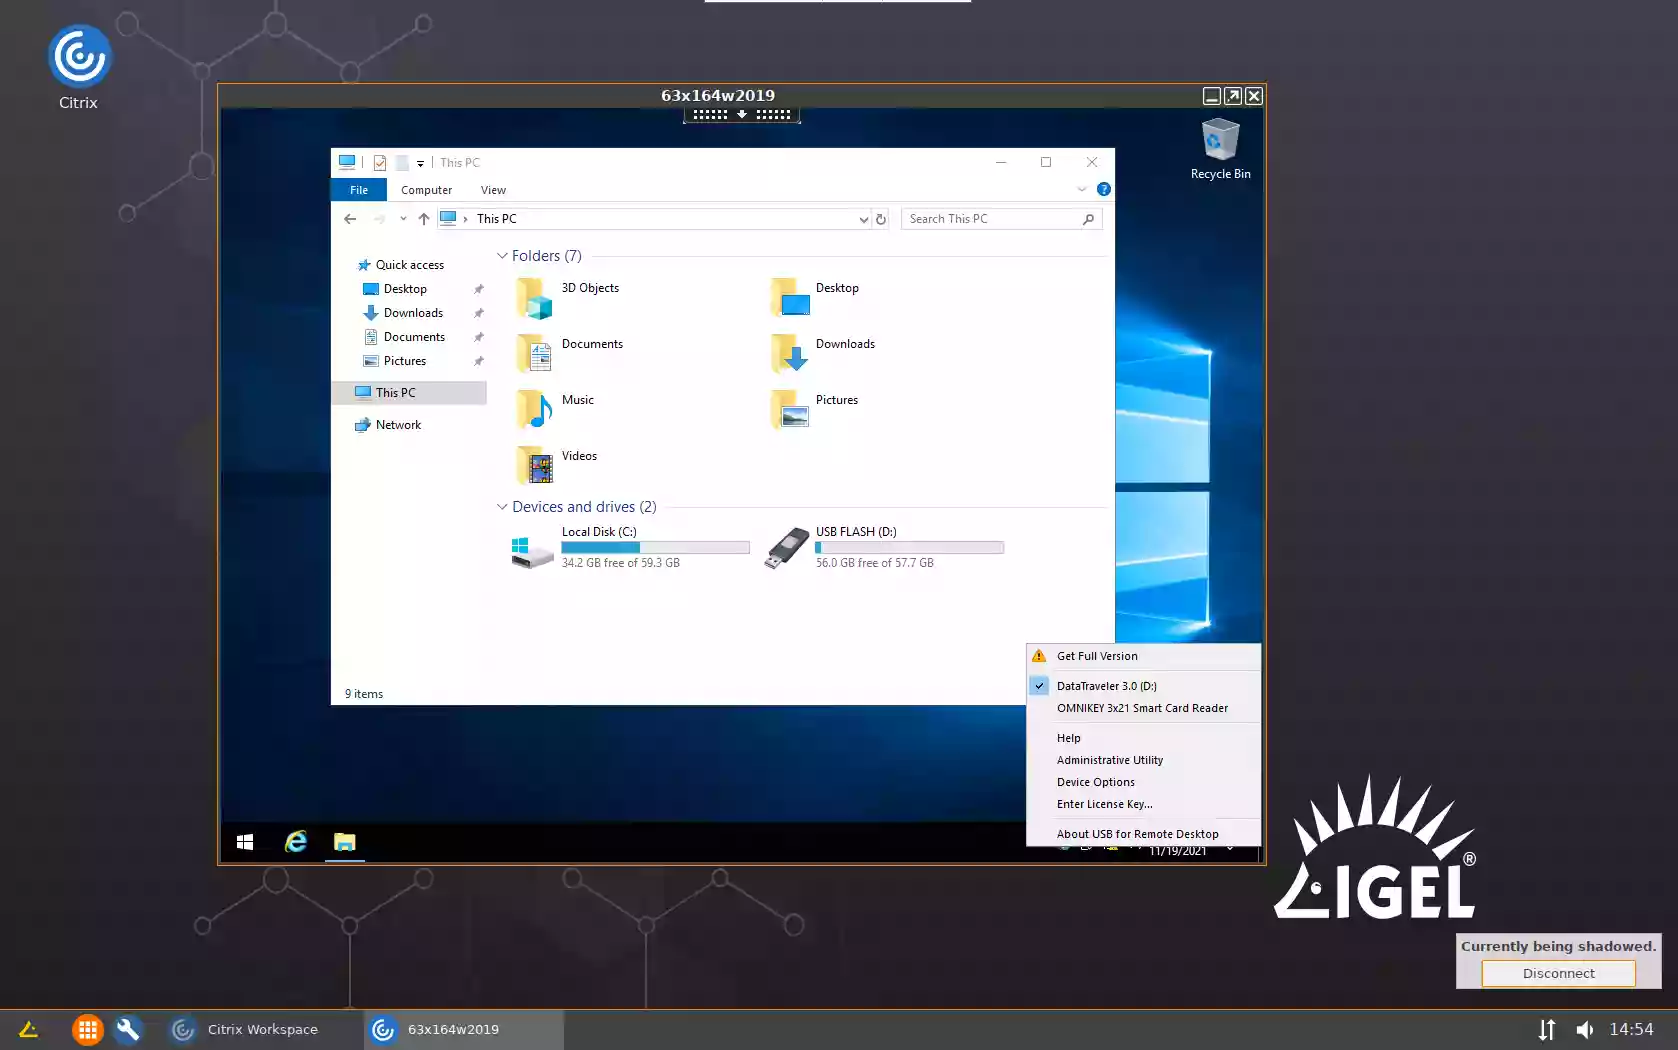
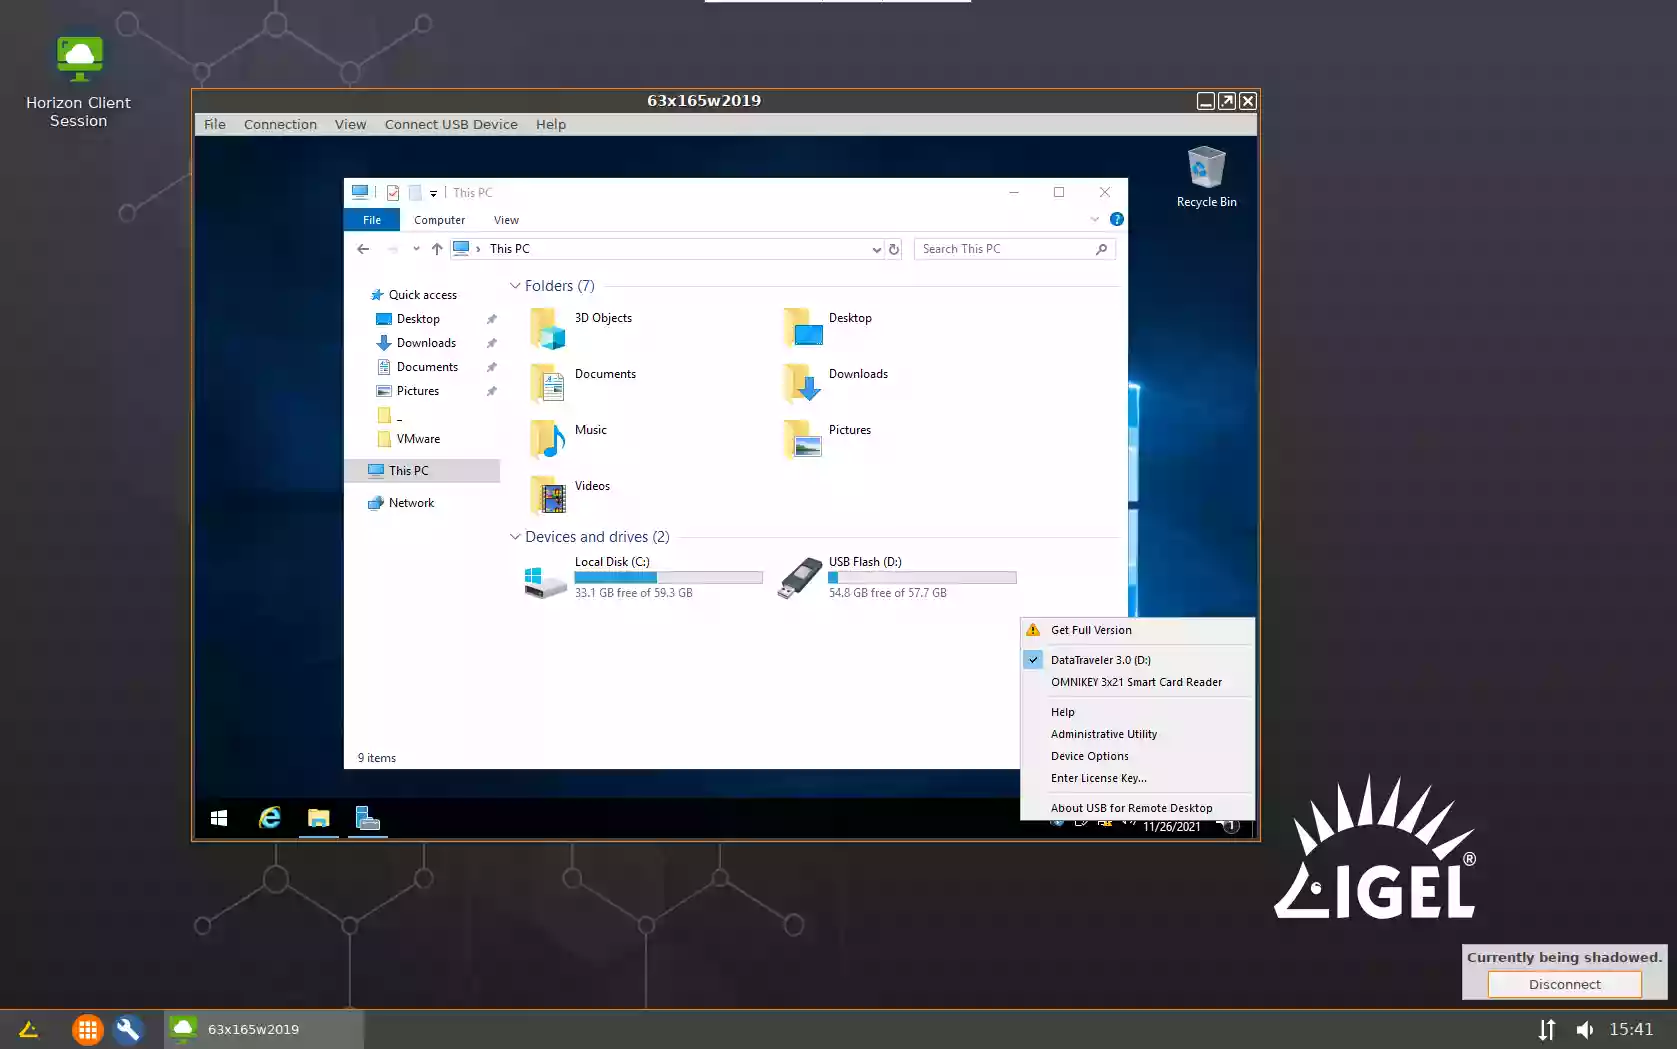
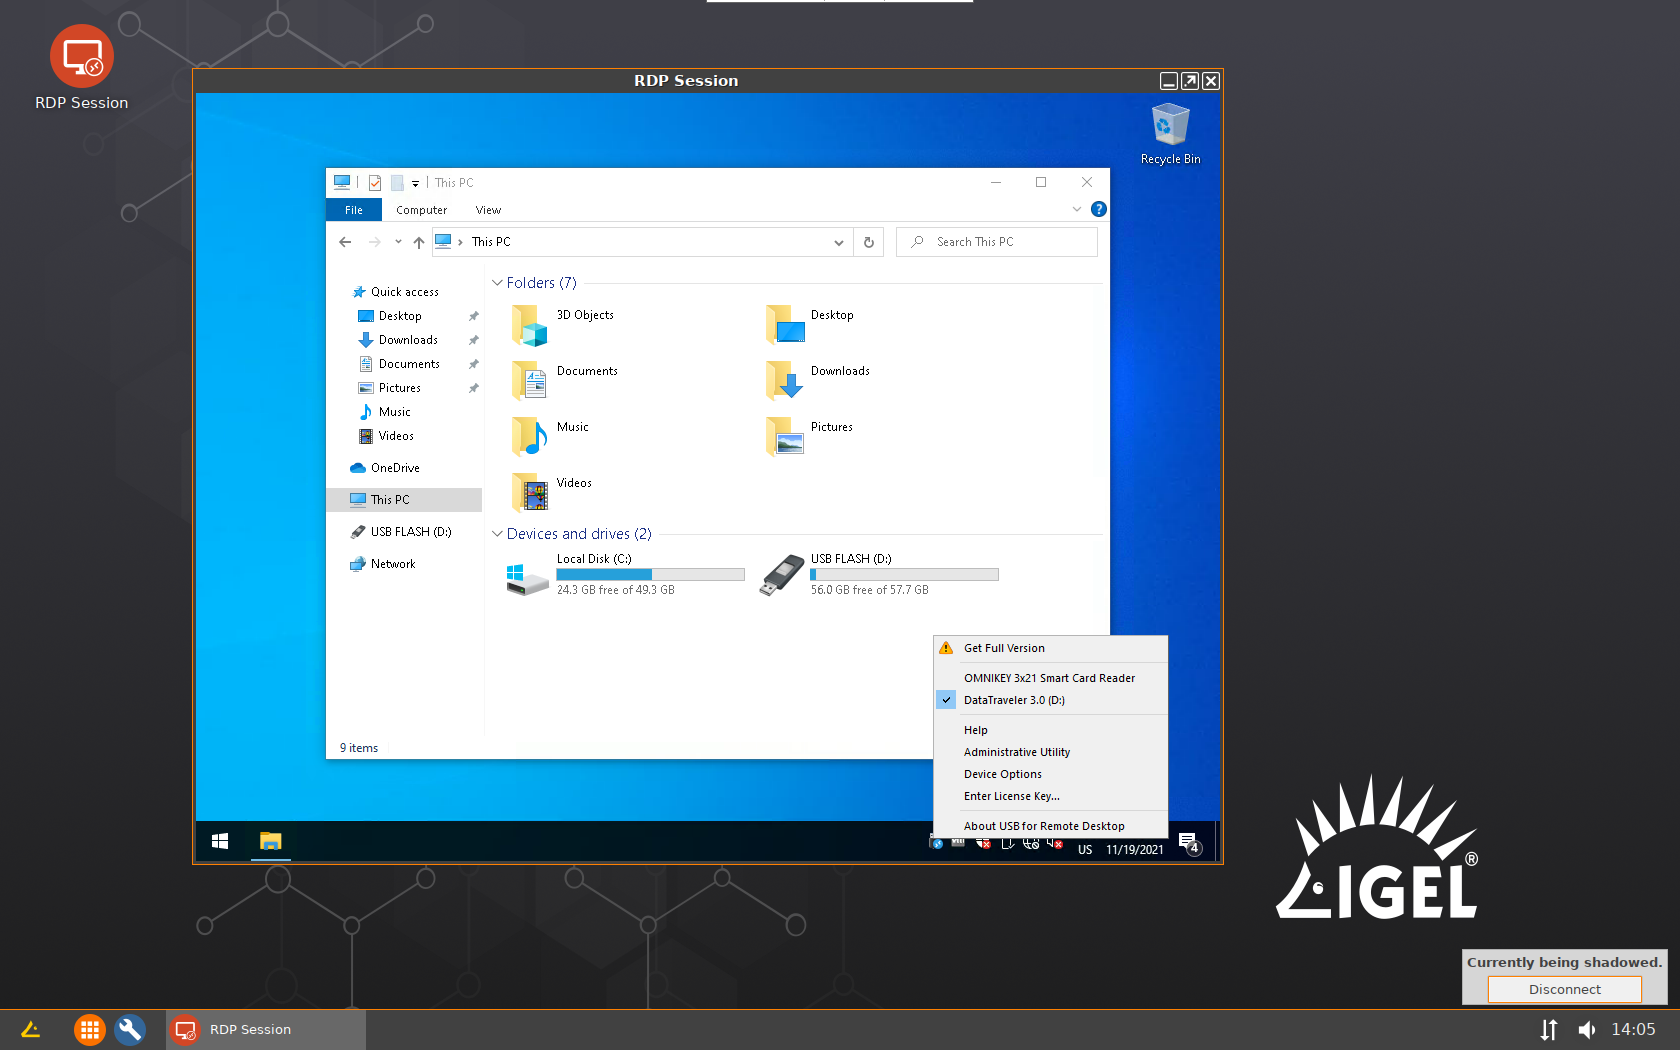
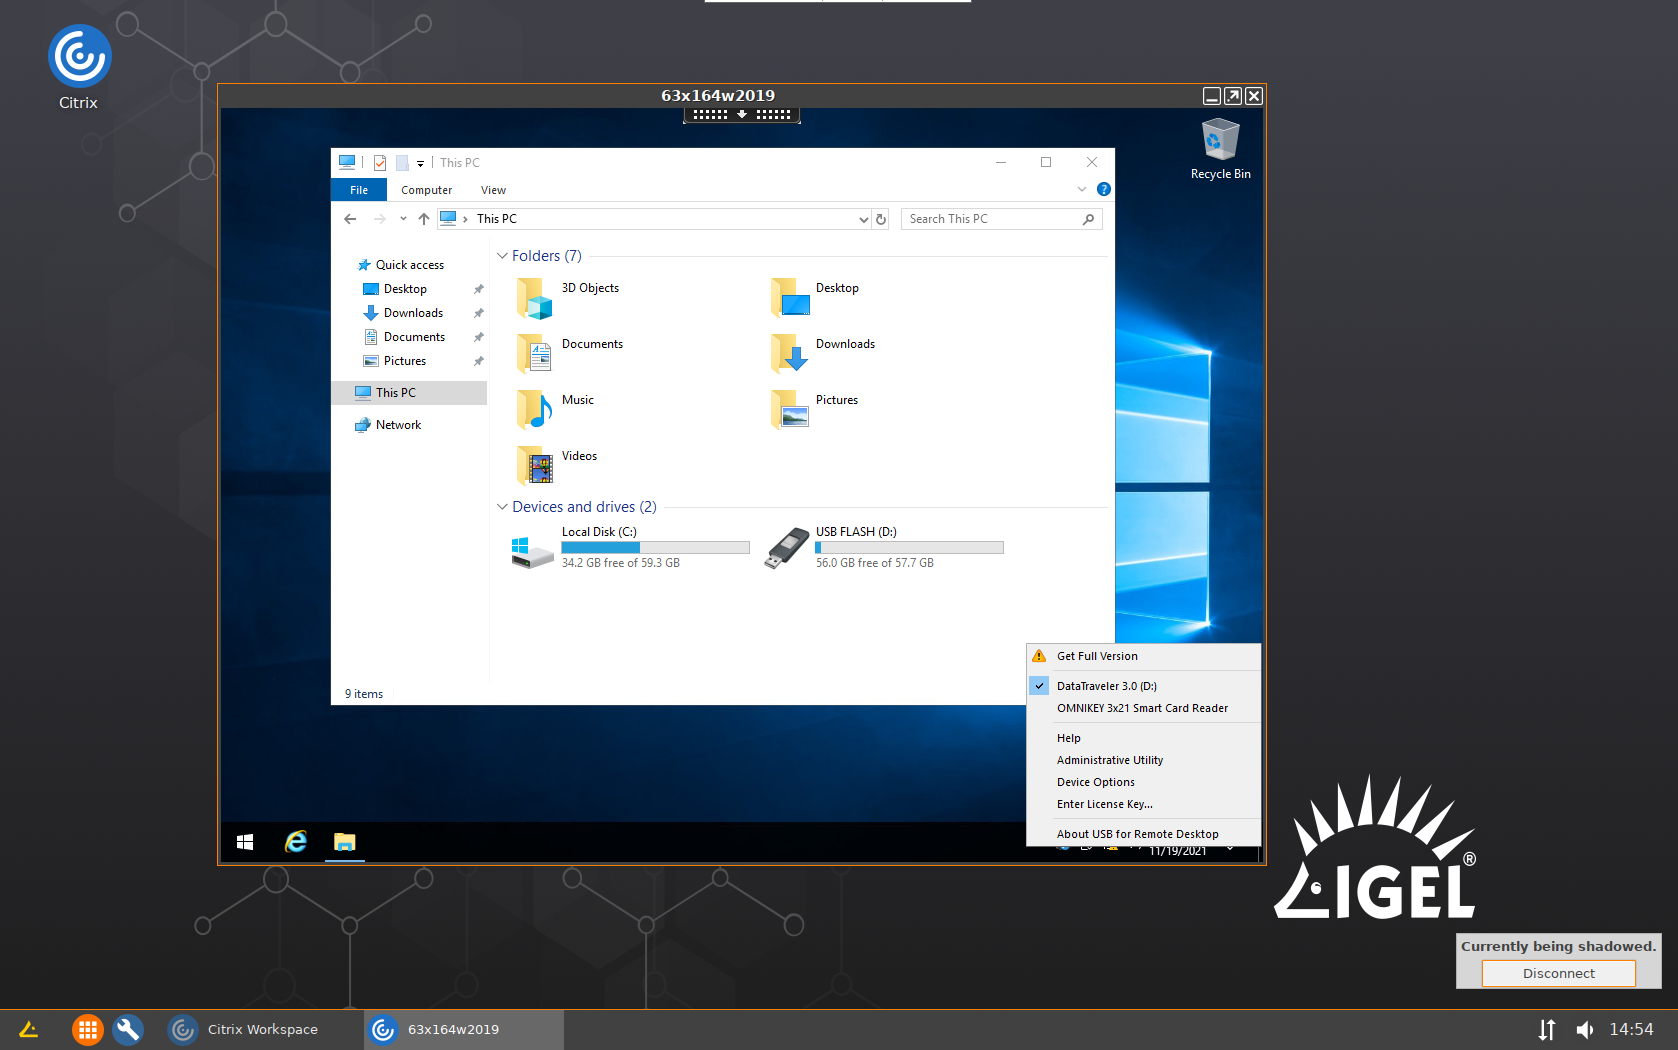
- Launch RDP Session and connect to the remote Windows PC. Devices available for redirection will appear in the taskbar menu under the USB for Remote Desktop icon.

-
Install Igel Remote Desktop from Igel App Portal.
- Citrix
-
Install Citrix Workspace App from Igel App Portal.
- Assign it to the Thin Client
- Upgrade and reboot the Thin Client.
- Check FabulaTech support for Citrix Workspace App checkbox:
Setup > Apps > FabulaTech Plugins > Settings
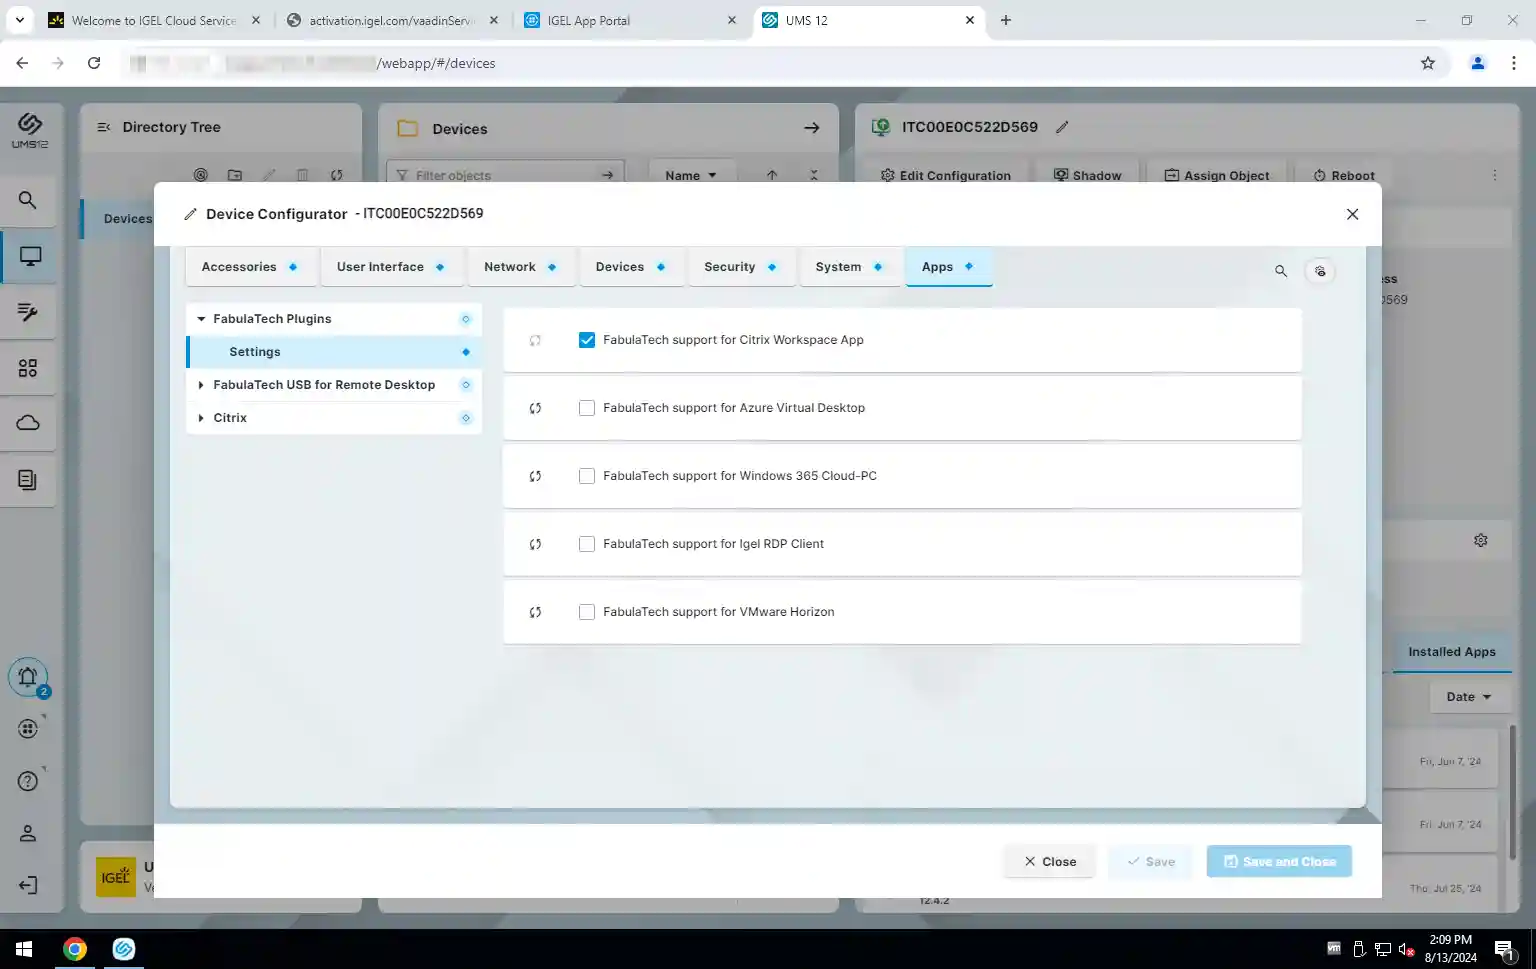
- Reboot the Thin Client.
- Create a new Citrix connection profile: Setup > Apps > Citrix > Citrix Sessions
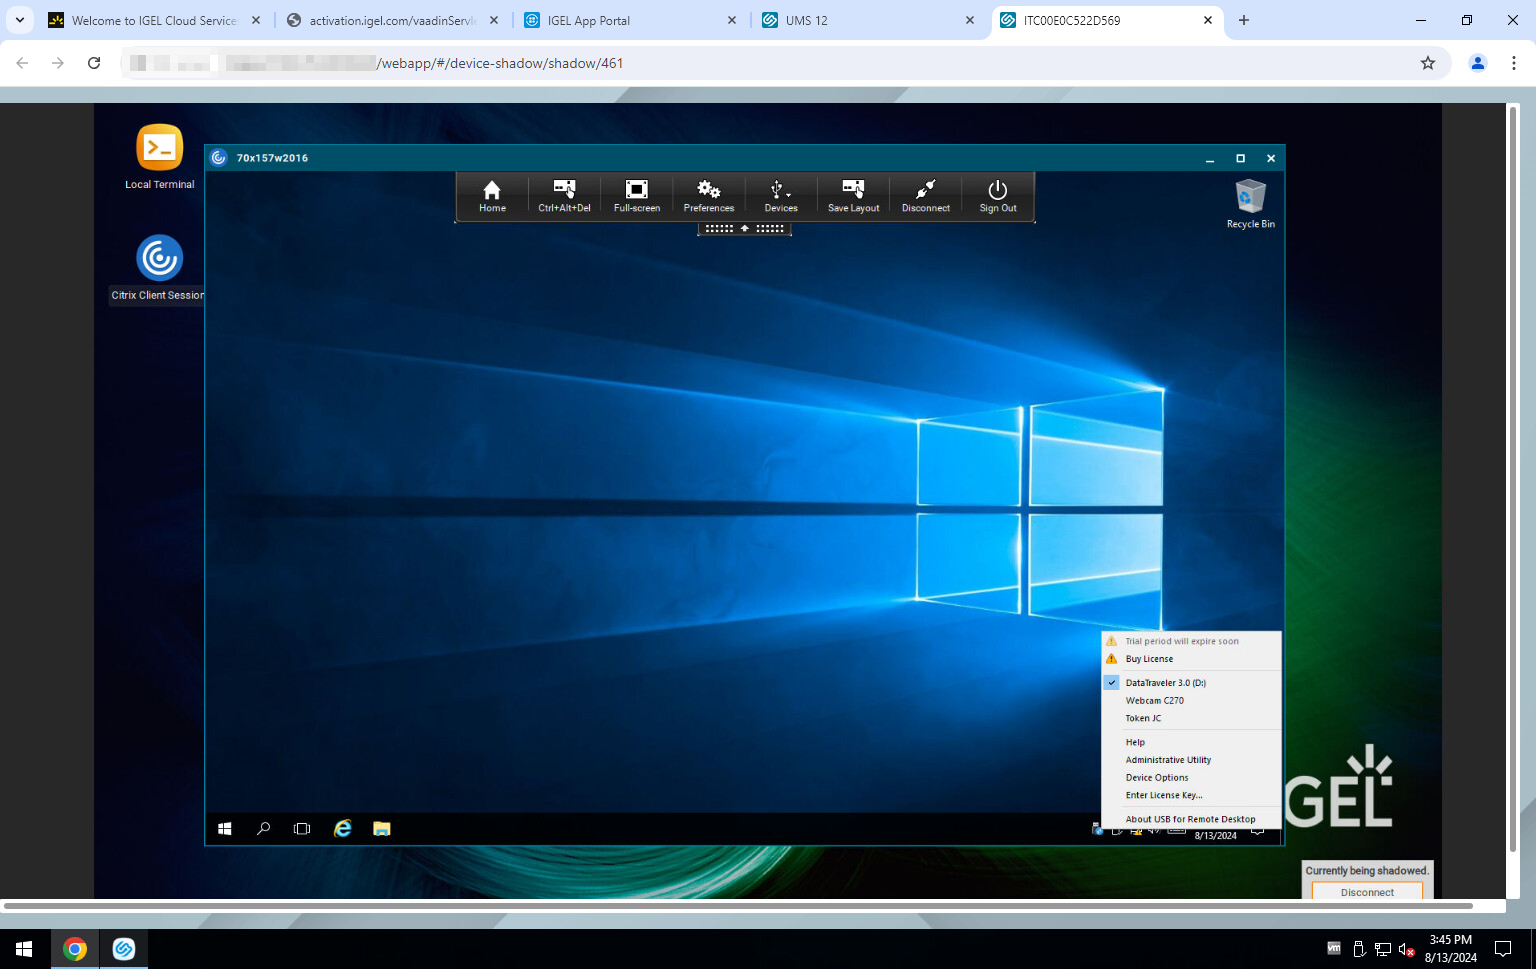
- Launch Citrix Session and connect to the remote Windows PC. Devices available for redirection will appear in the taskbar menu under the USB for Remote Desktop icon.

-
Install Citrix Workspace App from Igel App Portal.
- VMware Horizon
-
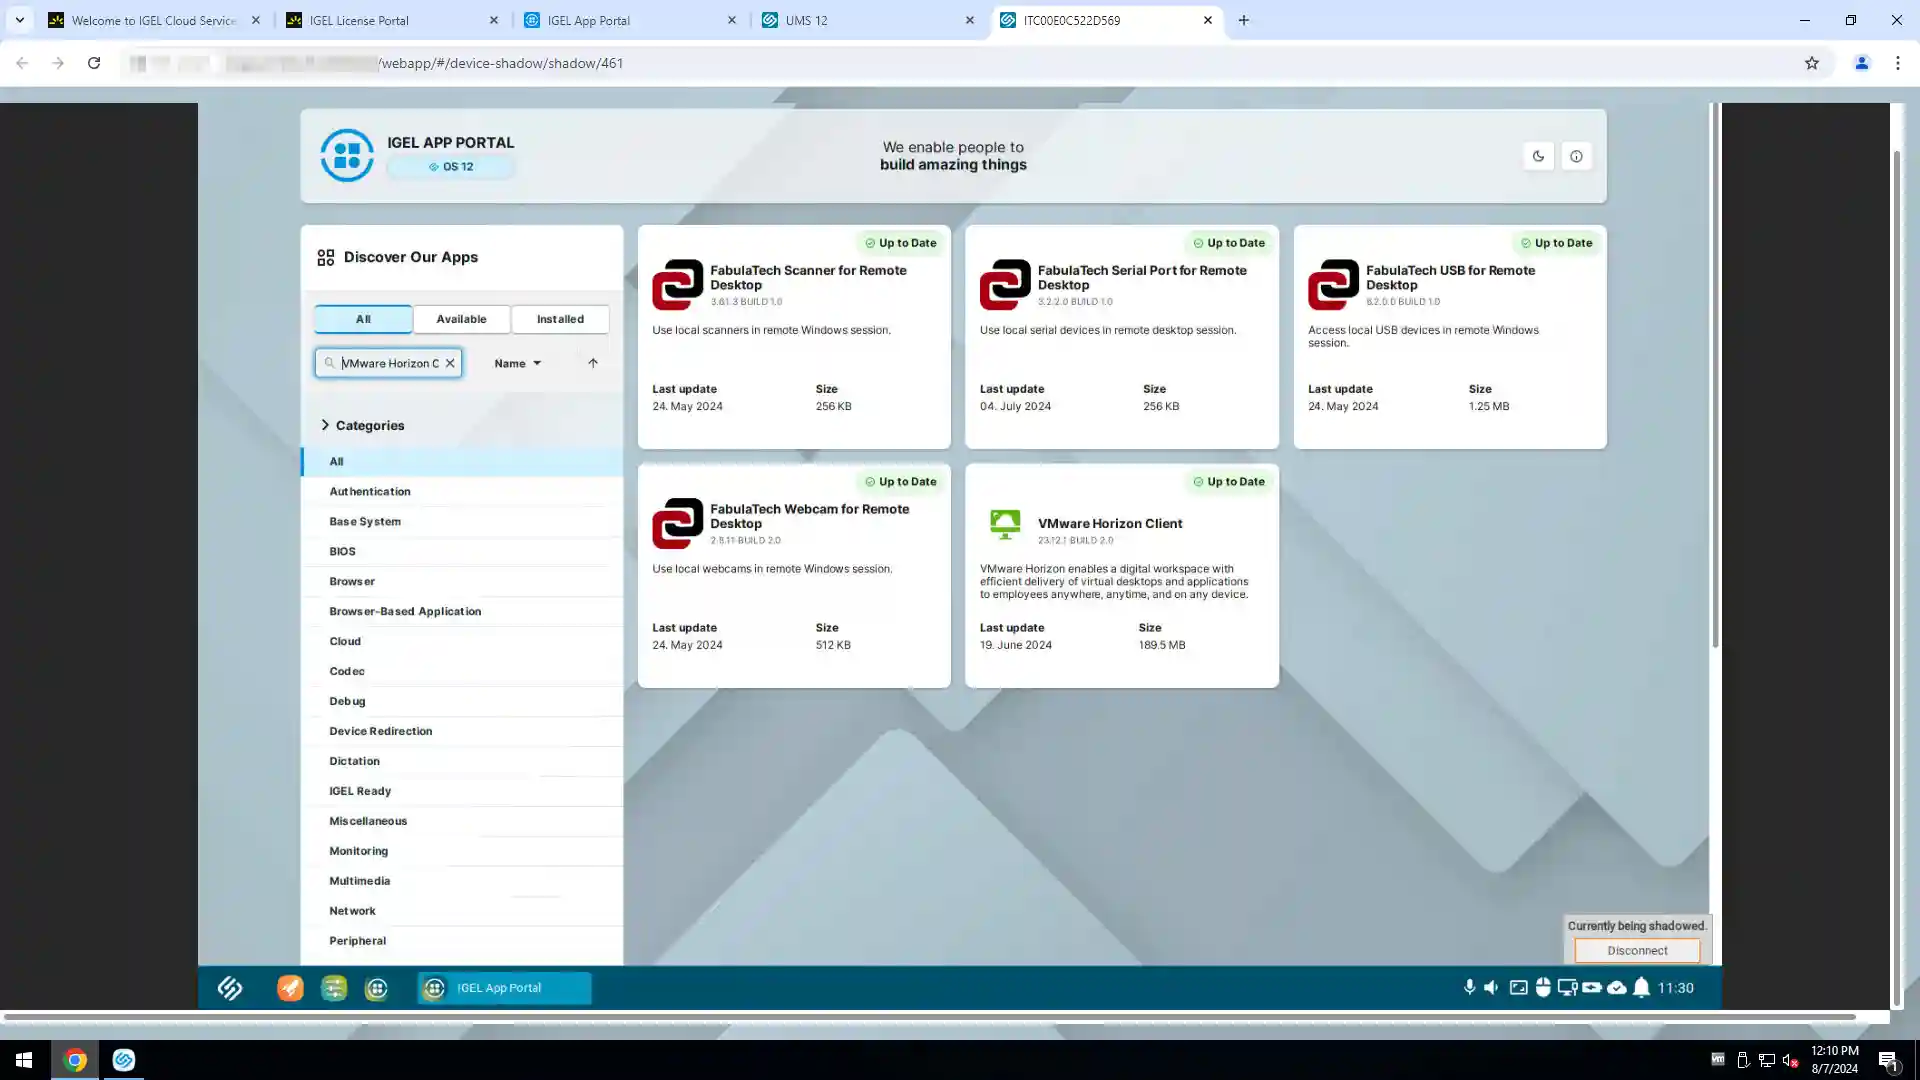
Install VMware Horizon Client from Igel App Portal.
- Assign it to the Thin Client
- Upgrade and reboot the Thin Client.
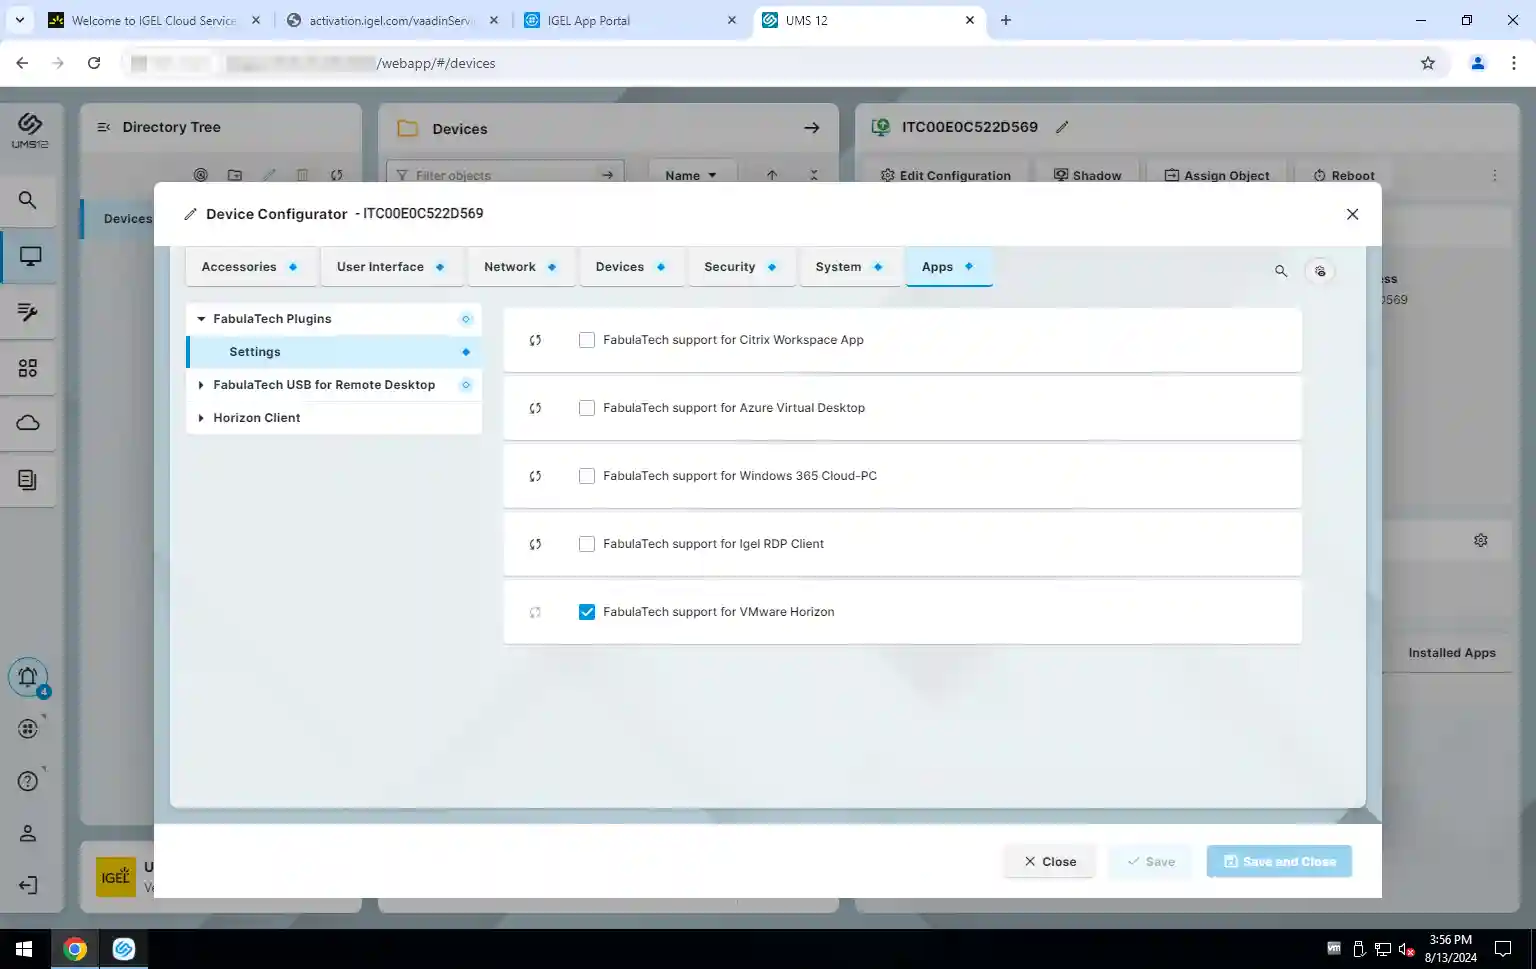
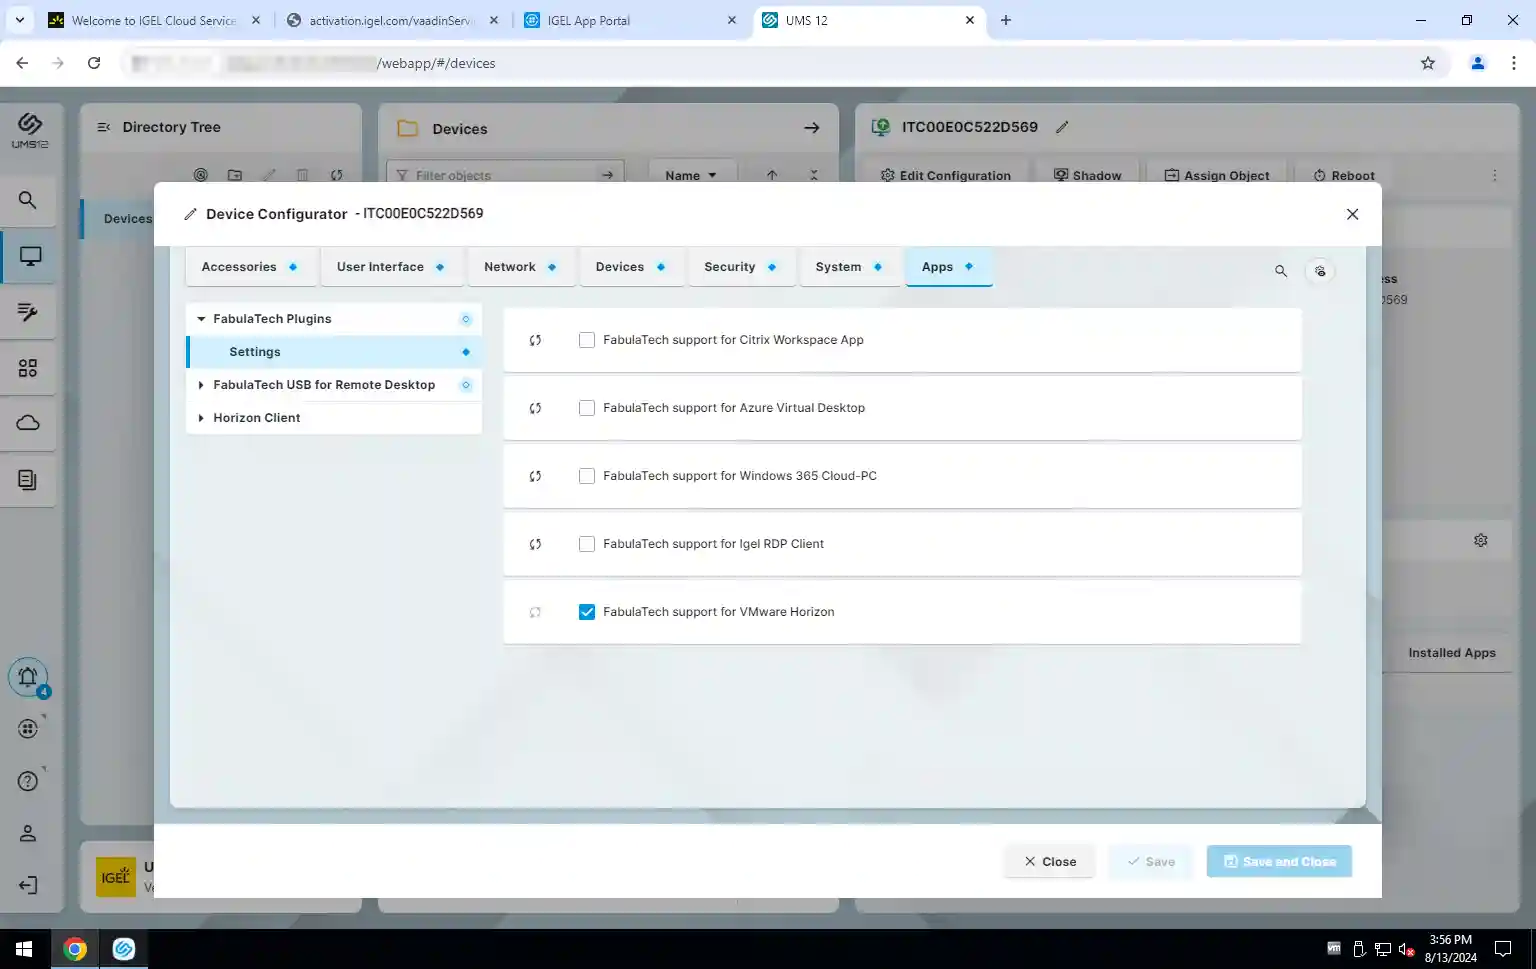
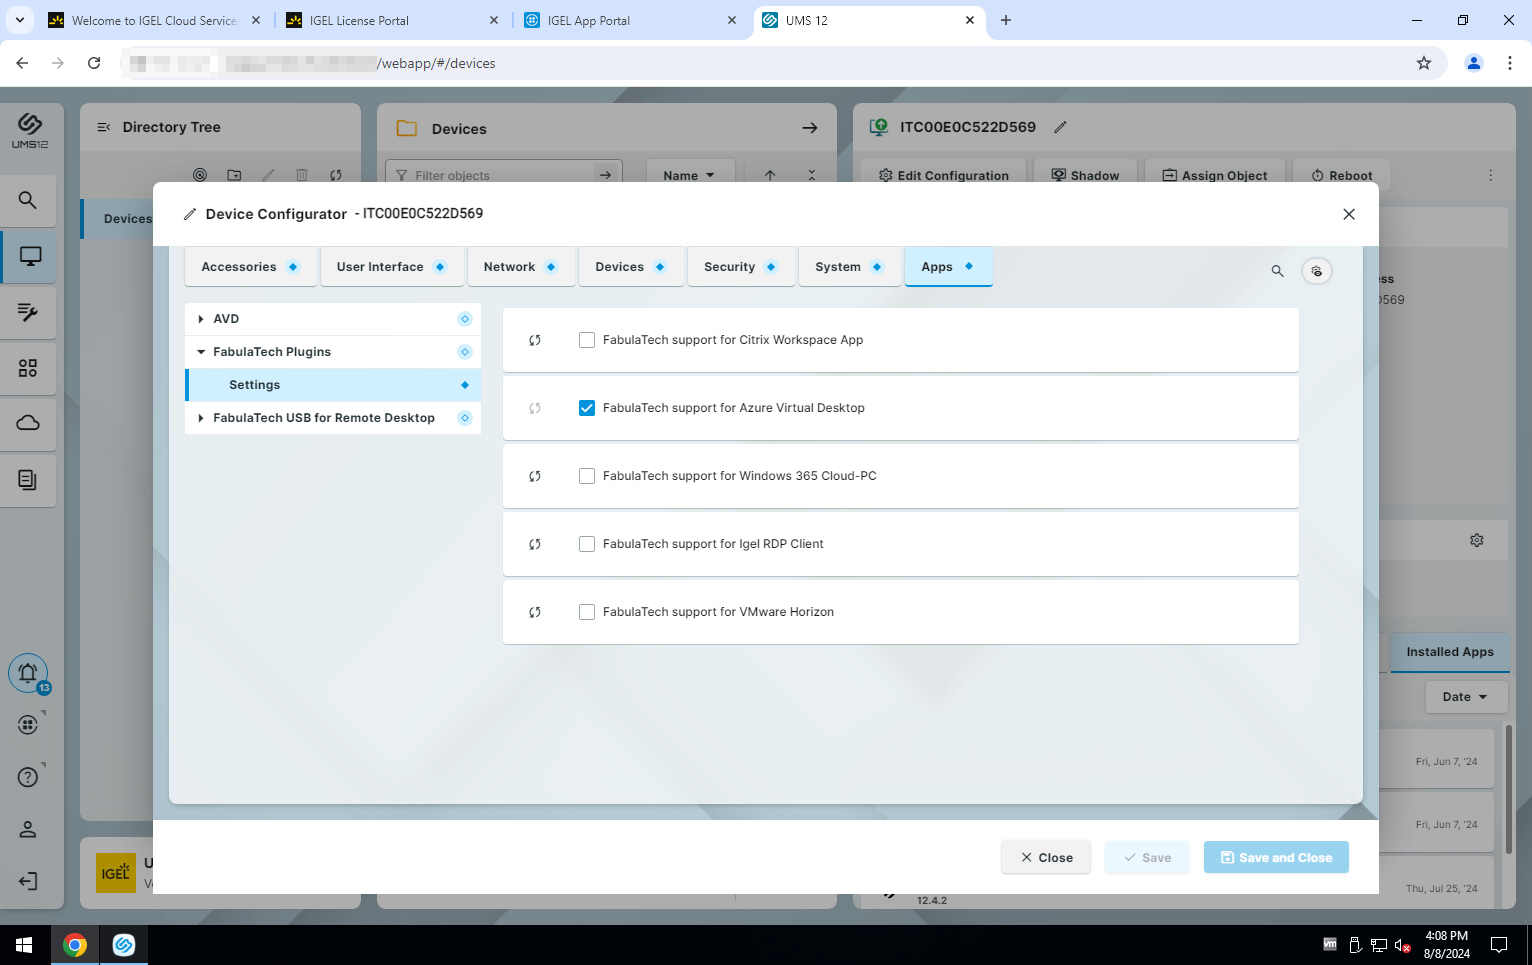
- Check FabulaTech support for VMware Horizon checkbox:
Setup > Apps > FabulaTech Plugins > Settings

- Reboot the Thin Client.
- Create a new Horizon Client connection profile: Setup > Apps > Horizon Client > Horizon Client Sessions
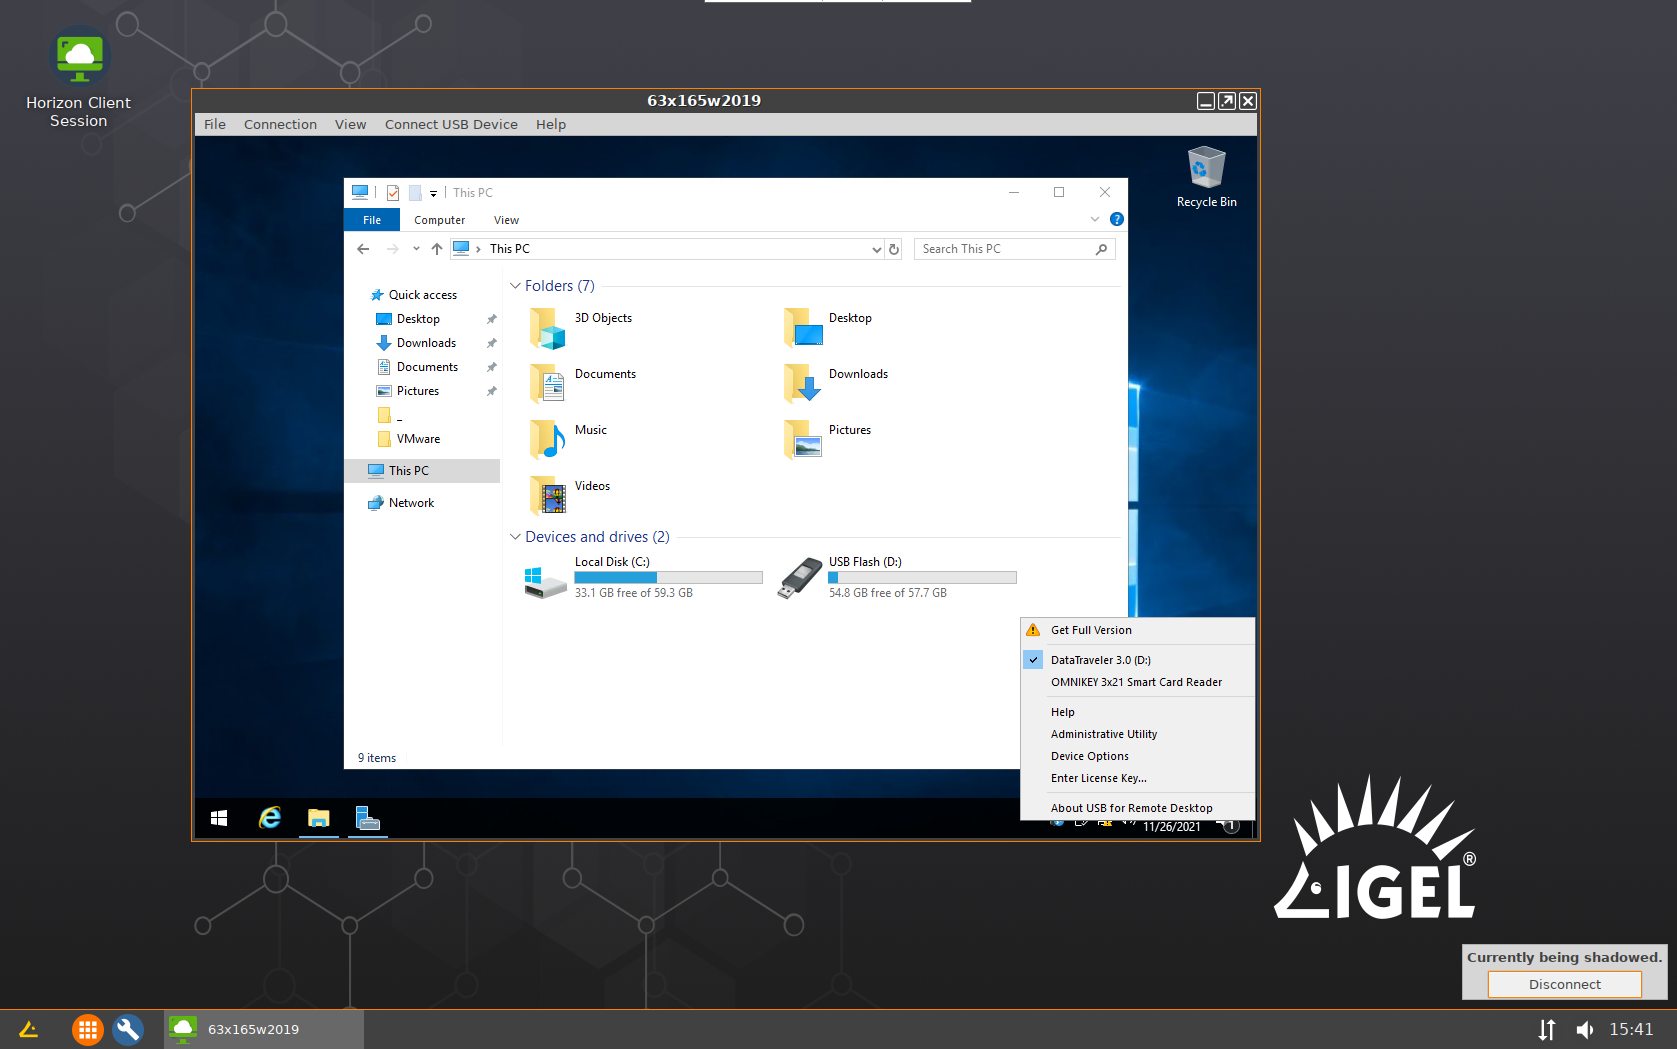
- Launch Horizon Client Session and connect to the remote Windows PC. Devices available for redirection will appear in the taskbar menu under the USB for Remote Desktop icon.

-
Install VMware Horizon Client from Igel App Portal.
- Microsoft AVD
-
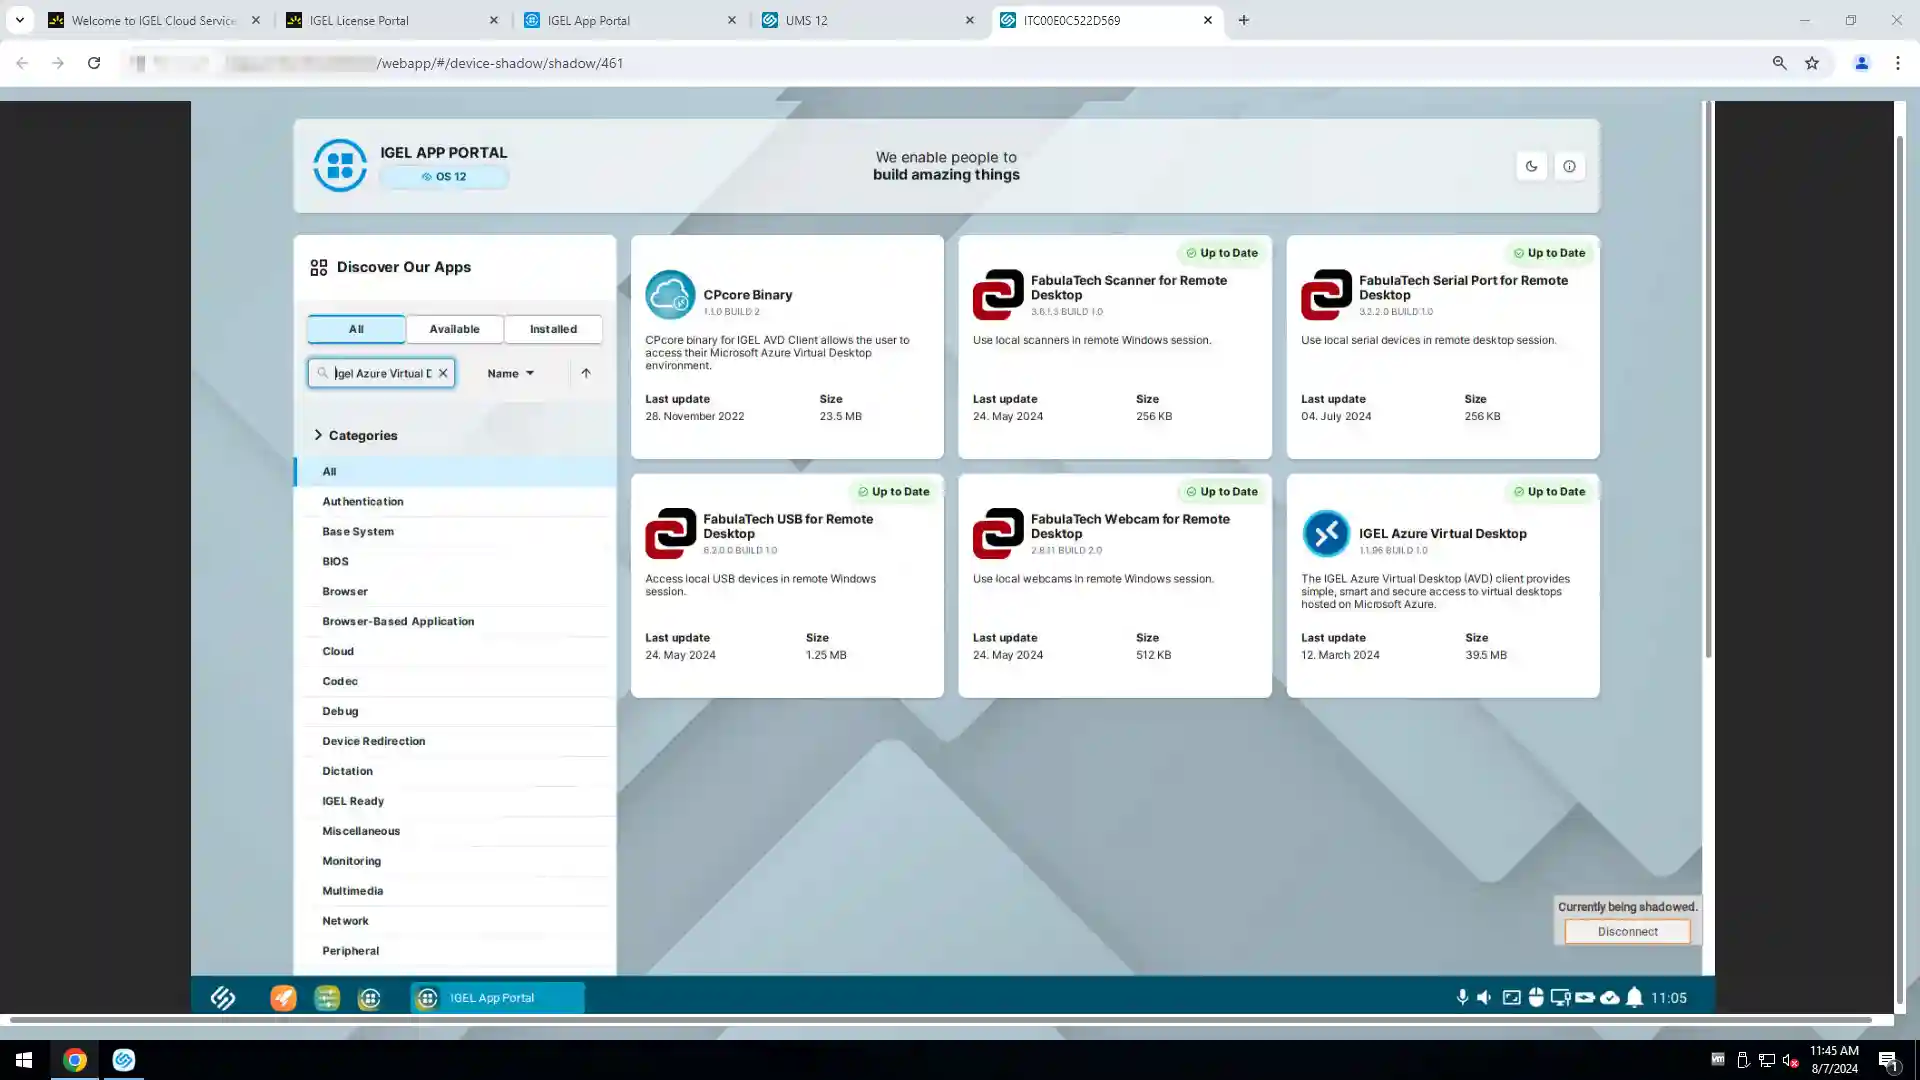
Install Igel Azure Virtual Desktop from Igel App Portal.
- Assign it to the Thin Client
- Upgrade and reboot the Thin Client.
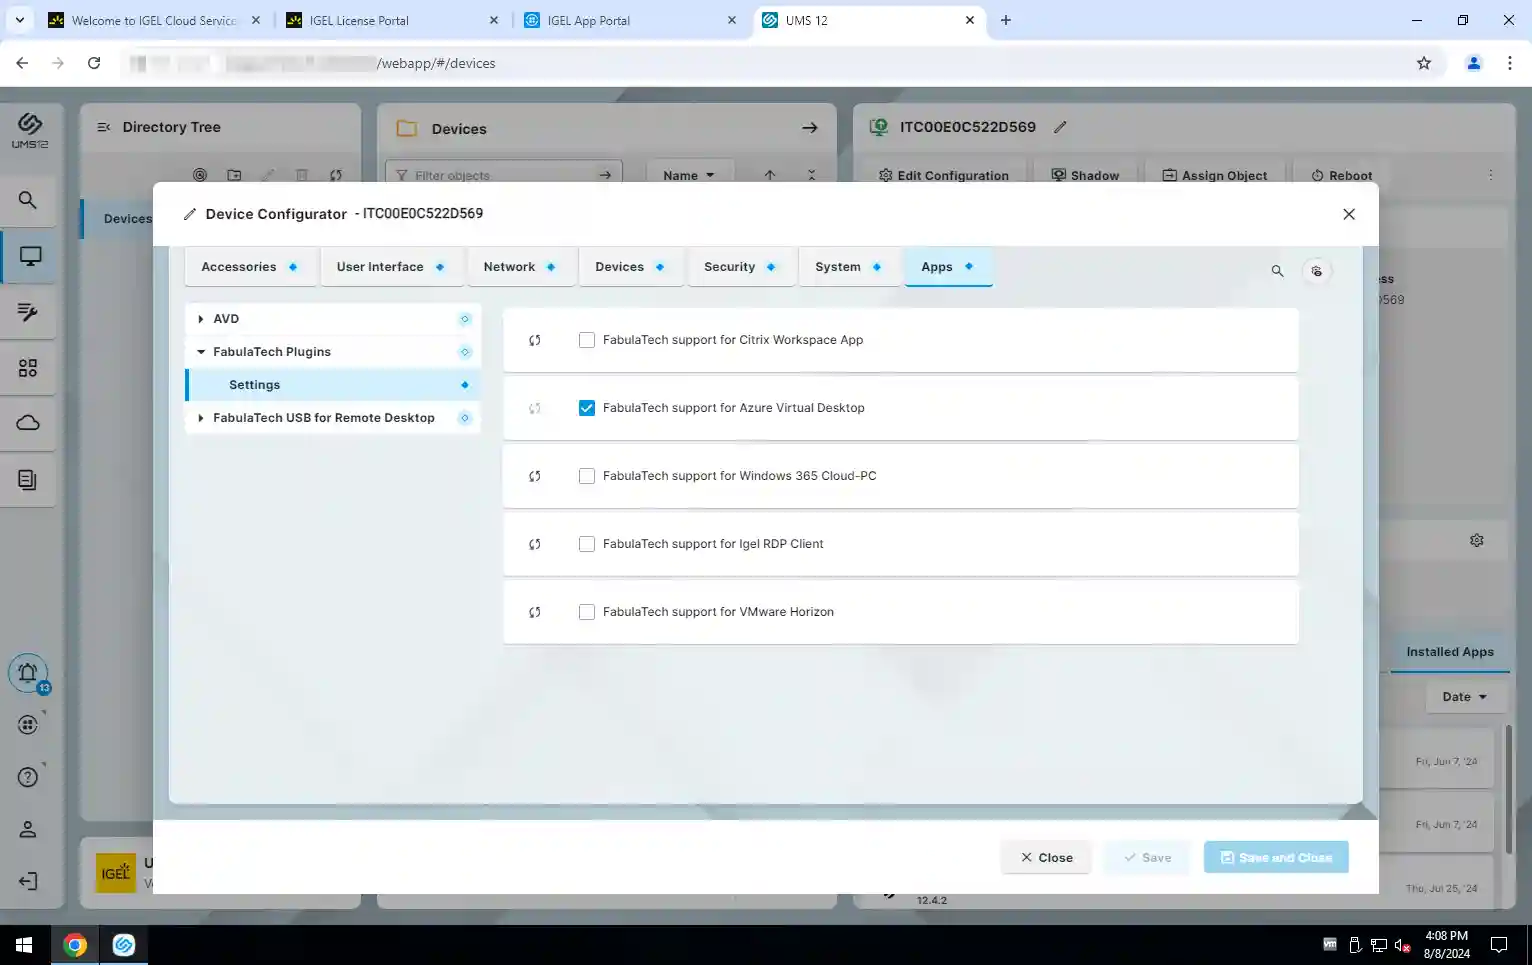
- Check FabulaTech support for VMware Horizon checkbox:
Setup > Apps > FabulaTech Plugins > Settings
- Reboot the Thin Client.
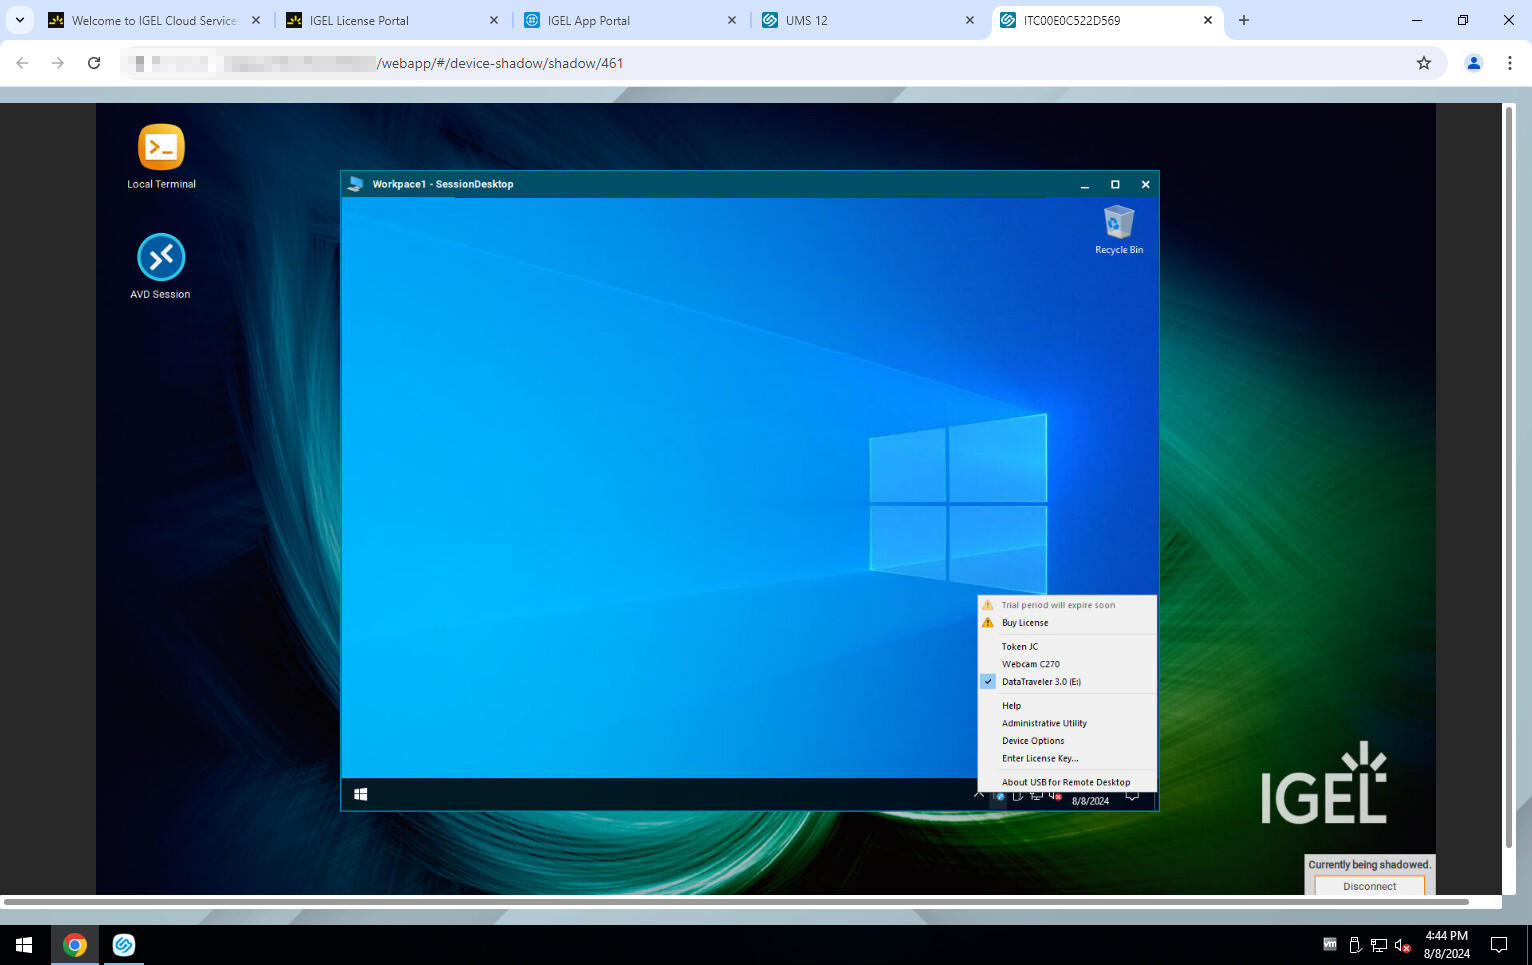
- Create a new AVD connection profile: Setup > Apps > AVD > AVD Sessions
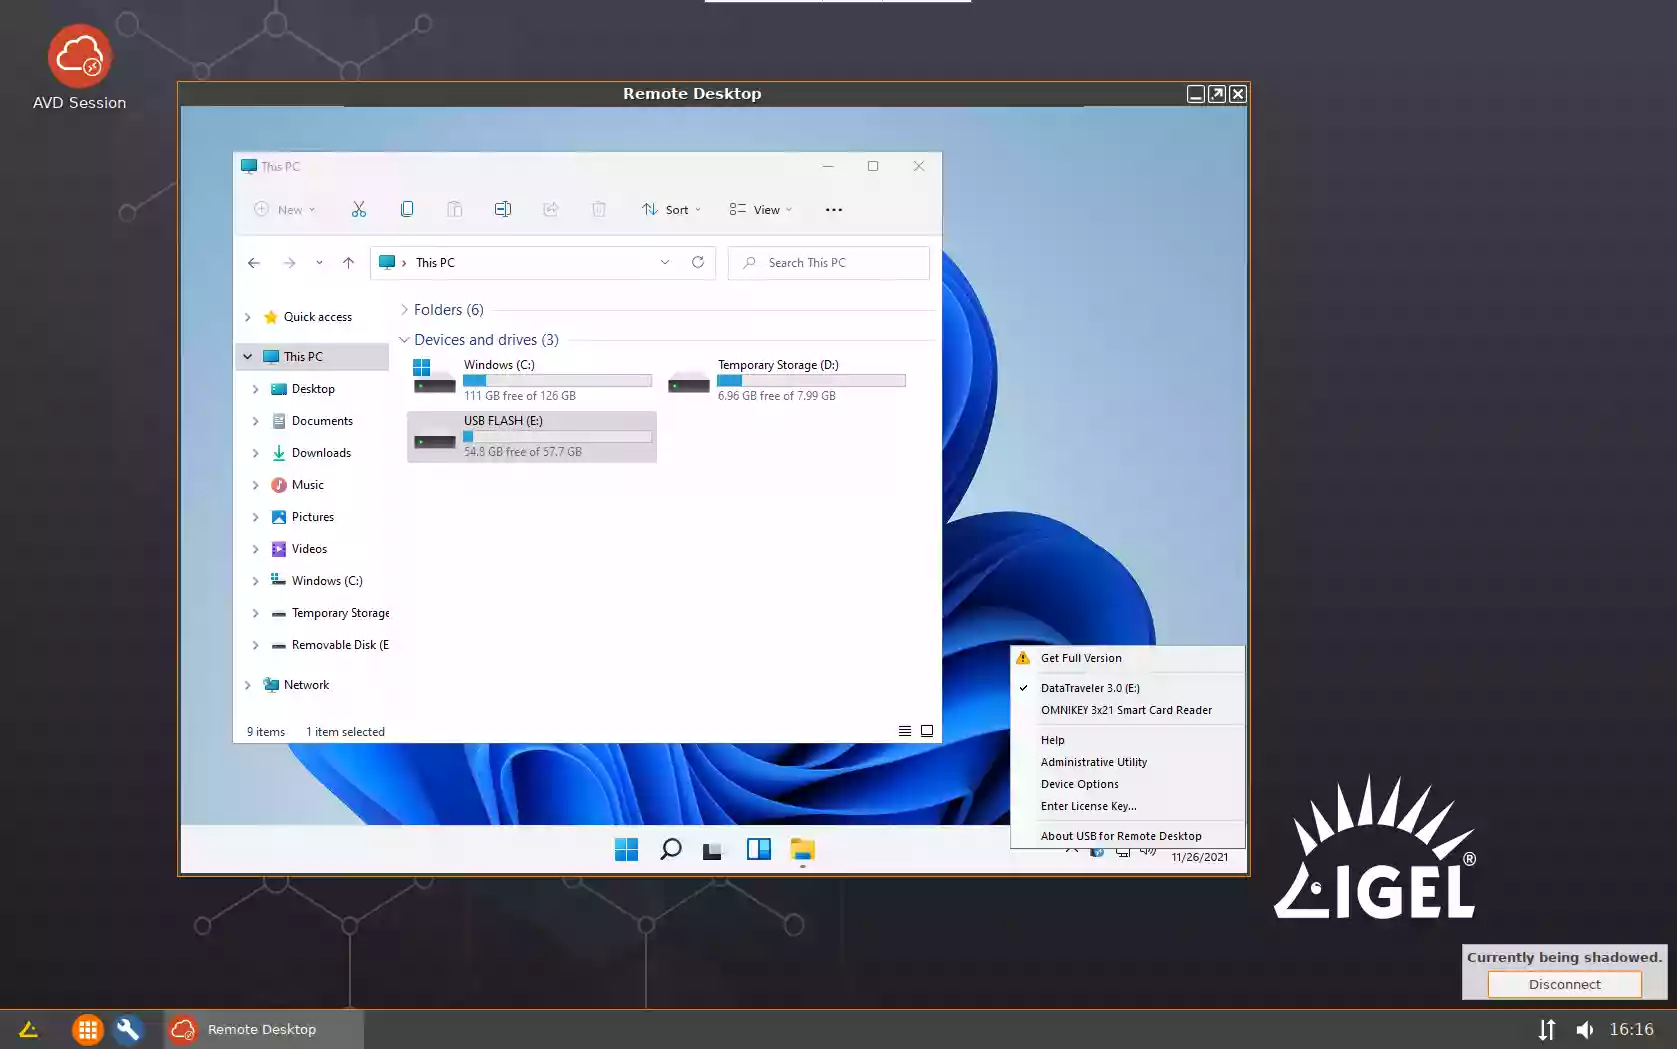
- Launch AVD Session and connect to the remote Windows PC. Devices available for redirection will appear in the taskbar menu under the USB for Remote Desktop icon.
-
Install Igel Azure Virtual Desktop from Igel App Portal.
- Windows 365
-
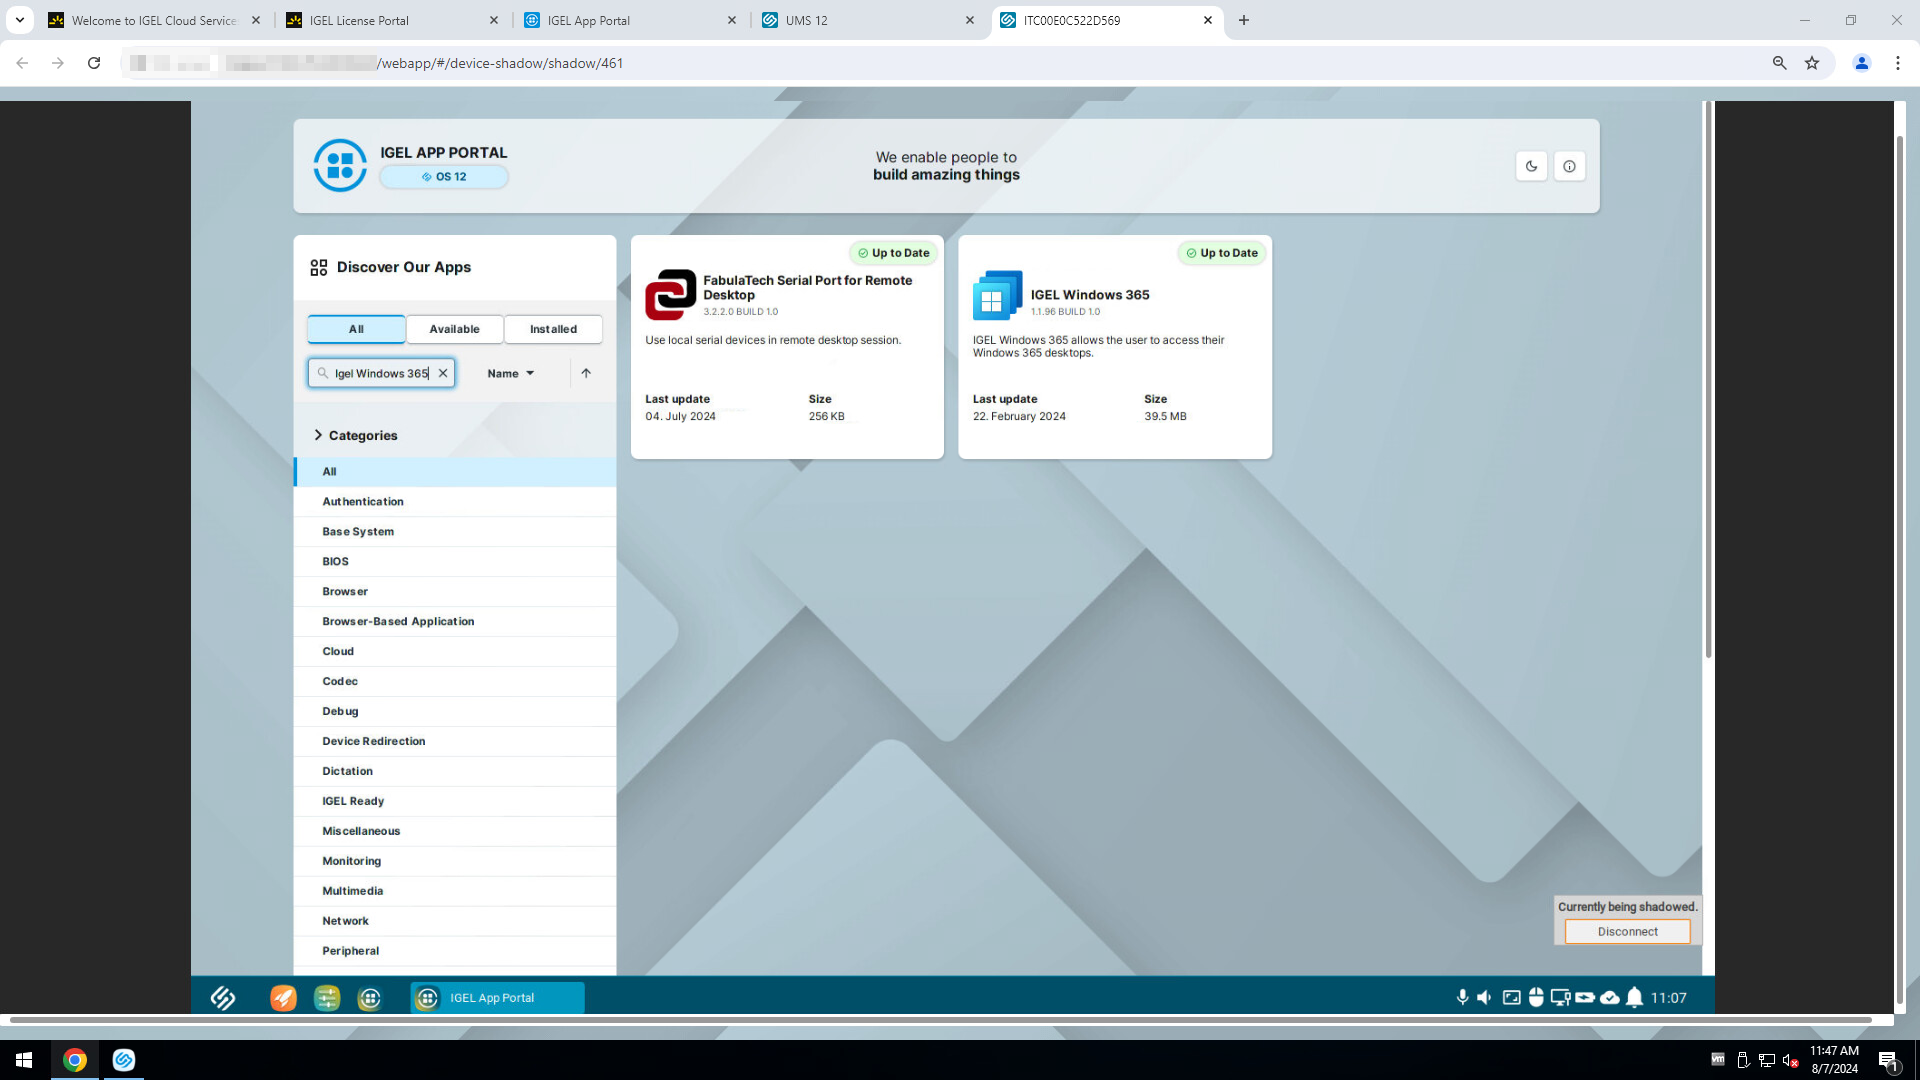
Install Igel Windows 365 from Igel App Portal.
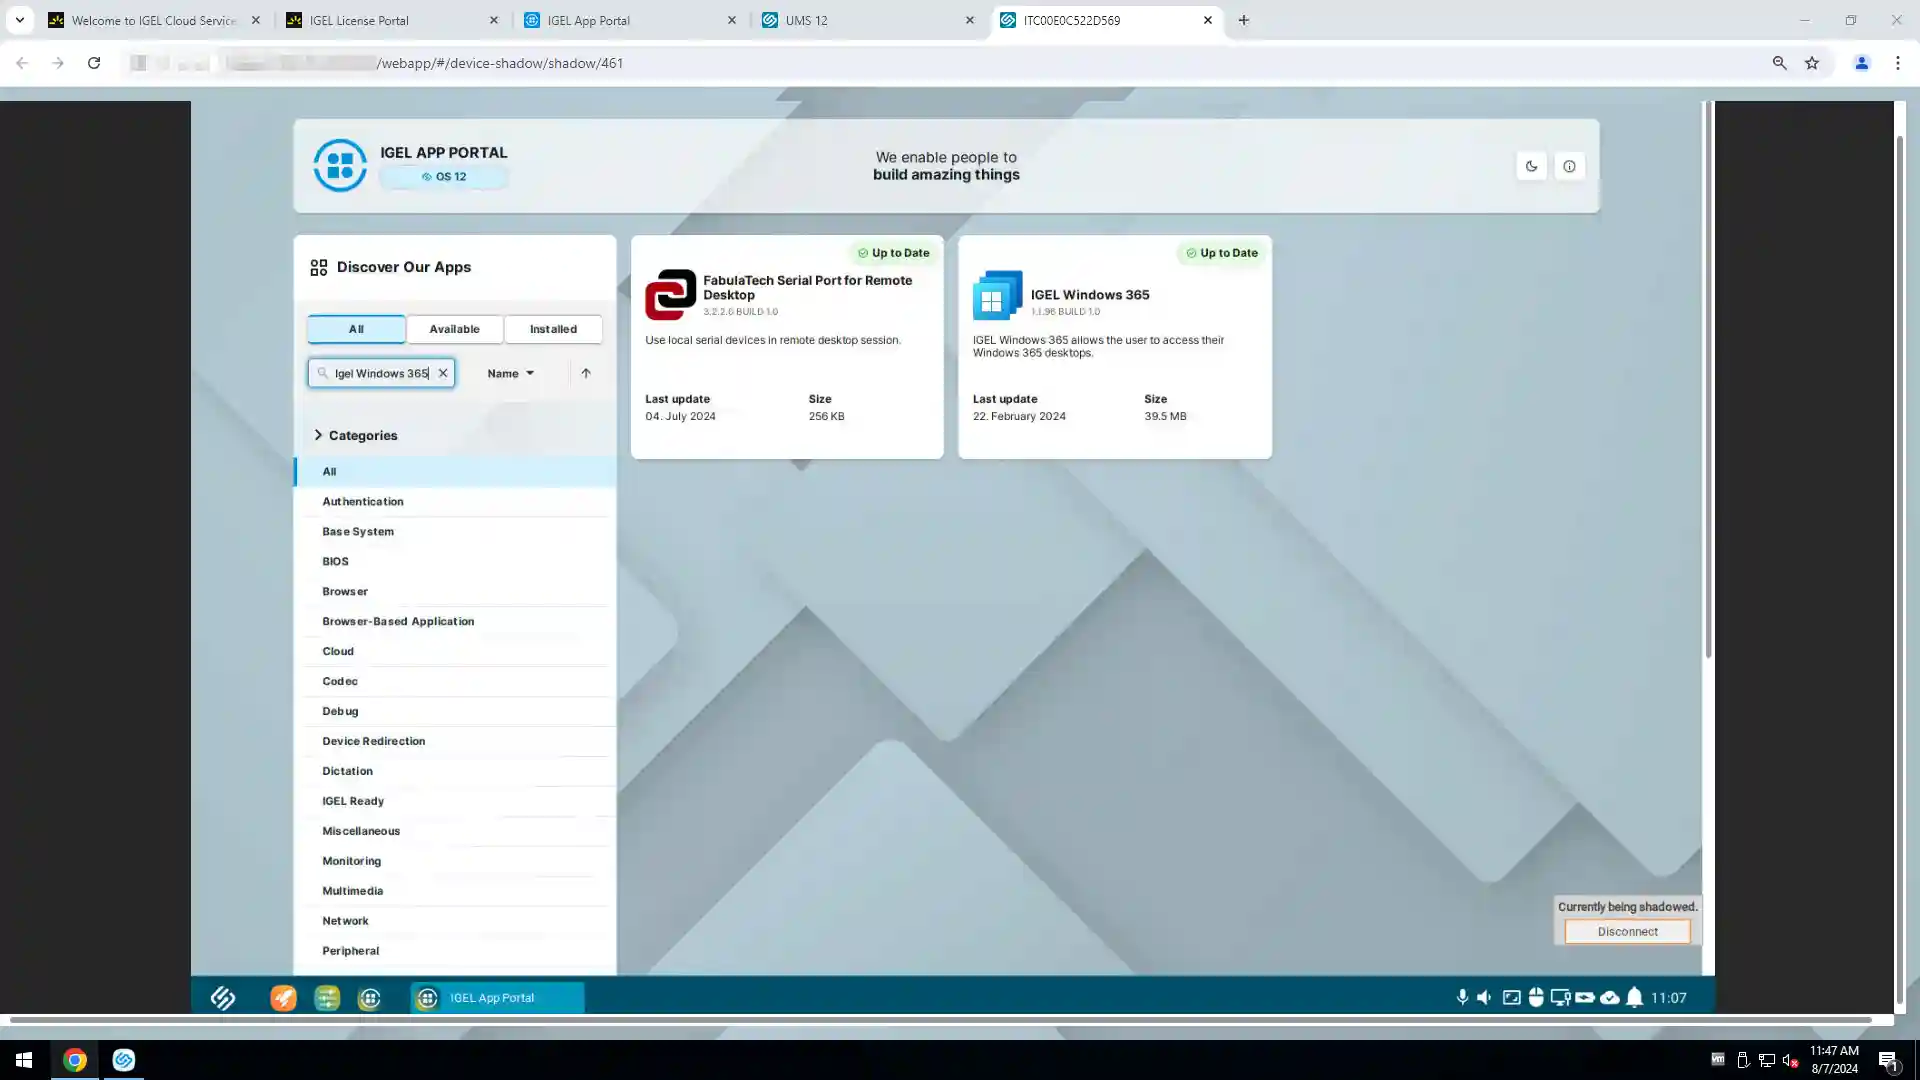
- Assign it to the Thin Client
- Upgrade and reboot the Thin Client.
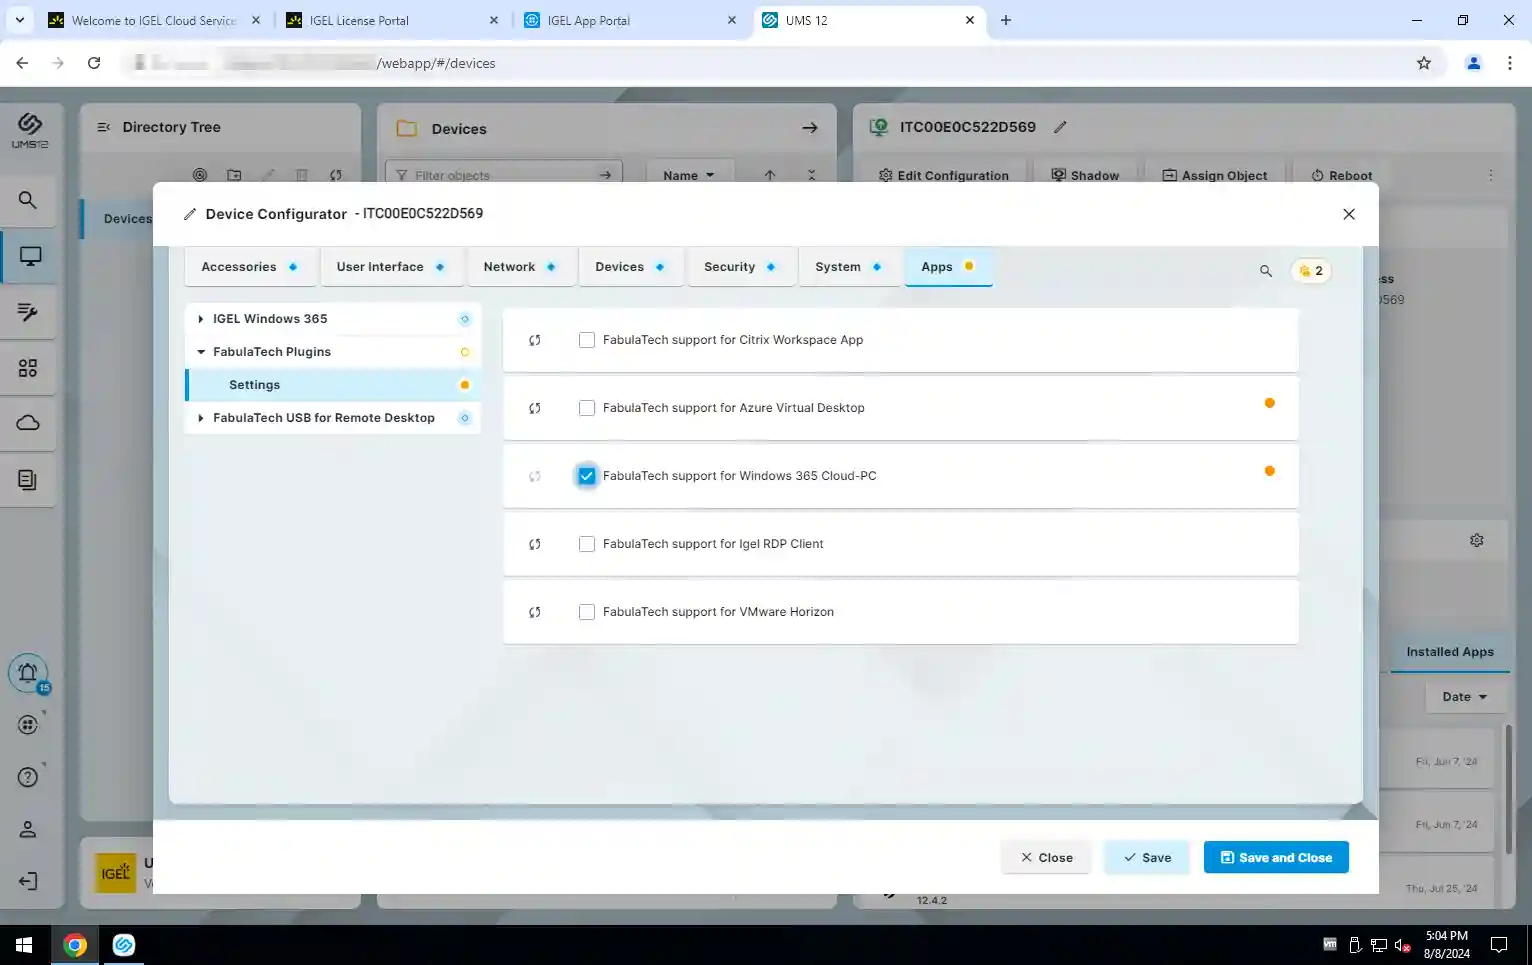
- Check FabulaTech support for Windows 365 Cloud-PC checkbox:
Setup > Apps > FabulaTech Plugins > Settings
- Reboot the Thin Client.
- Create a new Windows 365 connection profile: Setup > Apps > Igel Windows 365 > Windows 365 Sessions
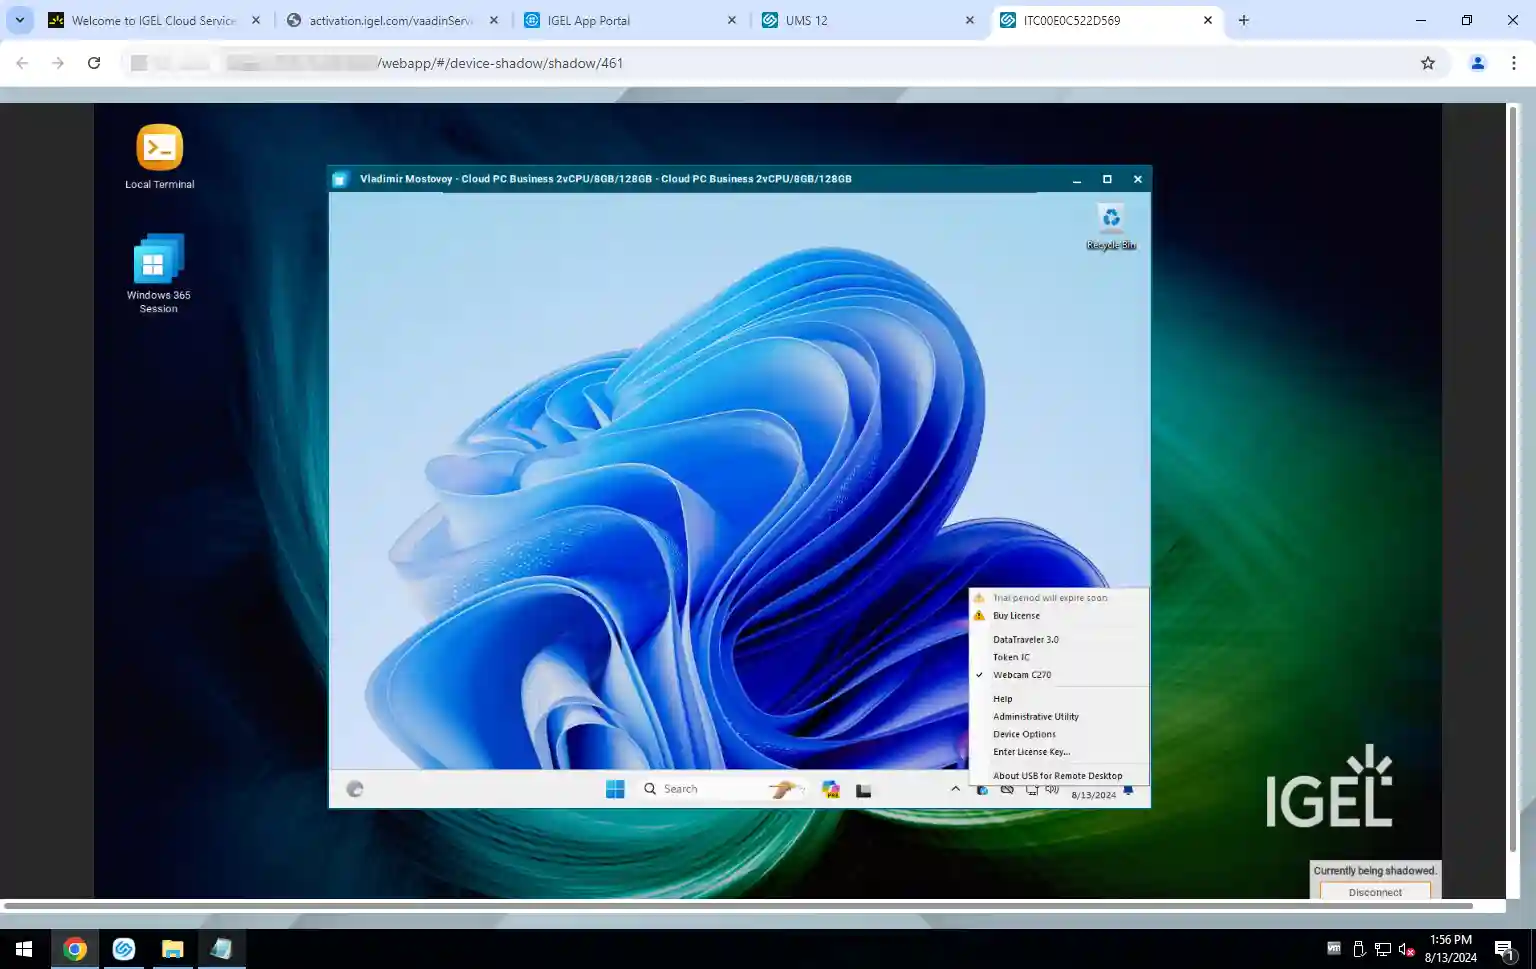
- Launch Windows 365 Session and connect to the remote Windows PC. Devices available for redirection will appear in the taskbar menu under the USB for Remote Desktop icon.
-
Install Igel Windows 365 from Igel App Portal.
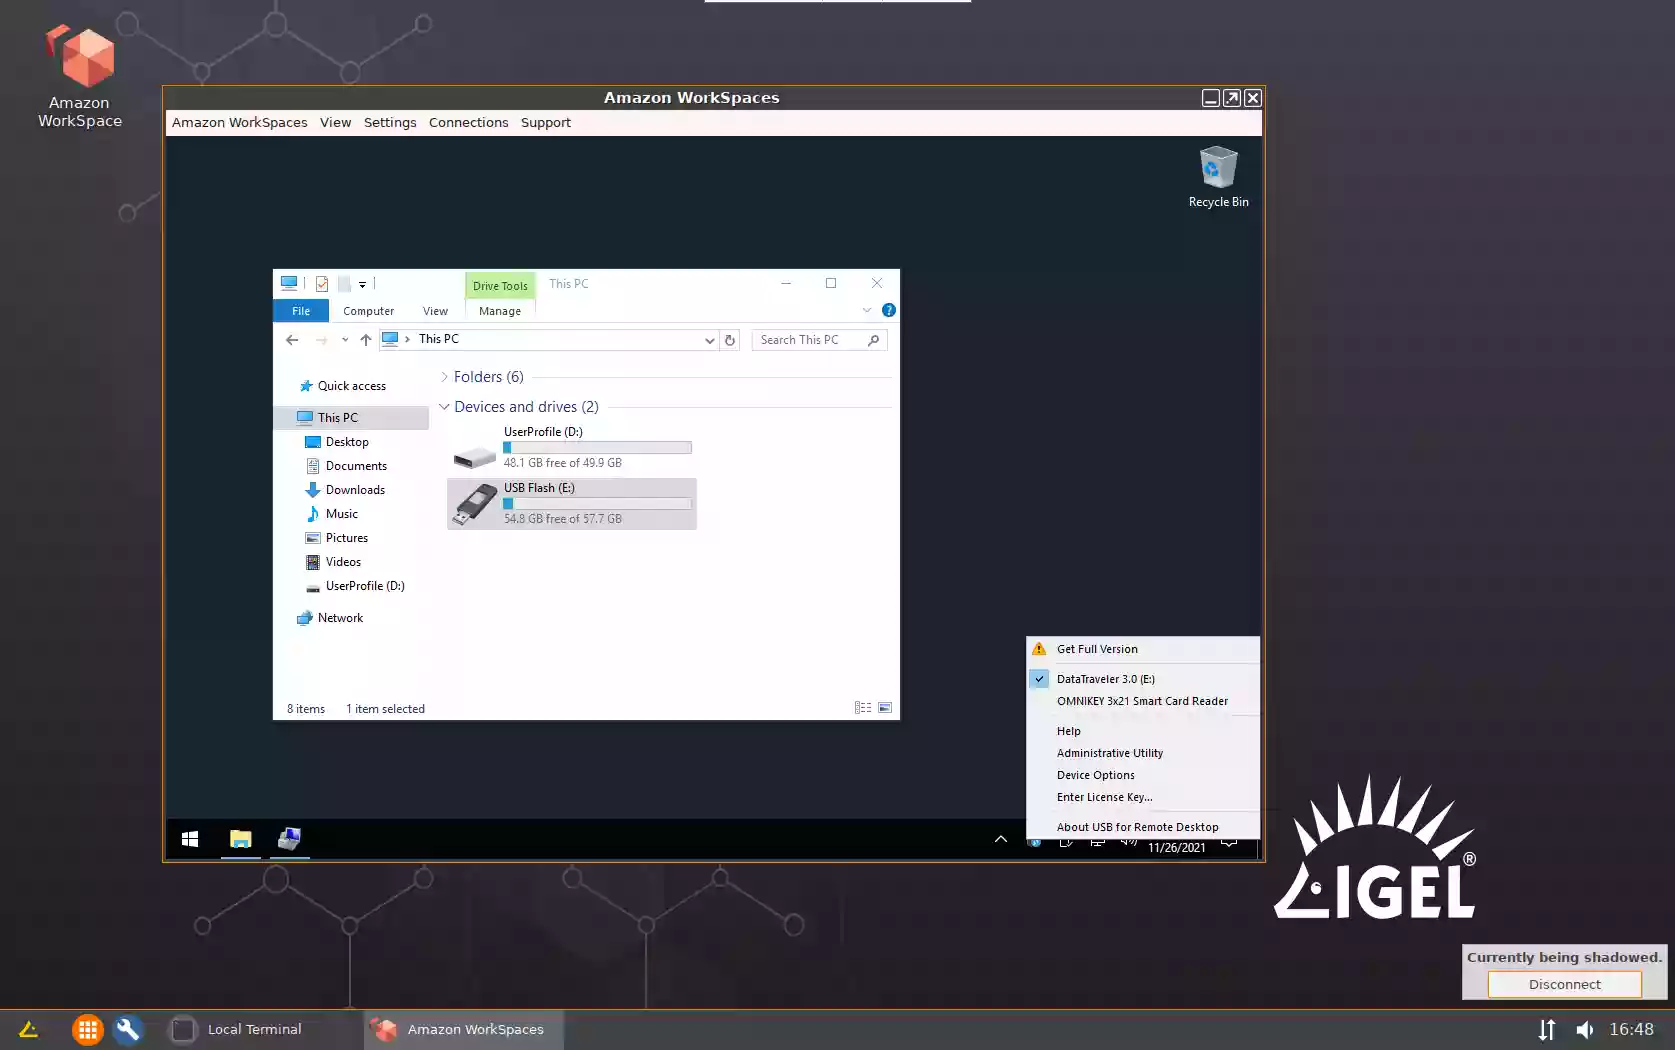
- Amazon
-
Install Amazon WorkSpaces Client from Igel App Portal.
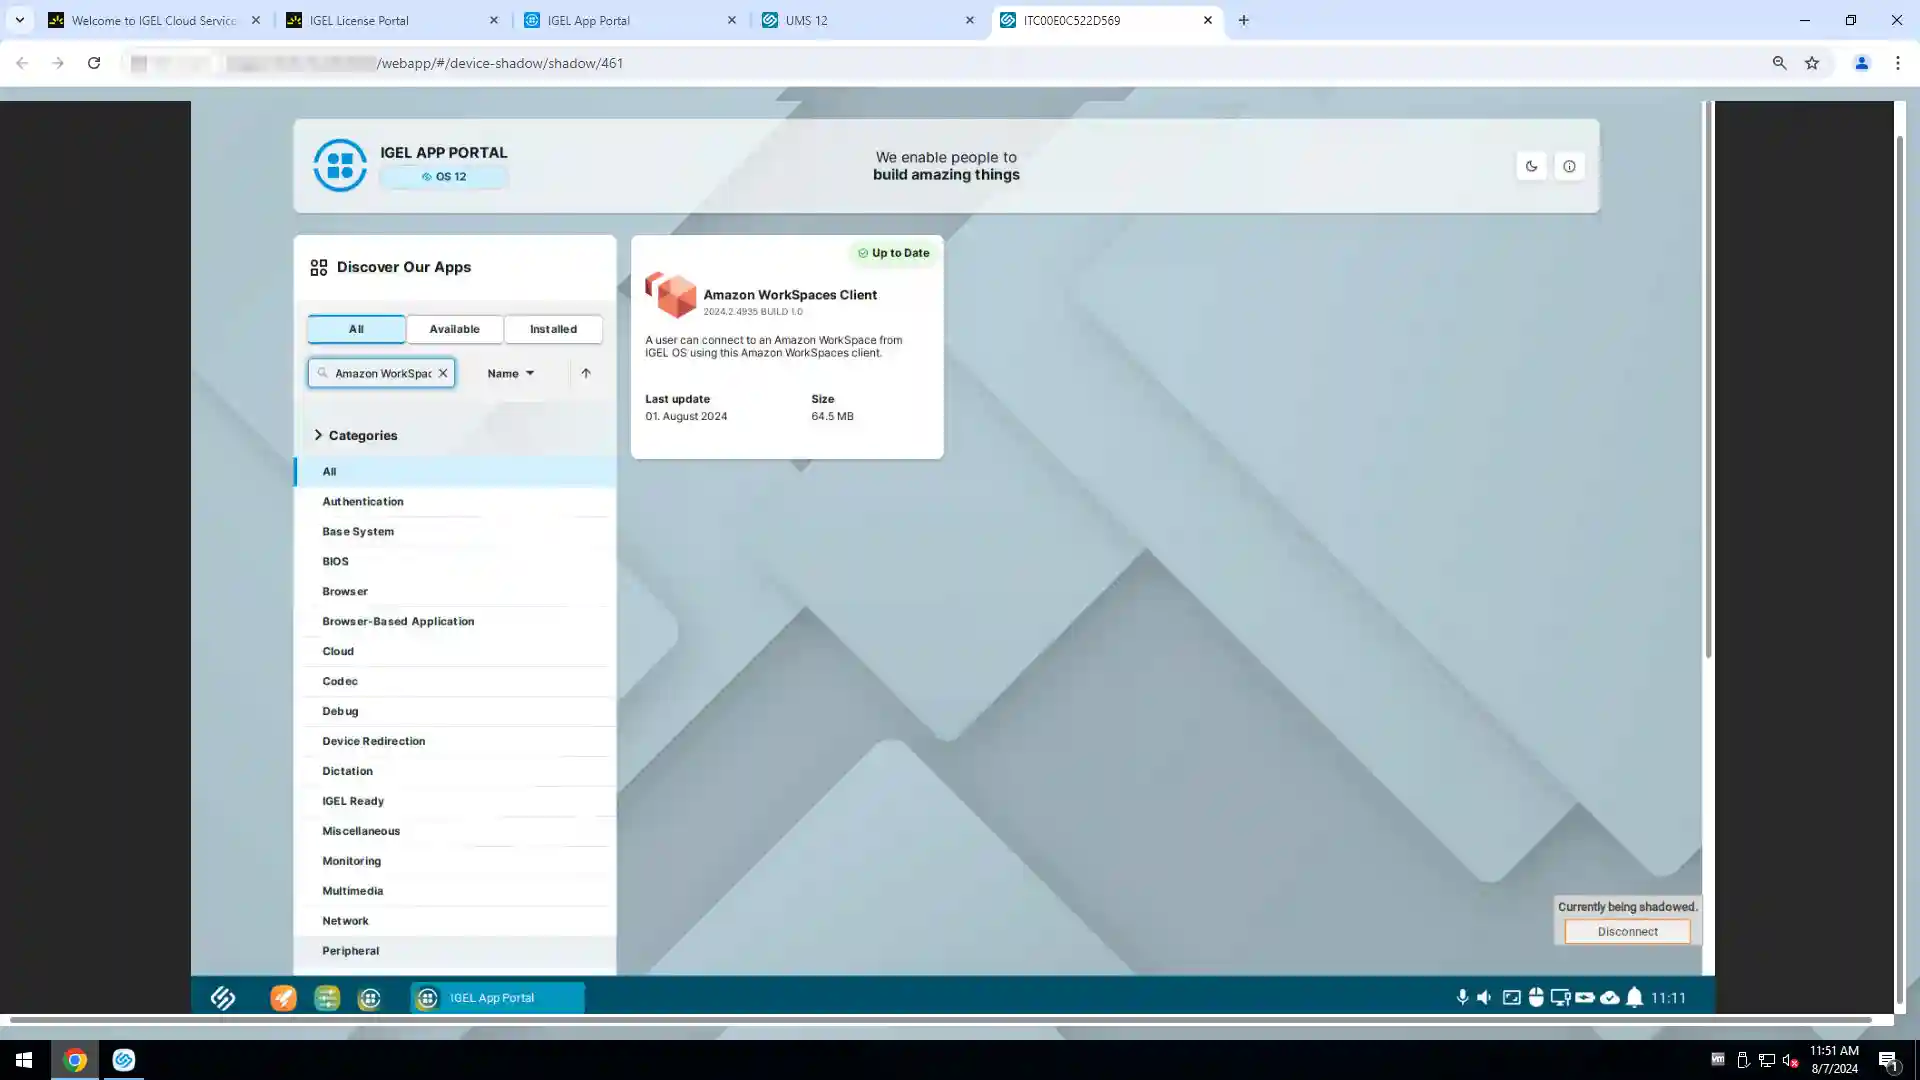
- Assign it to the Thin Client
- Upgrade and reboot the Thin Client.
- Check FabulaTech support for VMware Horizon checkbox:
Setup > Apps > FabulaTech Plugins > Settings
- Enable loading of our plugin (one time only). In the
Configuration > System > System Customization > Custom Commands > Desktop > Final desktop command
add the command:ln -sf /services/fabulatech_plugins/ftplugins/lib/libvchan-plugin-ftpcoipbr.so /usr/lib/x86_64-linux-gnu/pcoip-client/vchan_plugins/libvchan-plugin-ftpcoipbr.so - Reboot the Thin Client.
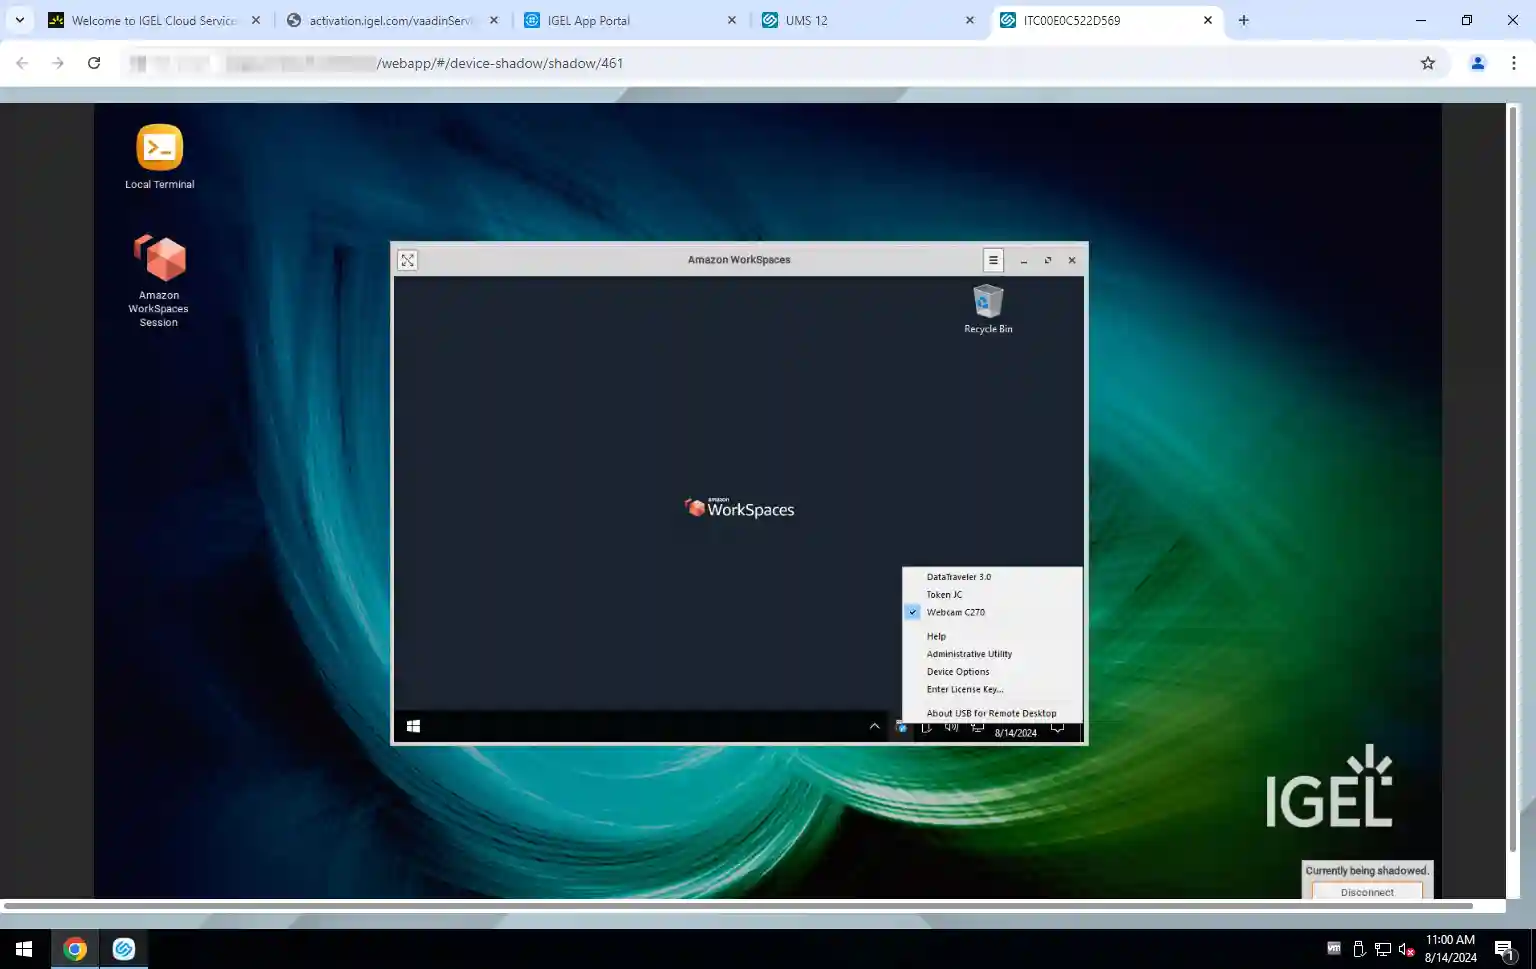
- Create a new Amazon WorkSpaces connection profile: Setup > Apps > Amazon > Amazon WorkSpaces Client
- Launch Amazon WorkSpaces and connect to the remote Windows PC. Devices available for redirection will appear in the taskbar menu under the USB for Remote Desktop icon.
-
Install Amazon WorkSpaces Client from Igel App Portal.
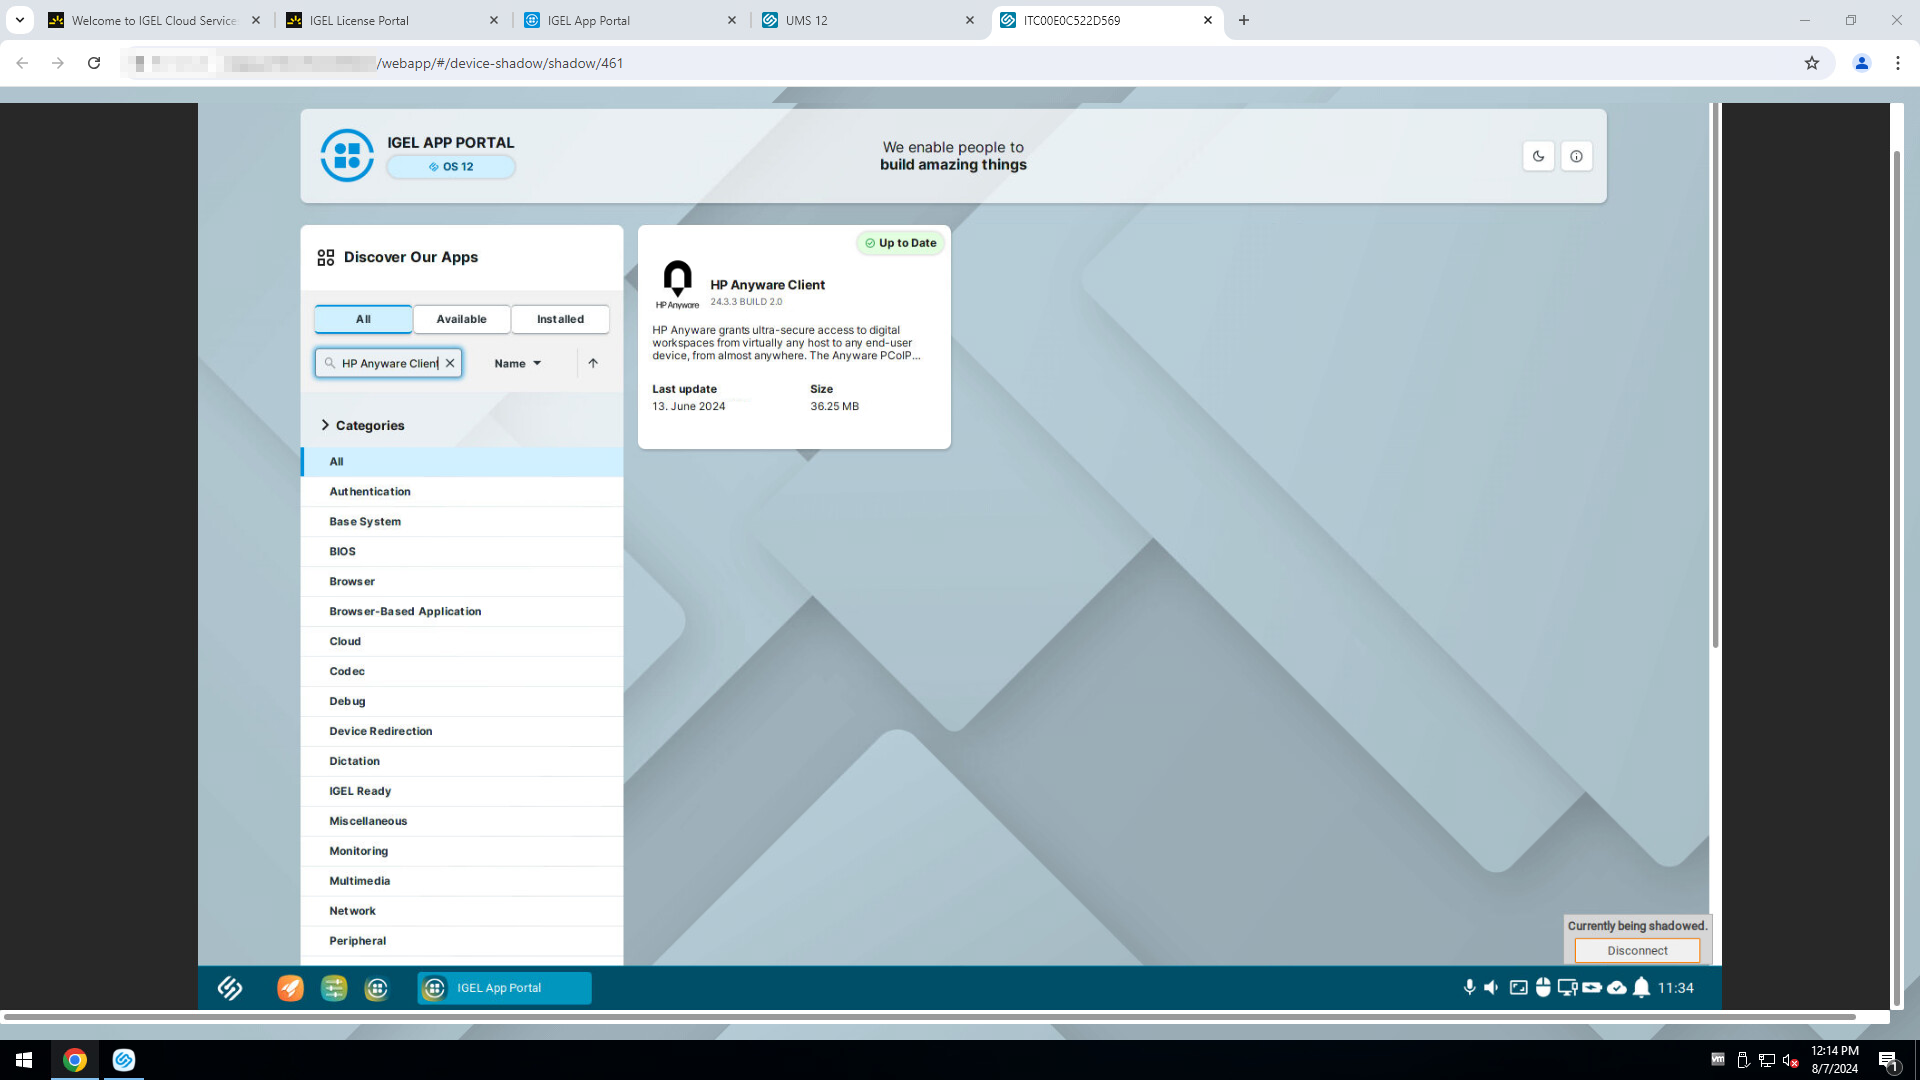
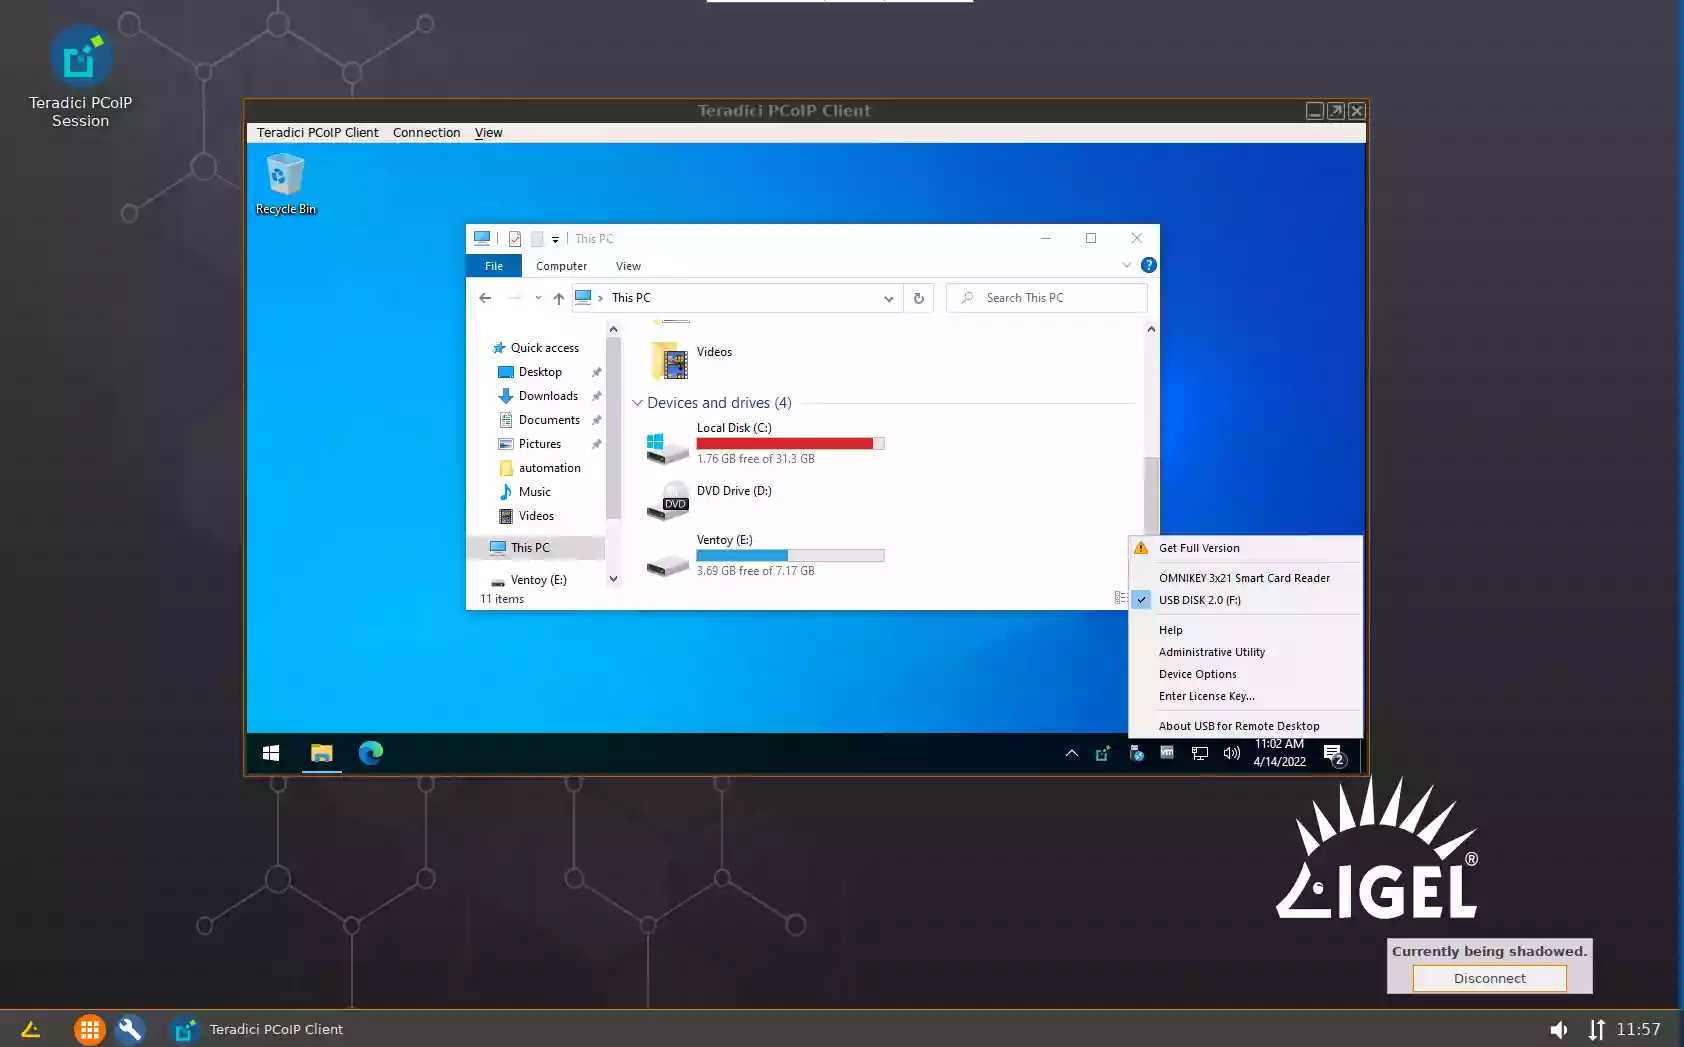
- HP / Teradici PCoIP
-
Install HP Anyware Client from Igel App Portal.

- Assign it to the Thin Client
- Upgrade and reboot the Thin Client.
- Check FabulaTech support for VMware Horizon checkbox:
Setup > Apps > FabulaTech Plugins > Settings
- Enable loading of our plugin (one time only). In the
Configuration > System > System Customization > Custom Commands > Desktop > Final desktop command
add the command:cp /services/fabulatech_plugins/ftplugins/lib/libvchan-plugin-ftpcoipbr.so /usr/lib/x86_64-linux-gnu/org.hp.pcoip-client/vchan_plugins/libvchan-plugin-ftpcoipbr.so - Reboot the Thin Client.
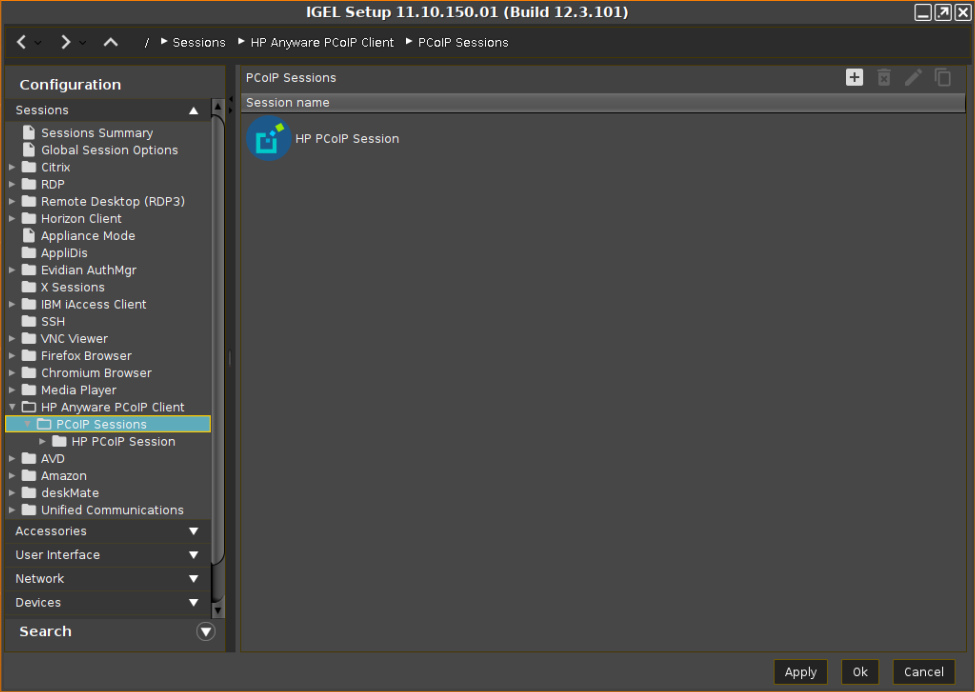
- Create a new HP Anyware PCoIP connection profile: Setup > Apps > HP Anyware > Sessions
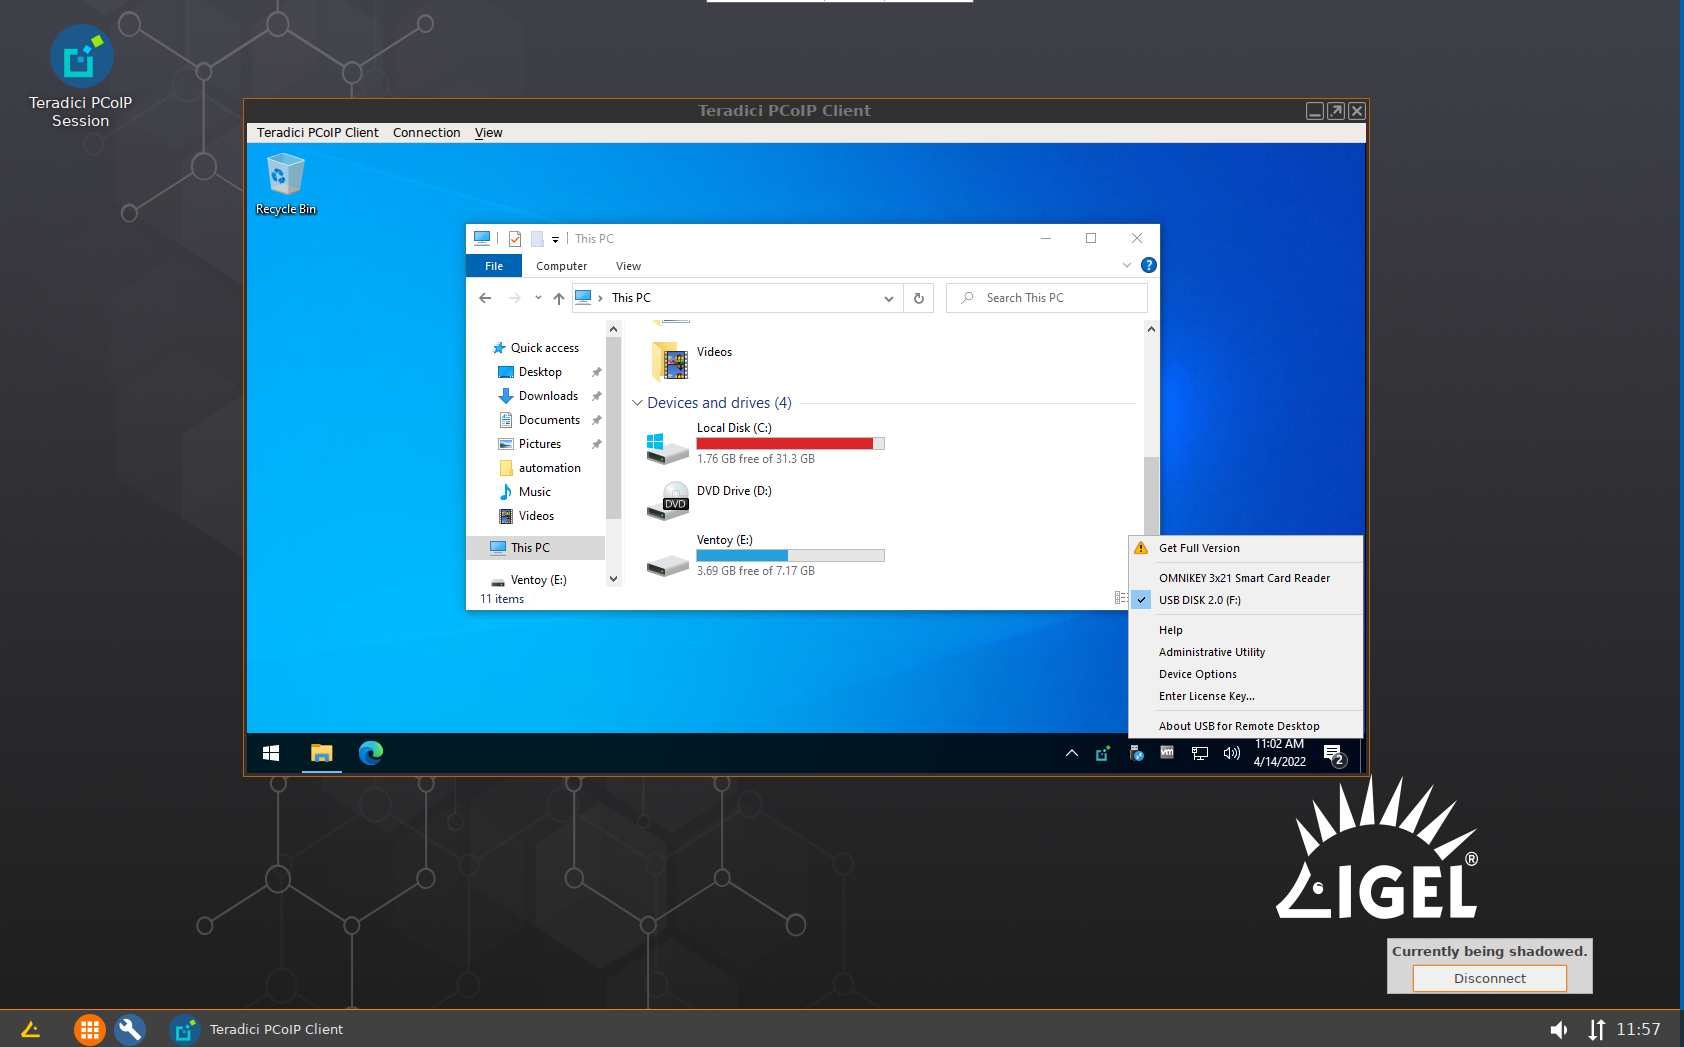
- Launch HP PCoIP Session and connect to the remote Windows PC. Devices available for redirection will appear in the taskbar menu under the USB for Remote Desktop icon.

-
Install HP Anyware Client from Igel App Portal.
- RDP


IGEL OS 11
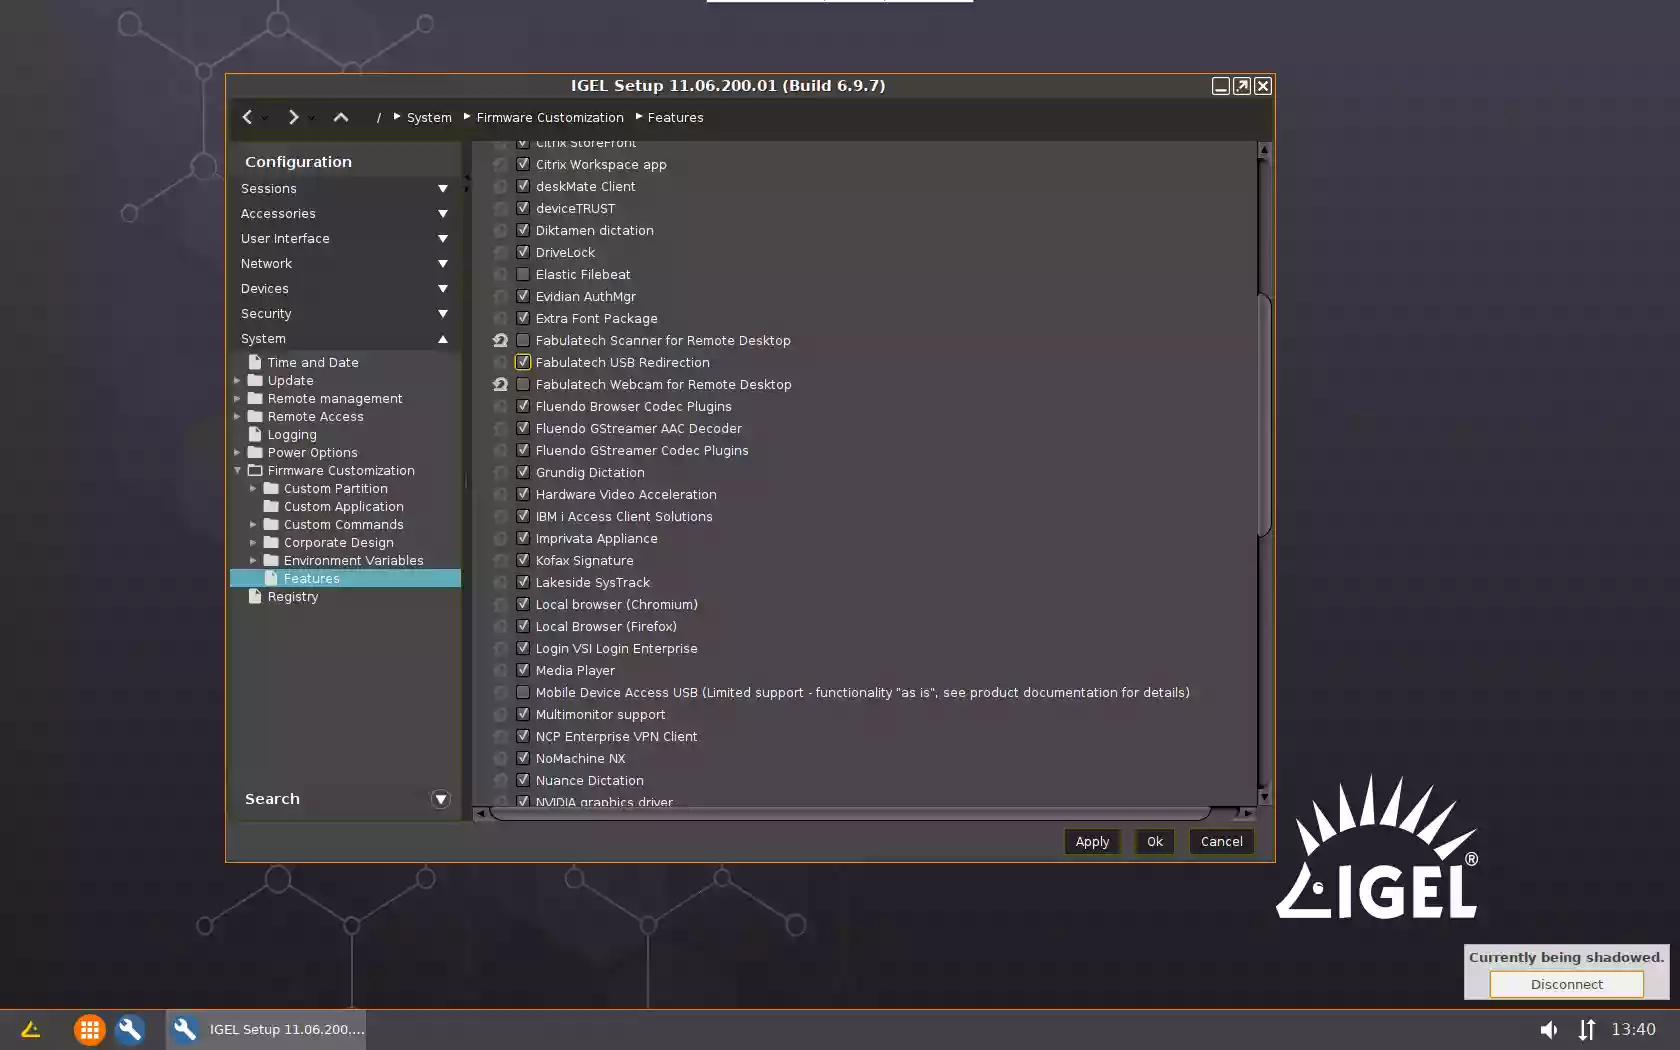
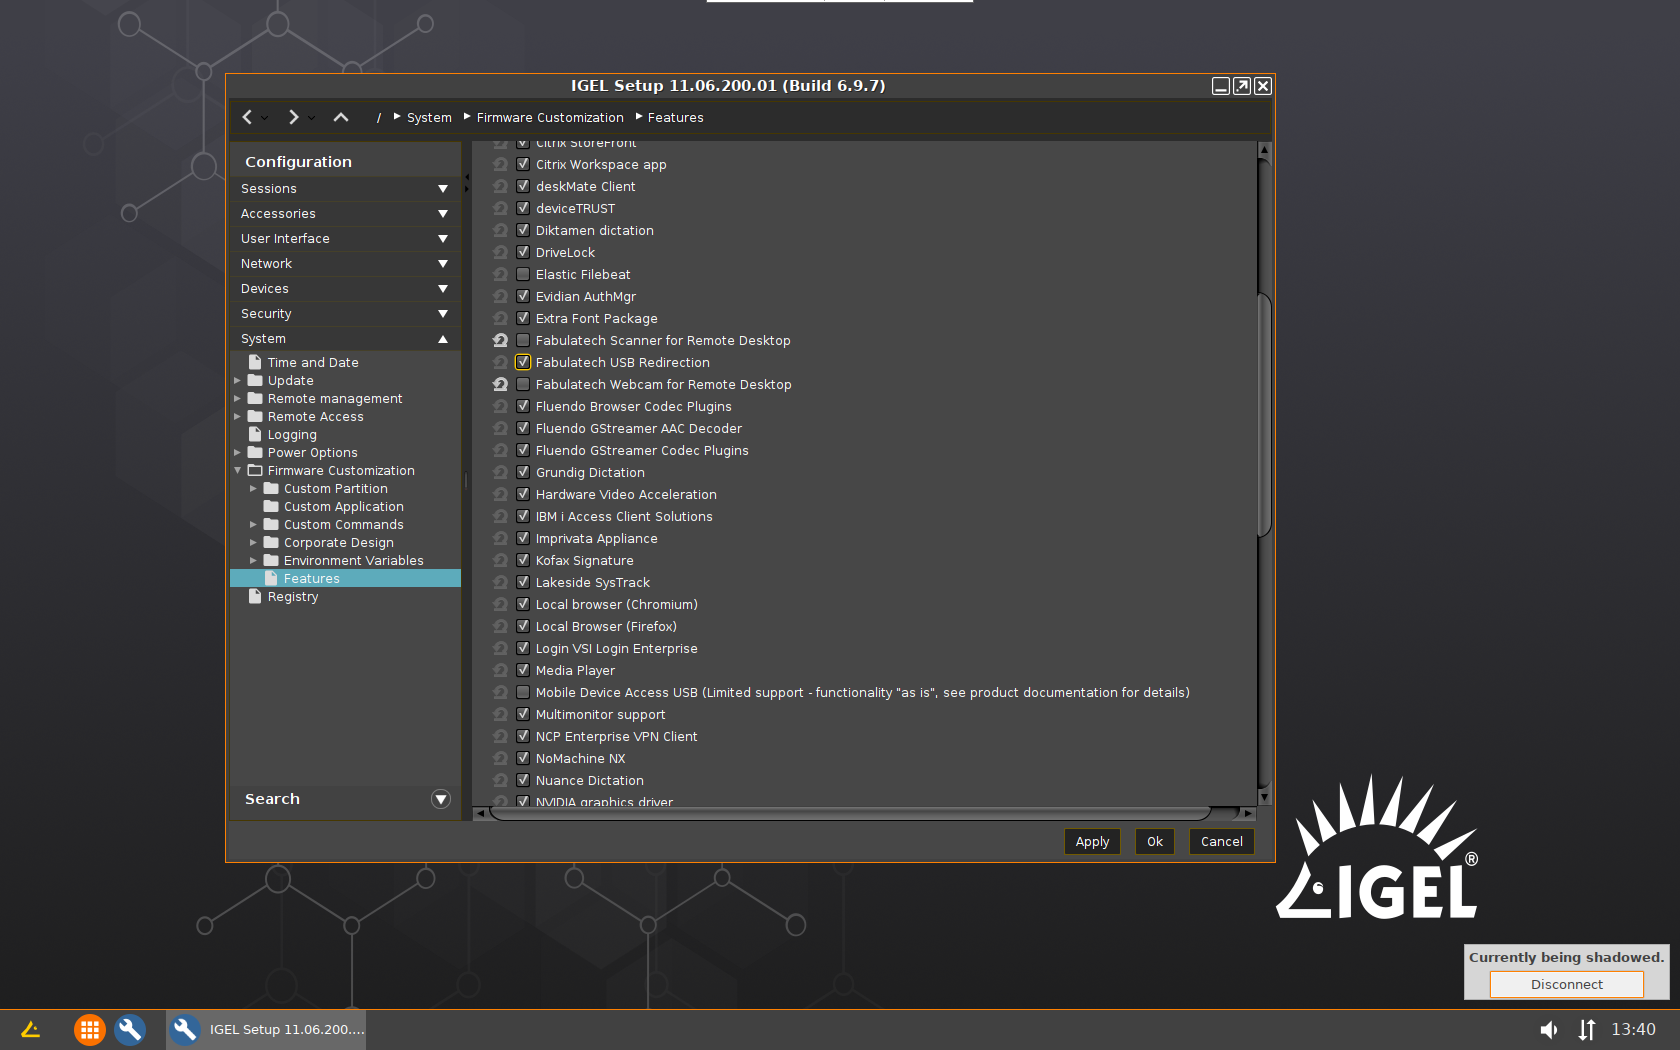
- Go to Setup > Configuration > System > Firmware Customization > Features and enable FabulaTech USB Redirection checkbox.
- Reboot the endpoint device.
- Activate redirection in remote desktop connection configuration:
- RDP
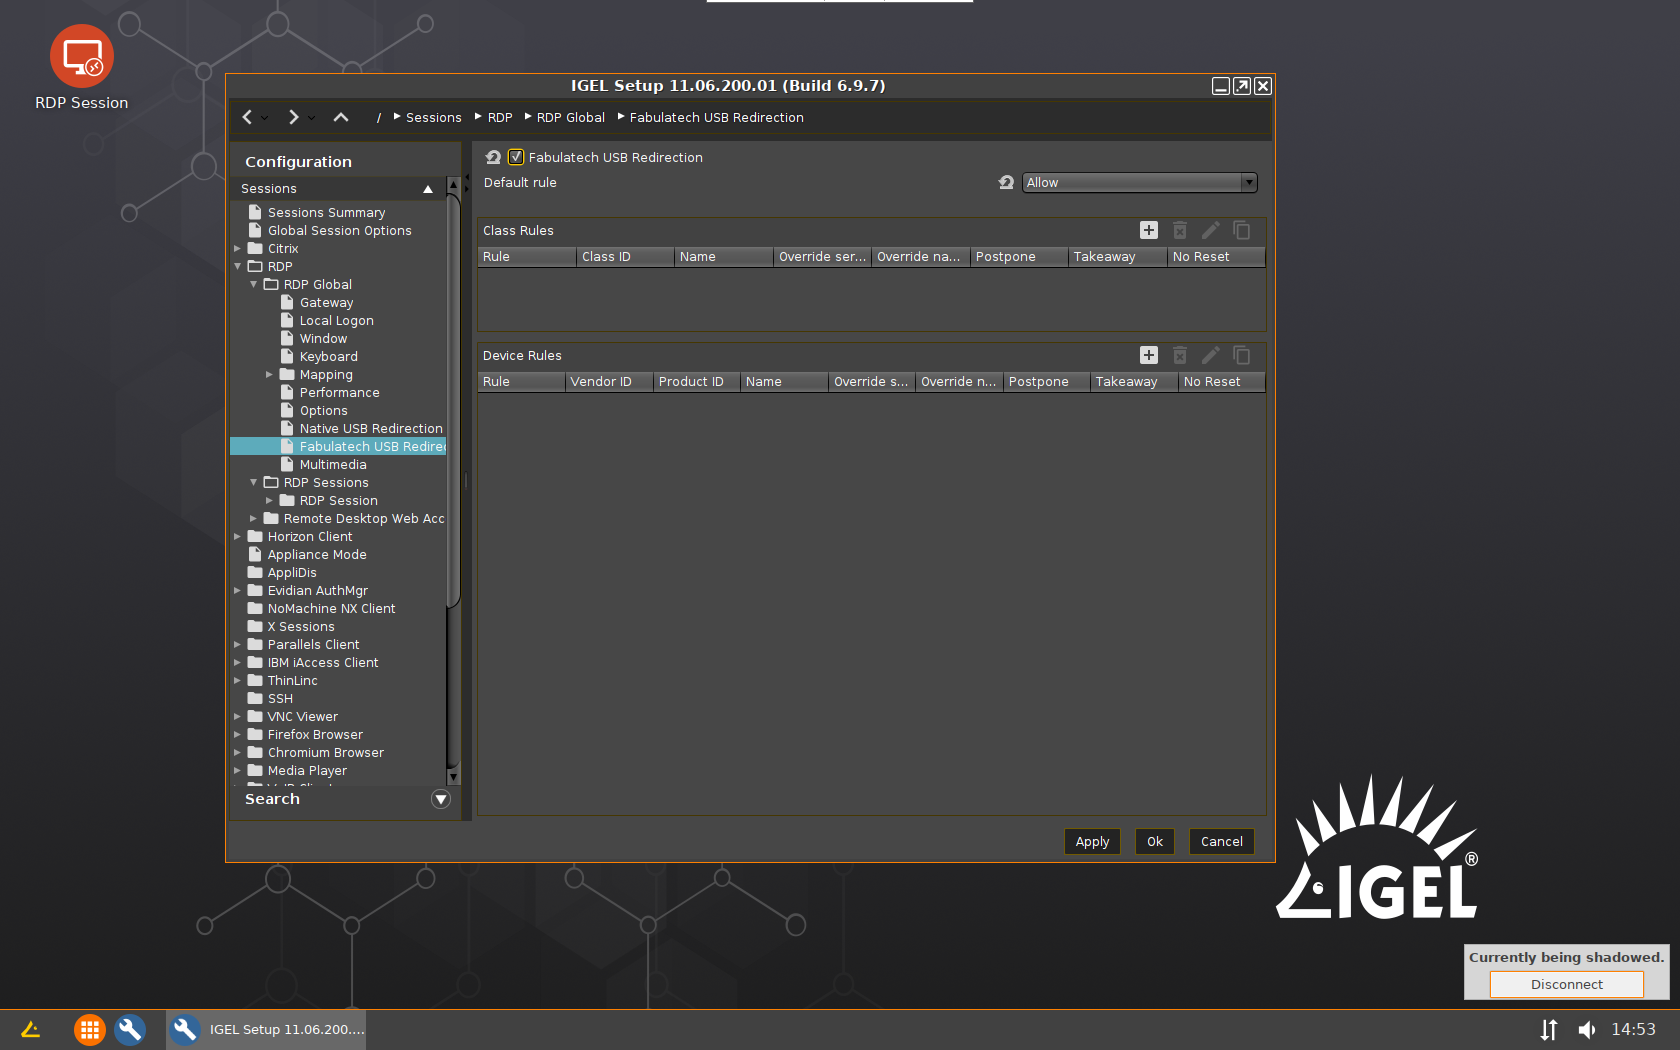
- Check FabulaTech USB Redirection checkbox:
Configuration > Sessions > RDP > RDP Global > FabulaTech USB Redirection
and ensure that Default rule option is set to Allow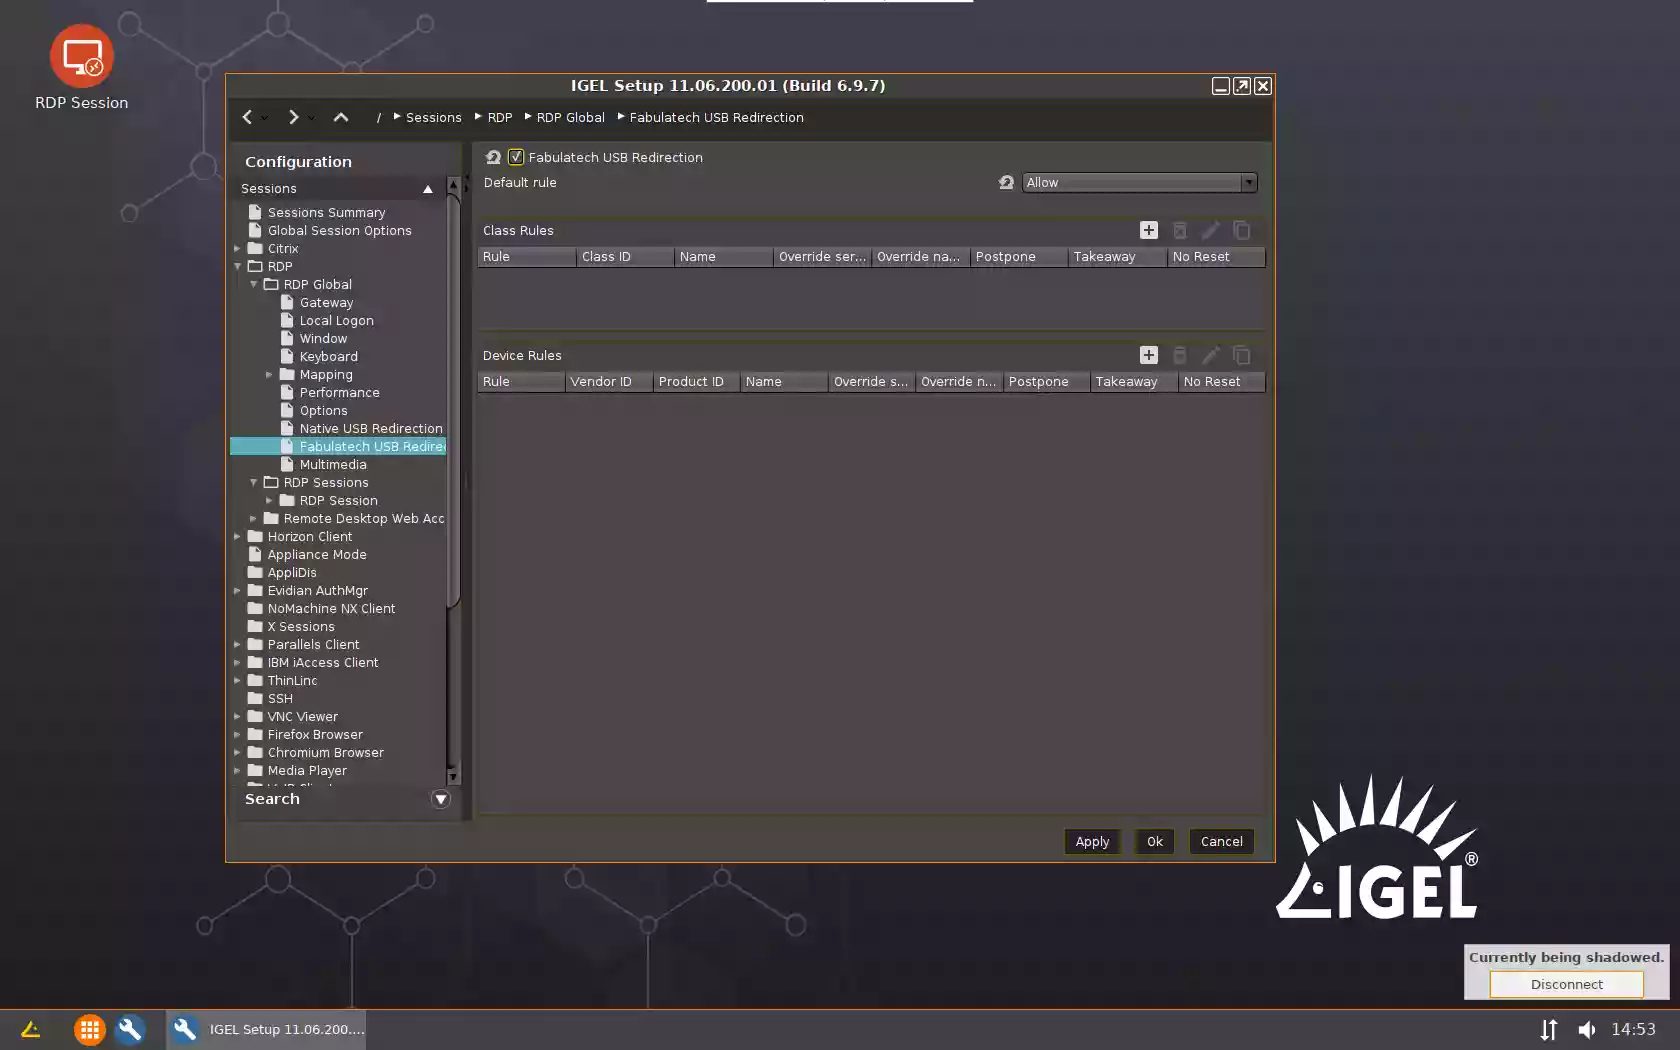
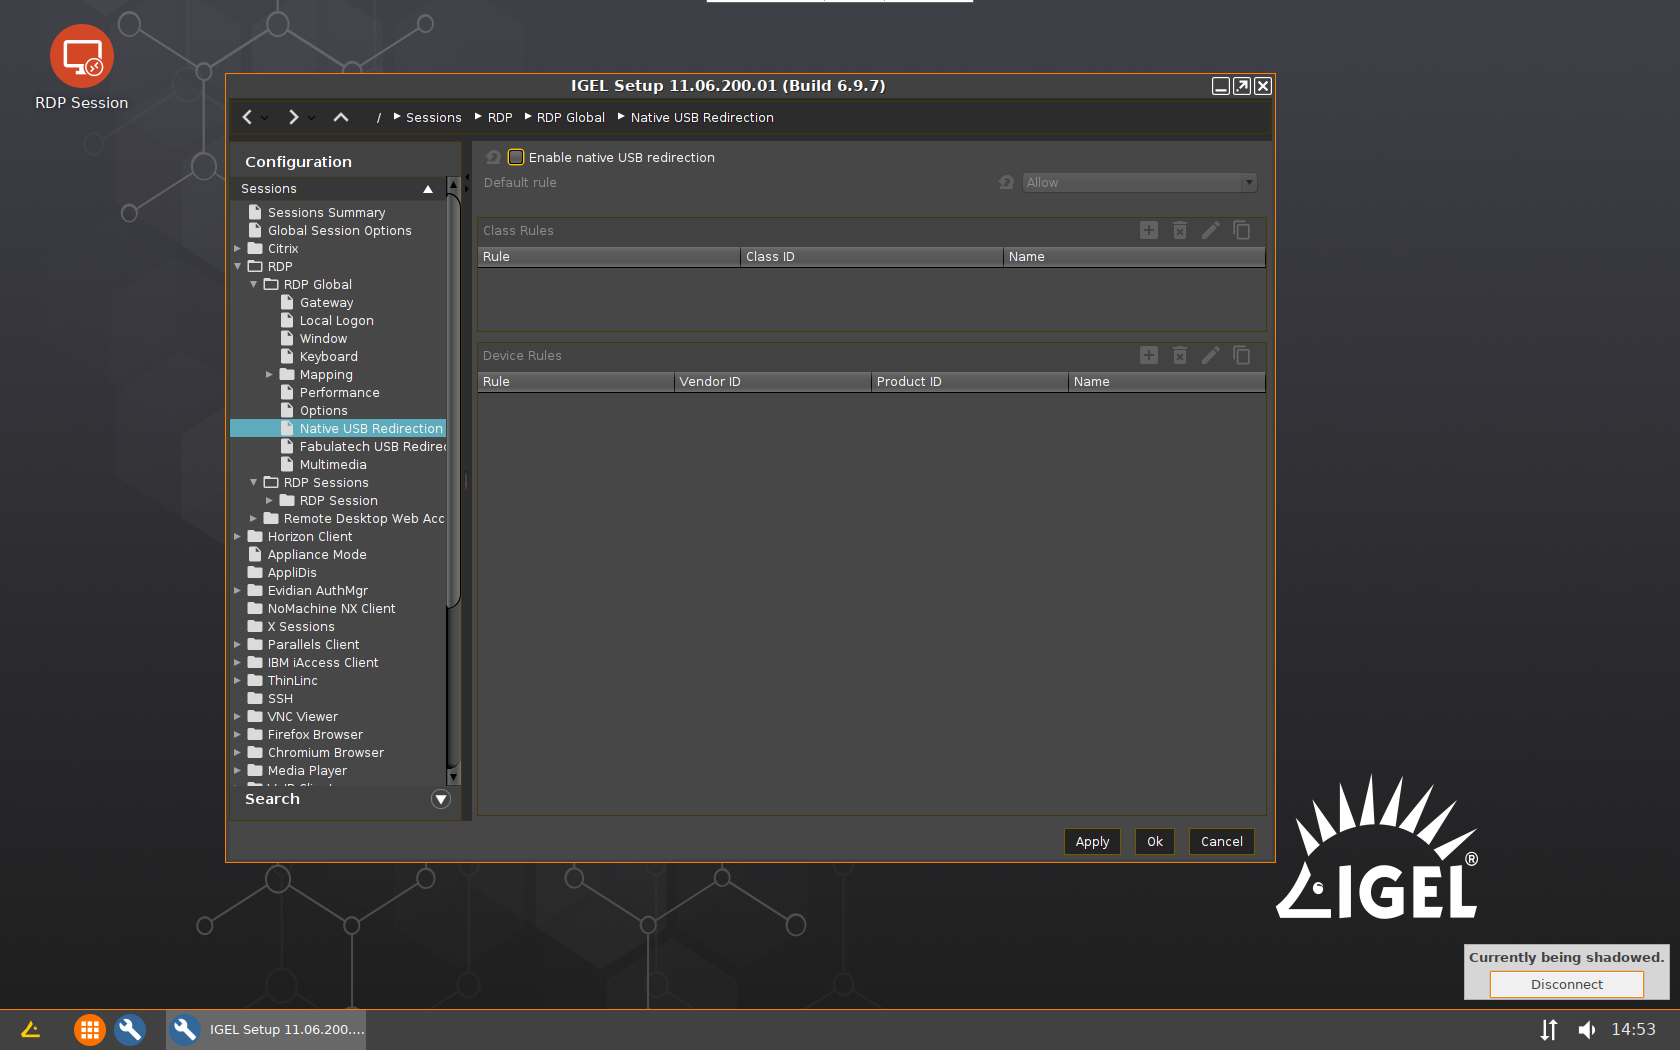
- Uncheck Enable native USB redirection checkbox:
Configuration > Sessions > RDP > RDP Global > Native USB Redirection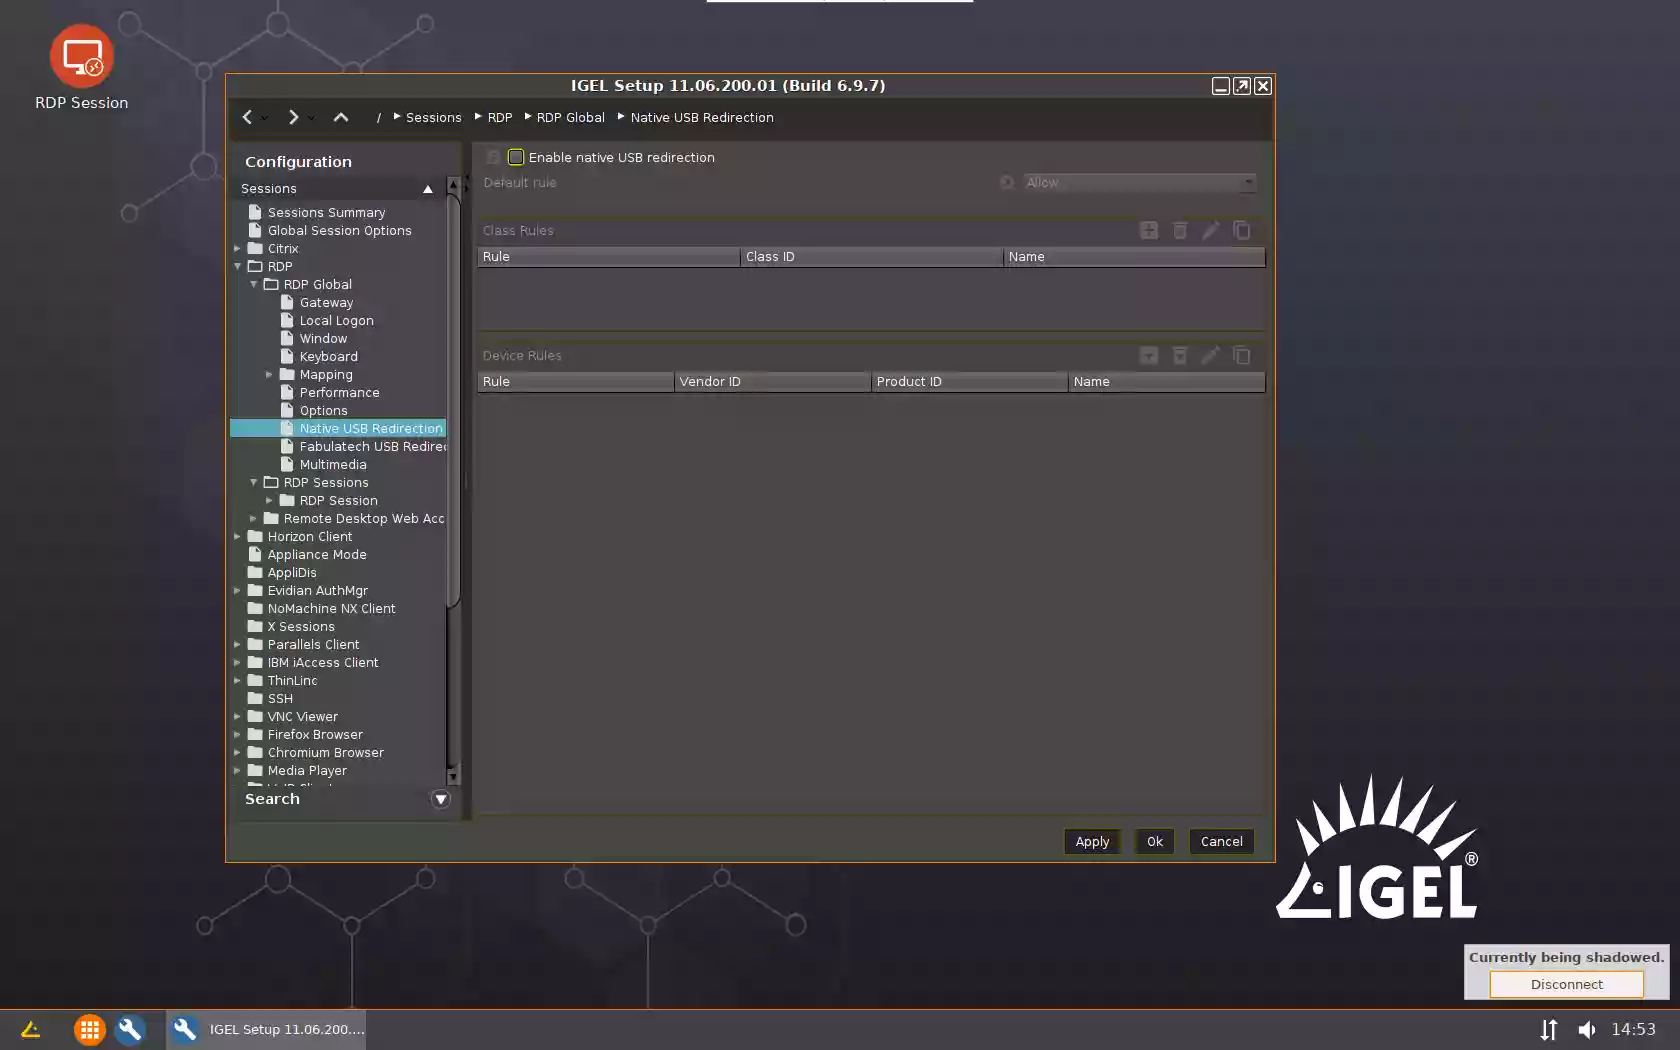
- Create a new RDP connection profile:
Configuration > Sessions > RDP > RDP Sessions - - Launch RDP Session and connect to the remote Windows PC. Devices available for redirection will appear in the taskbar menu under the USB for Remote Desktop icon.
- Check FabulaTech USB Redirection checkbox:
- Citrix
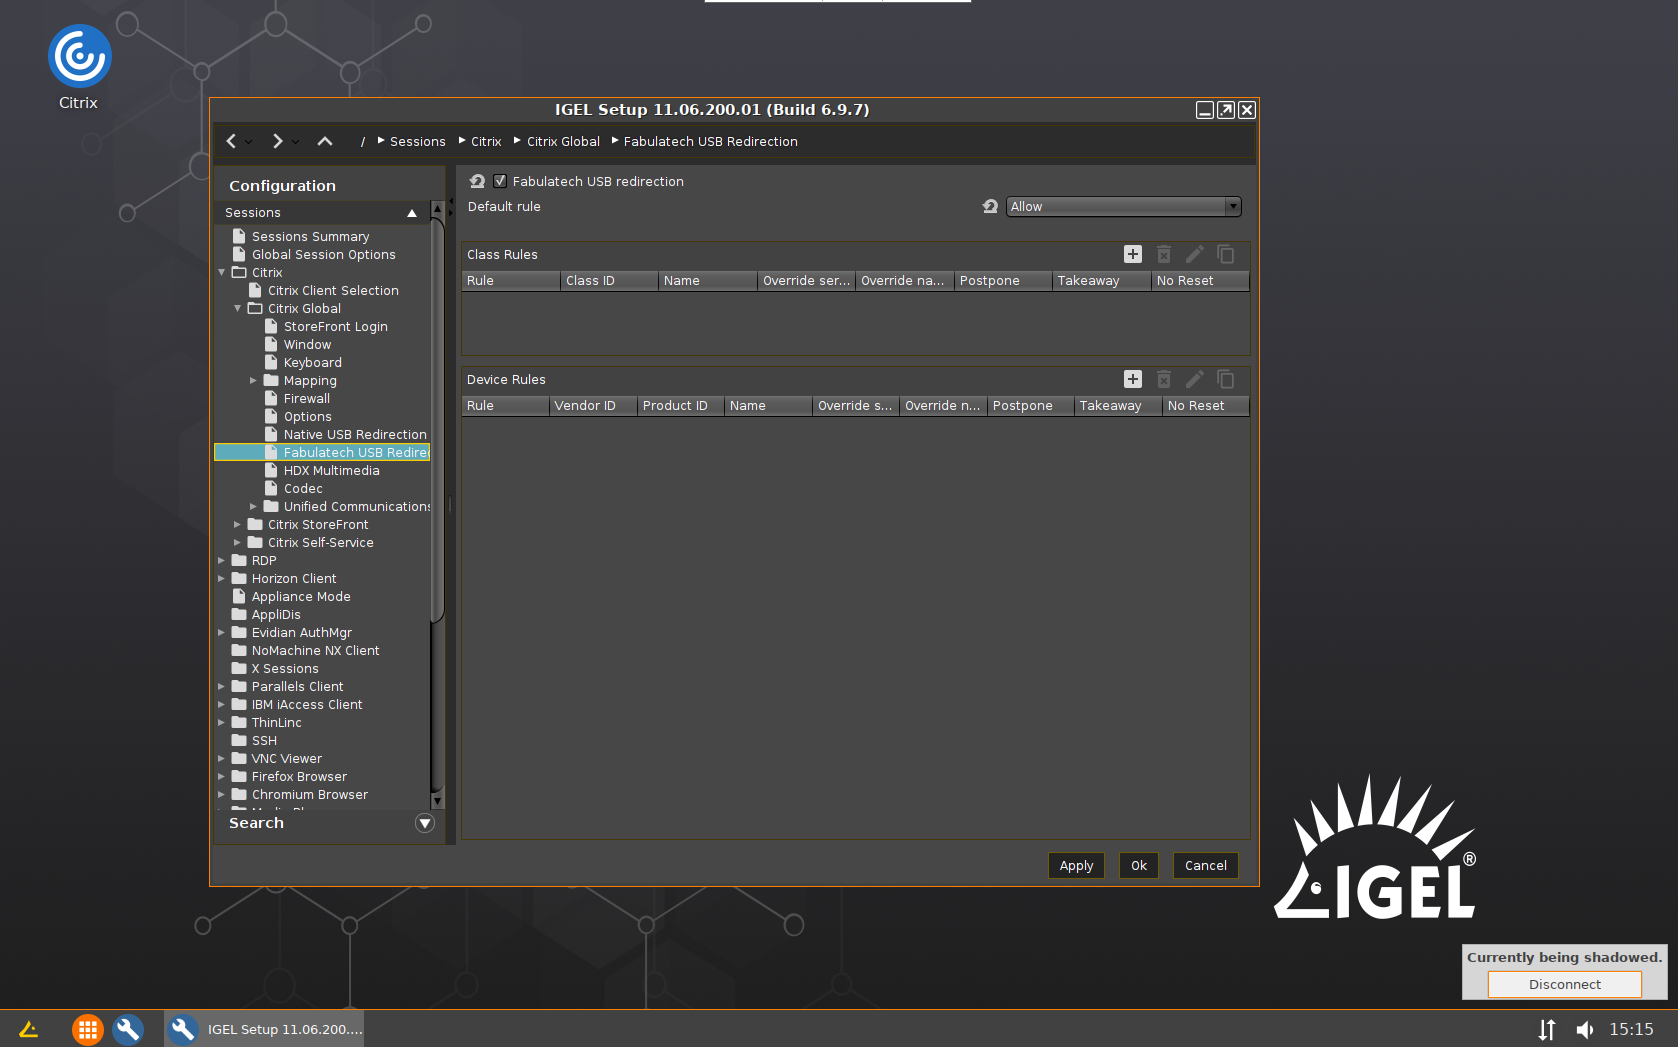
- Check FabulaTech USB Redirection checkbox:
Configuration > Sessions > Citrix > Citrix Global > Fabulatech USB Redirection
and ensure that Default rule option is set to Allow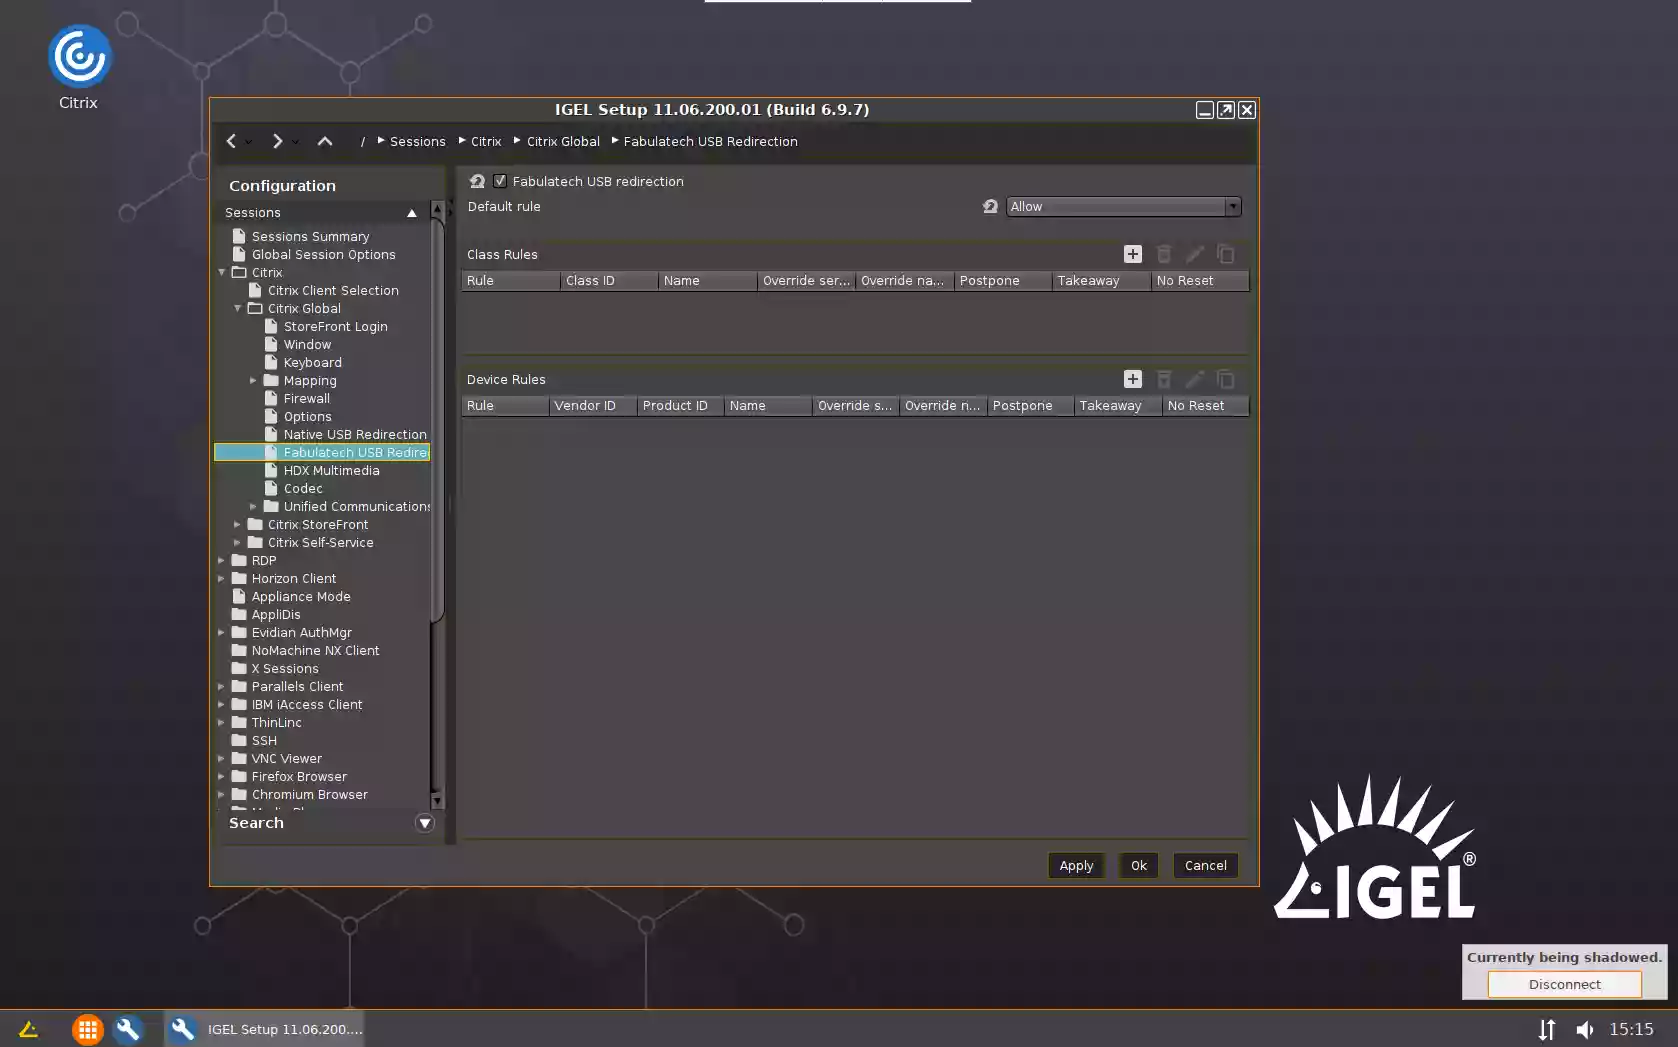
- Uncheck Native USB Redirection checkbox:
Configuration > Sessions > Citrix > Citrix Global > Native USB Redirection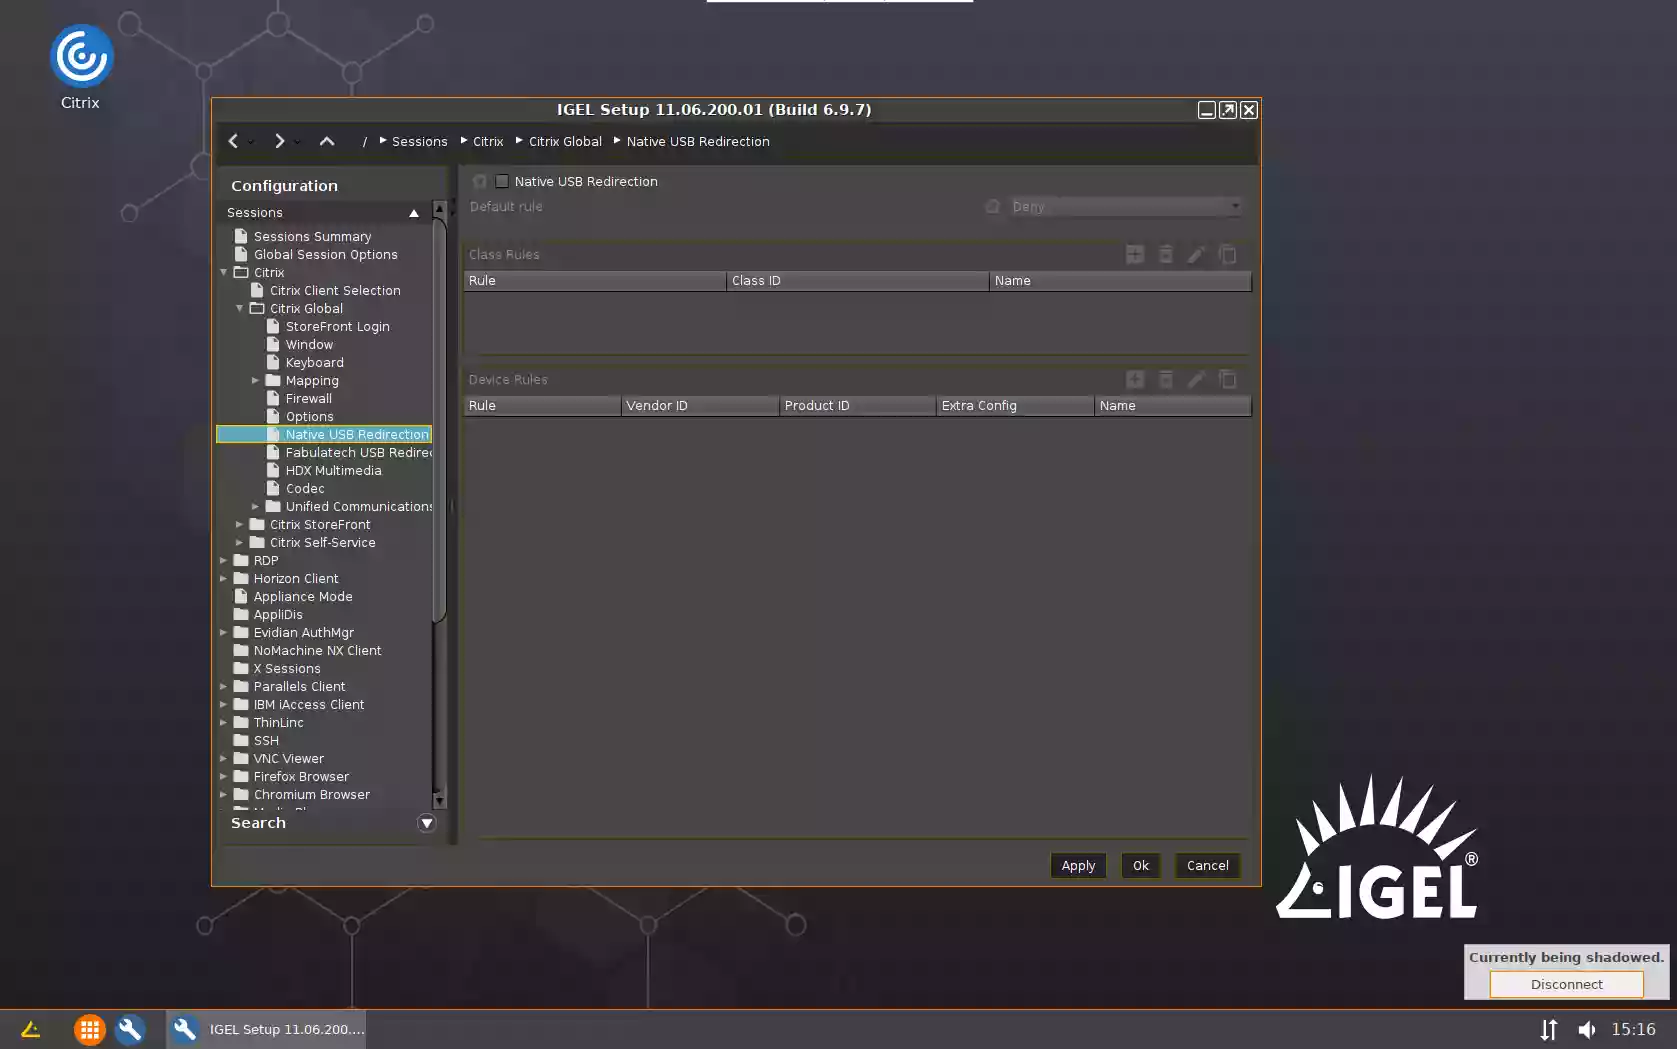
- Create a new Citrix connection profile.
- Launch Citrix Session and connect to the remote Windows PC. Devices available for redirection will appear in the taskbar menu under the USB for Remote Desktop icon.
- Check FabulaTech USB Redirection checkbox:
- VMware Horizon
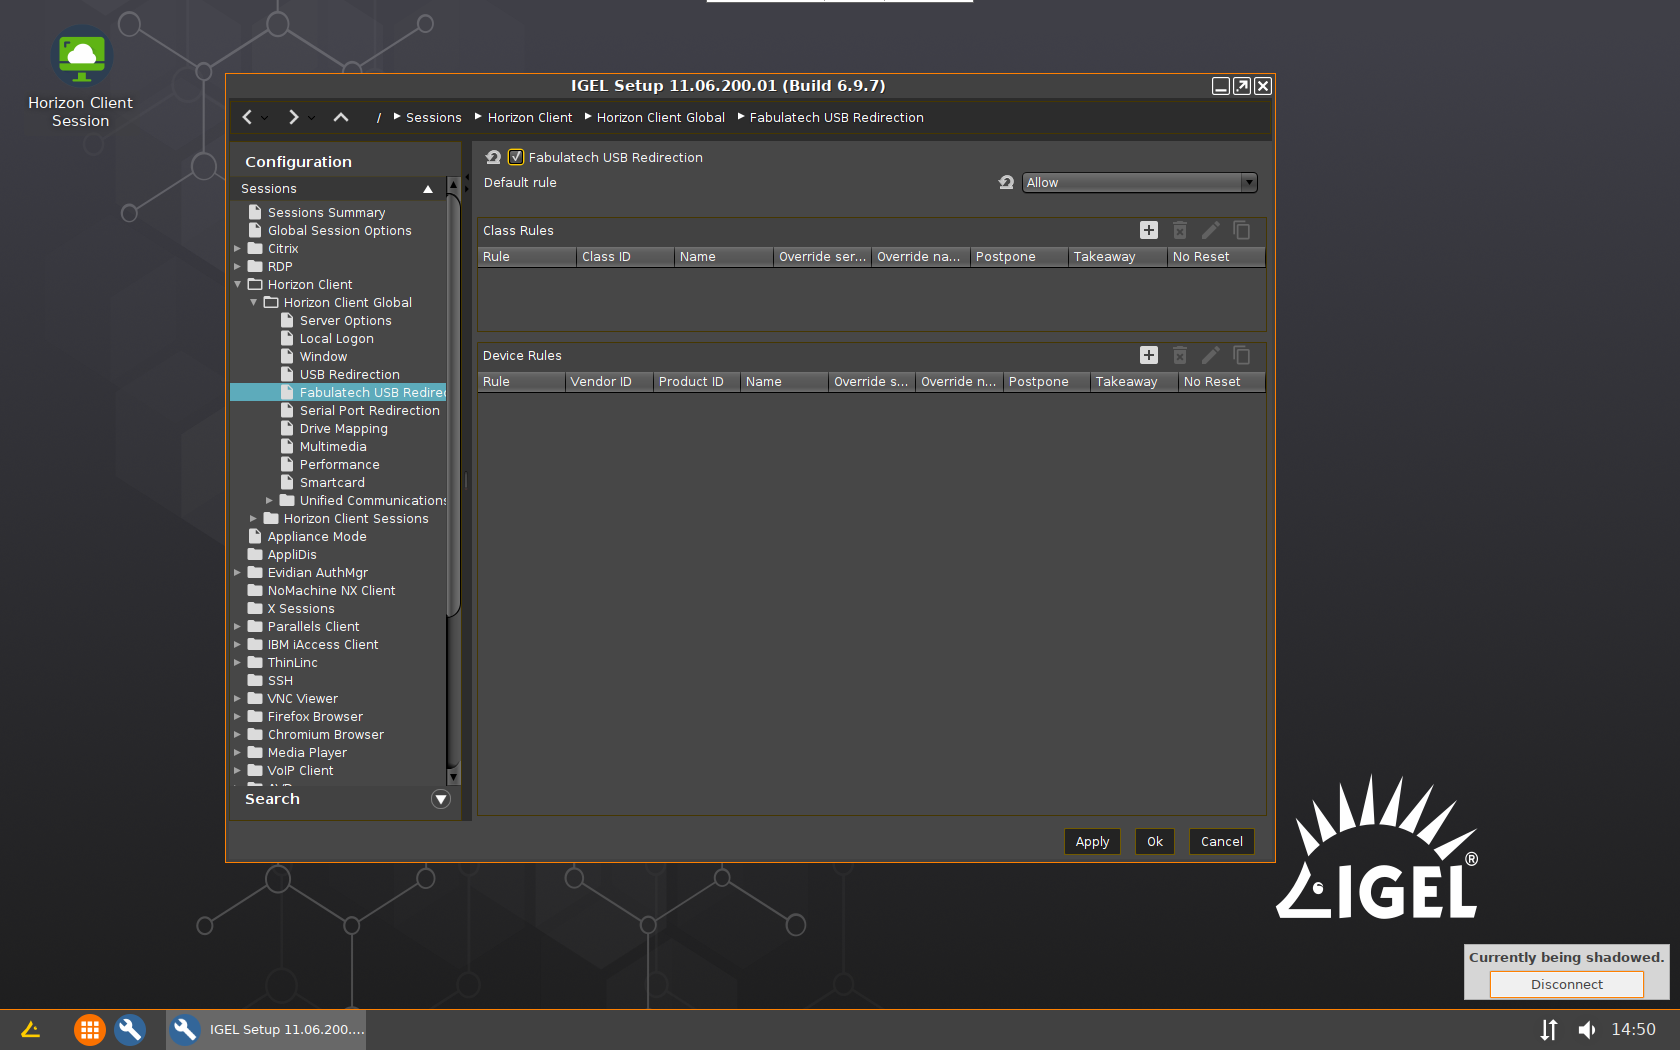
- Check FabulaTech USB Redirection checkbox:
Configuration > Sessions > Horizon Client > Horizon Client Global > Fabulatech USB Redirection
and ensure that Default rule option is set to Allow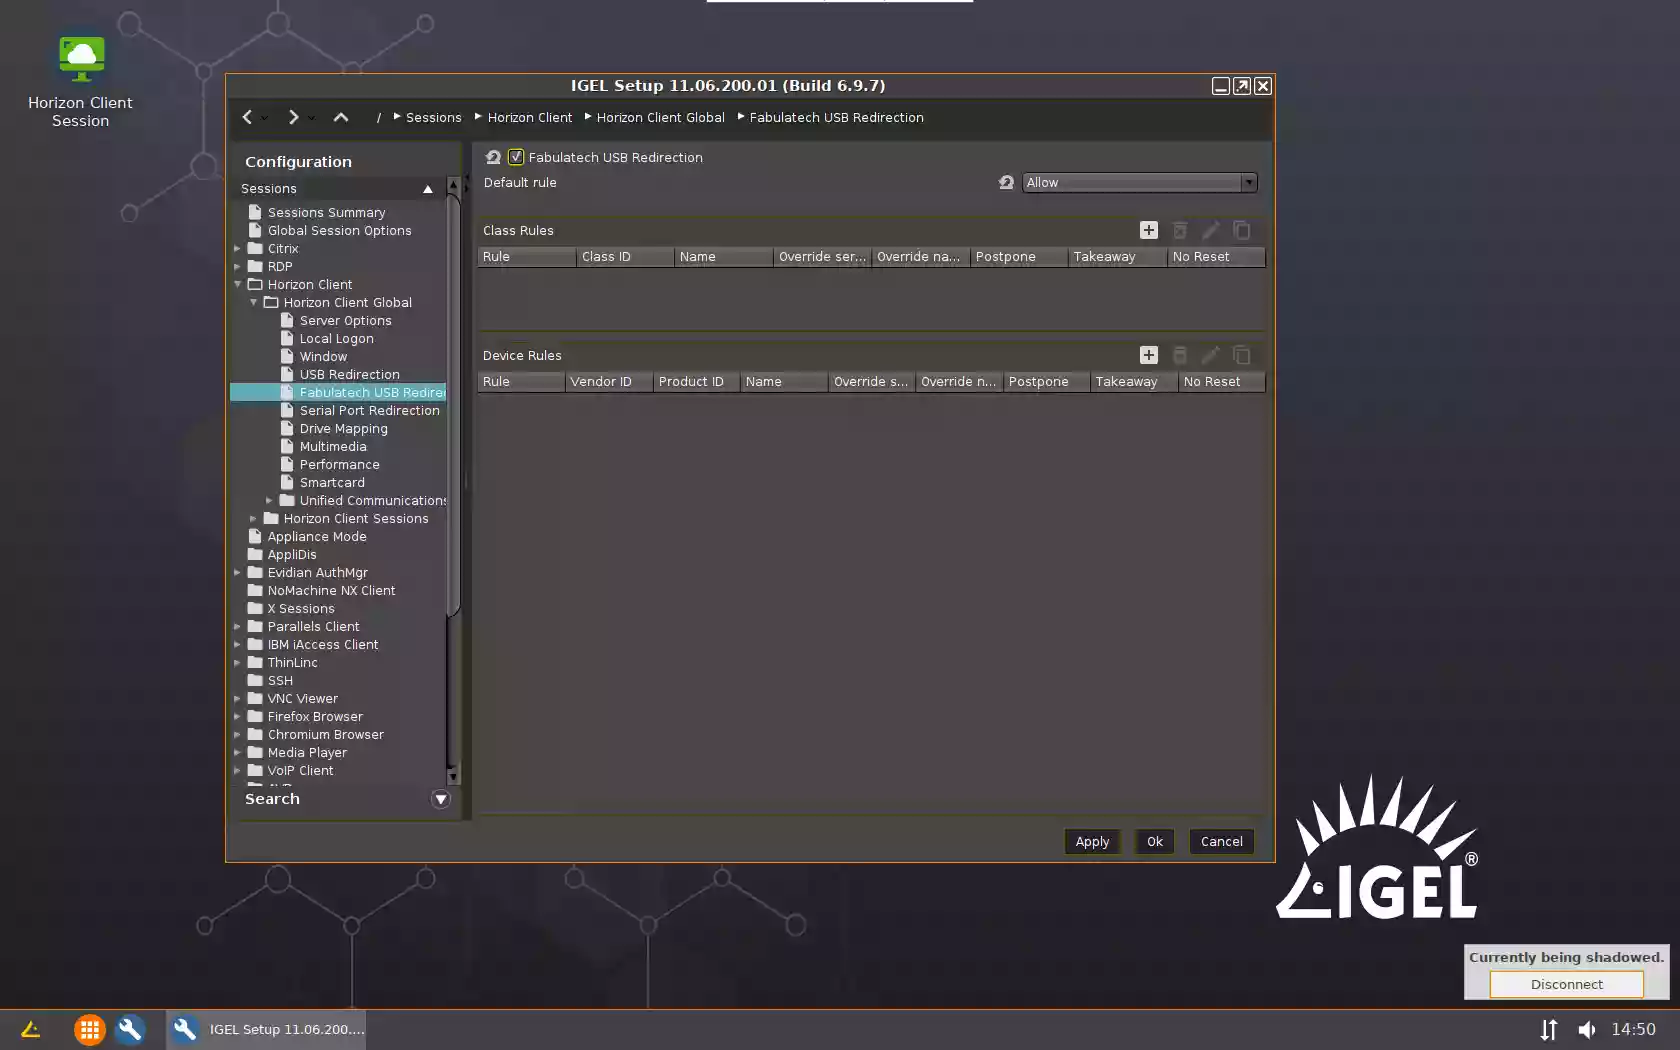
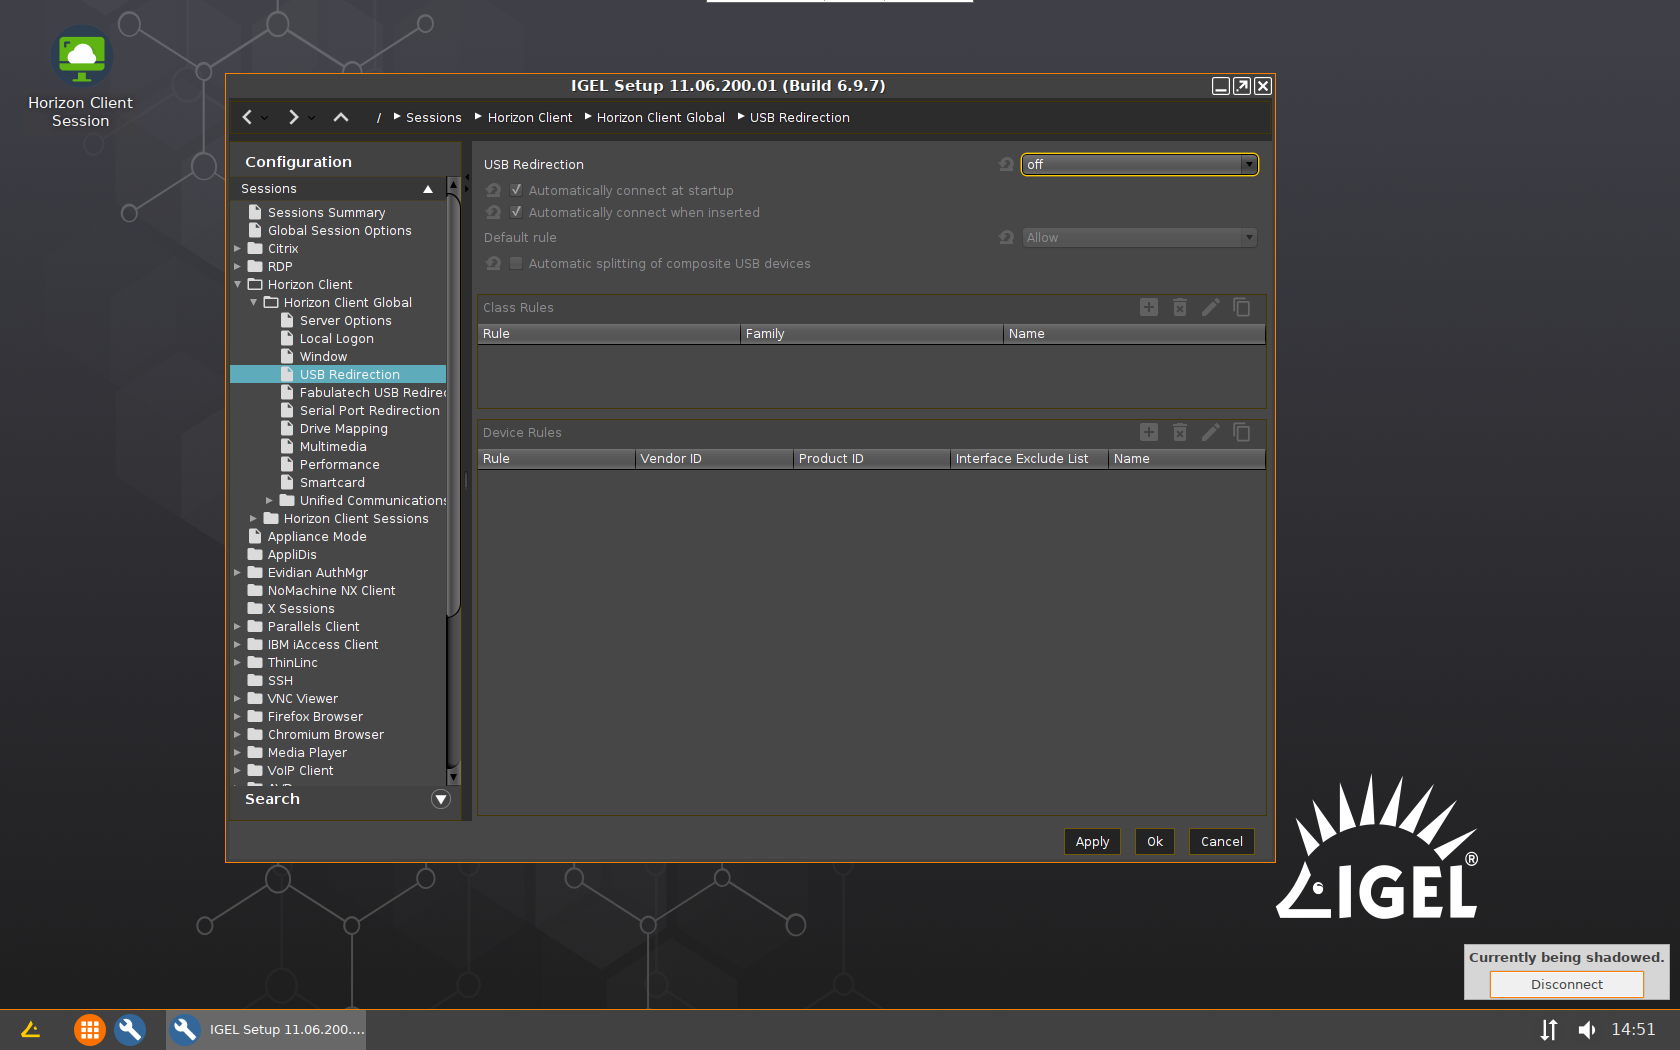
- Disable USB Redirection:
Configuration > Sessions > Horizon Client > Horizon Client Global > USB redirection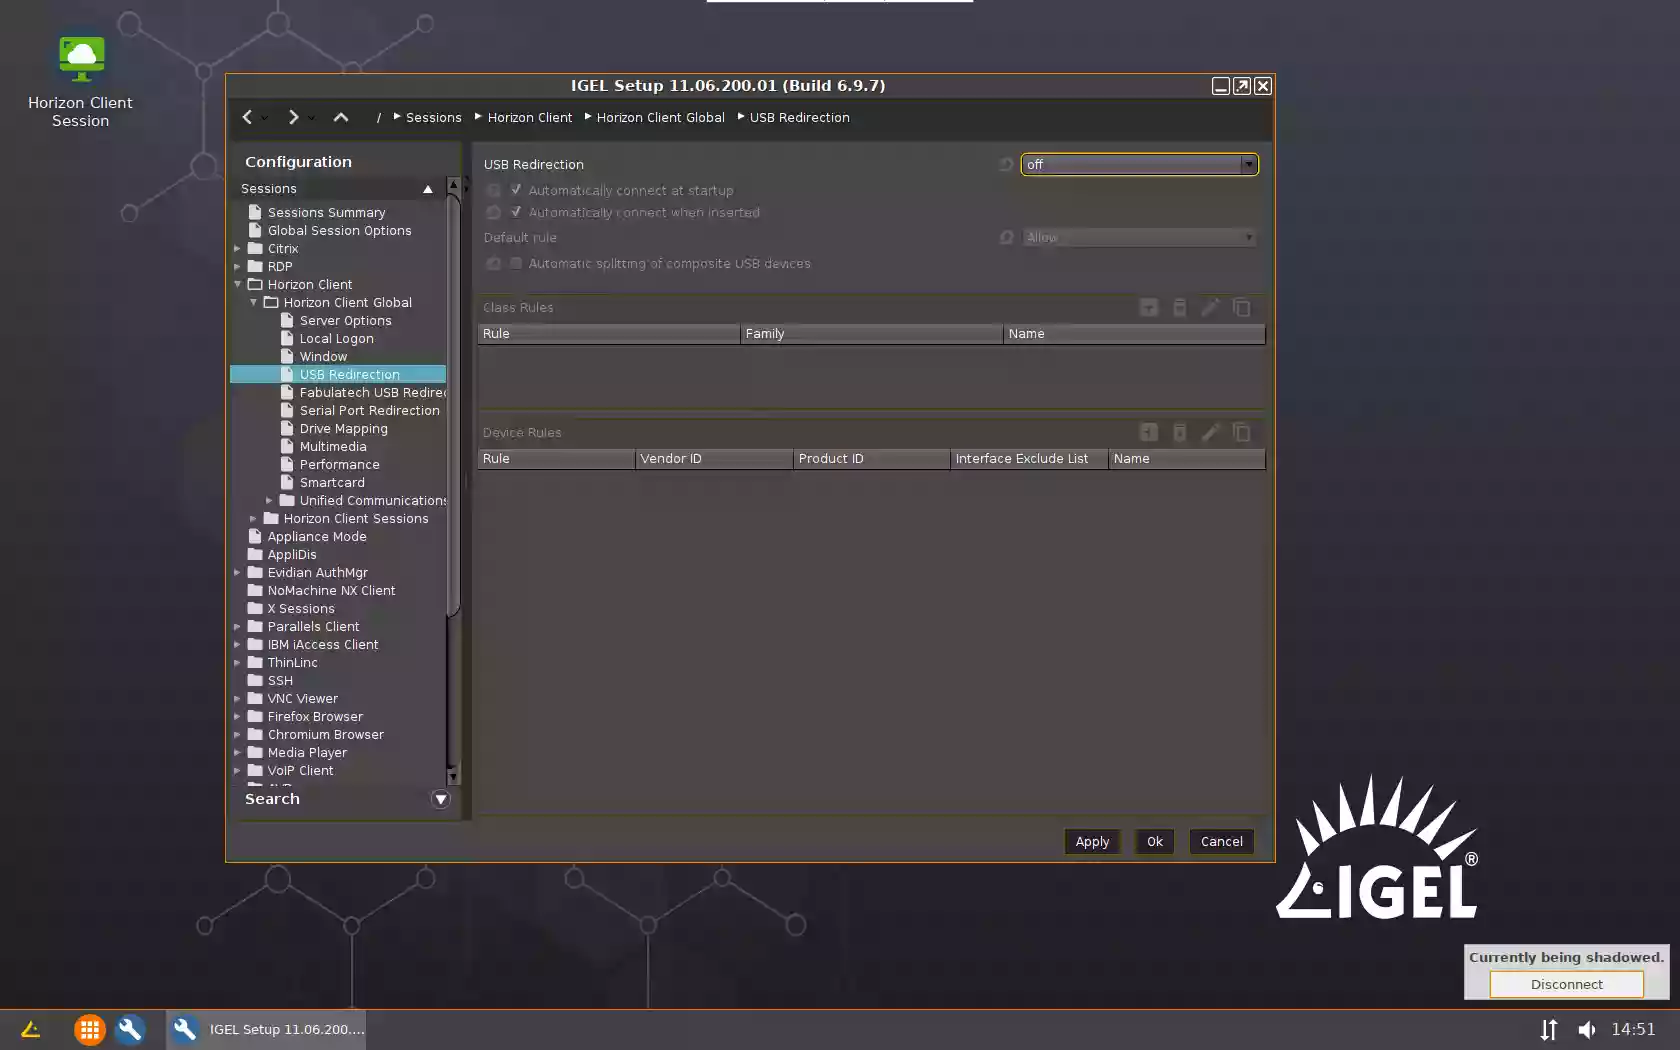
- Create a new Horizon Client connection profile:
Configuration > Sessions > Horizon Client > Horizon Client Sessions -- No additional configuration required for PCoIP protocol
-
The following configuration required for Blast protocol (one time only):
- Enable the usage of virtual channel on the remote Windows machine (Server side): apply two *-_enable.reg files from this archive. There are also two *-_disable.reg files to unroll changes if required. Restart the Server after registry change.
- Launch Horizon Client Session and connect to the remote Windows PC. Devices available for redirection will appear in the taskbar menu under the USB for Remote Desktop icon.
- Check FabulaTech USB Redirection checkbox:
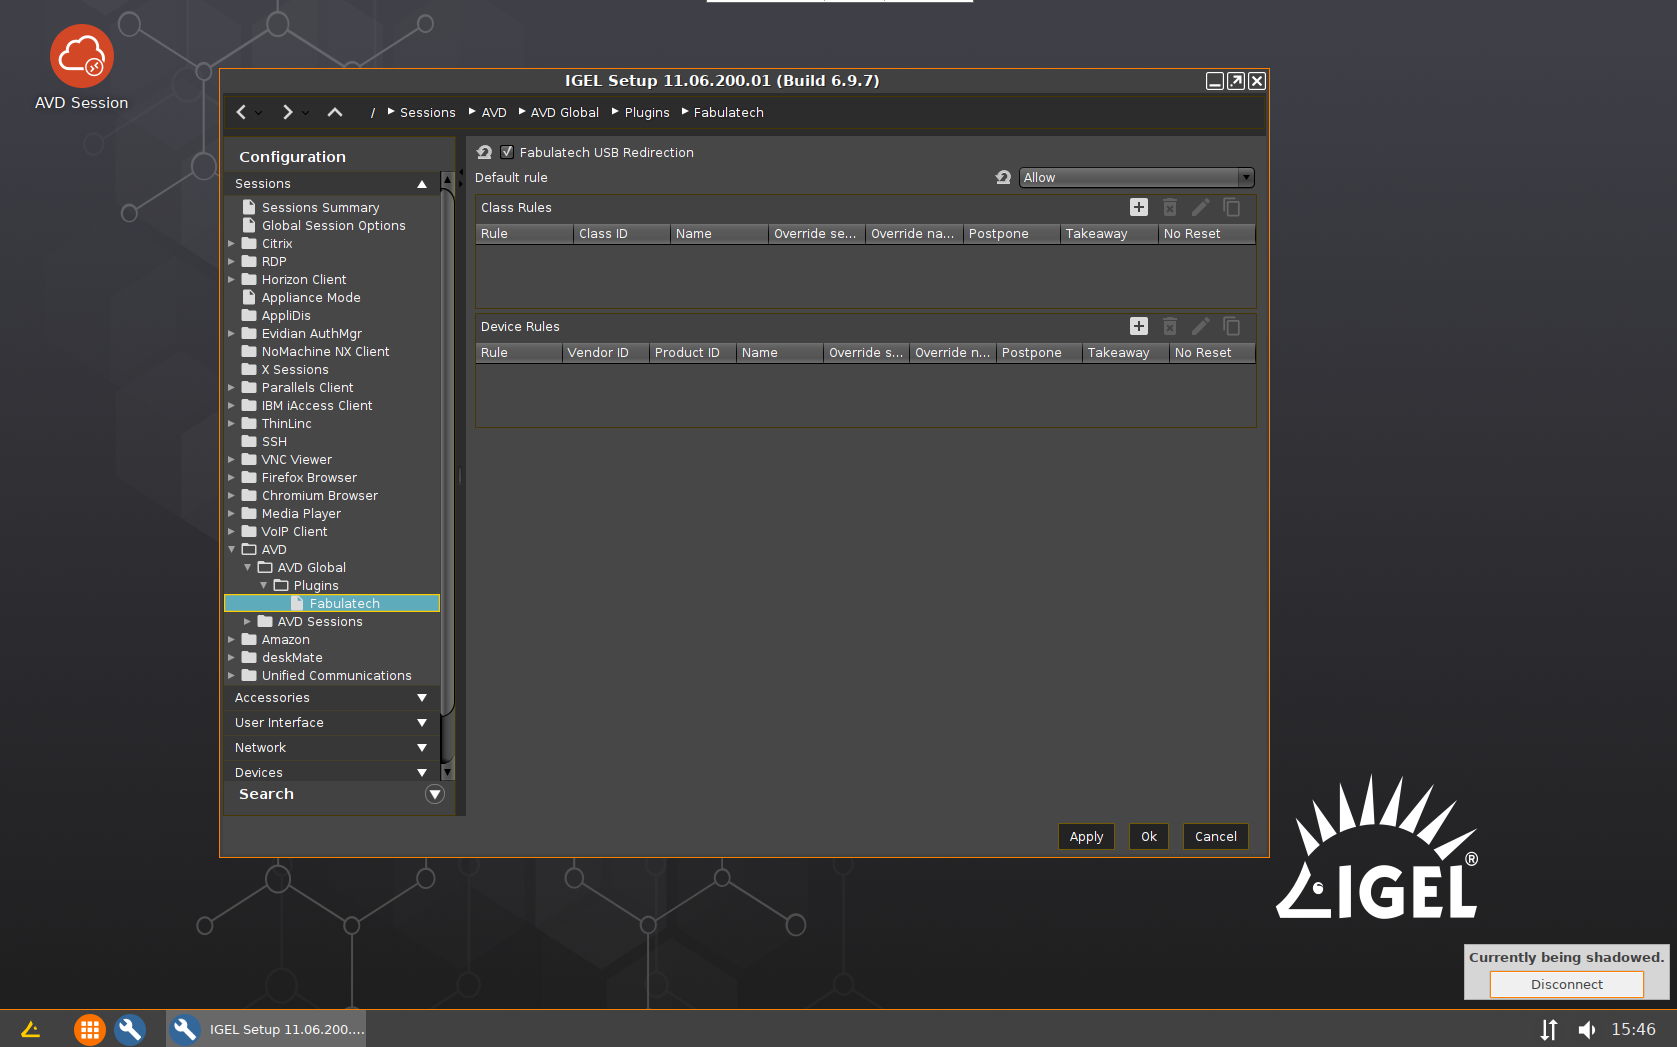
- Microsoft AVD
- Check FabulaTech USB Redirection checkbox:
Configuration > Sessions > AVD > AVD Global > Plugins > Fabulatech
and ensure that Default rule option is set to Allow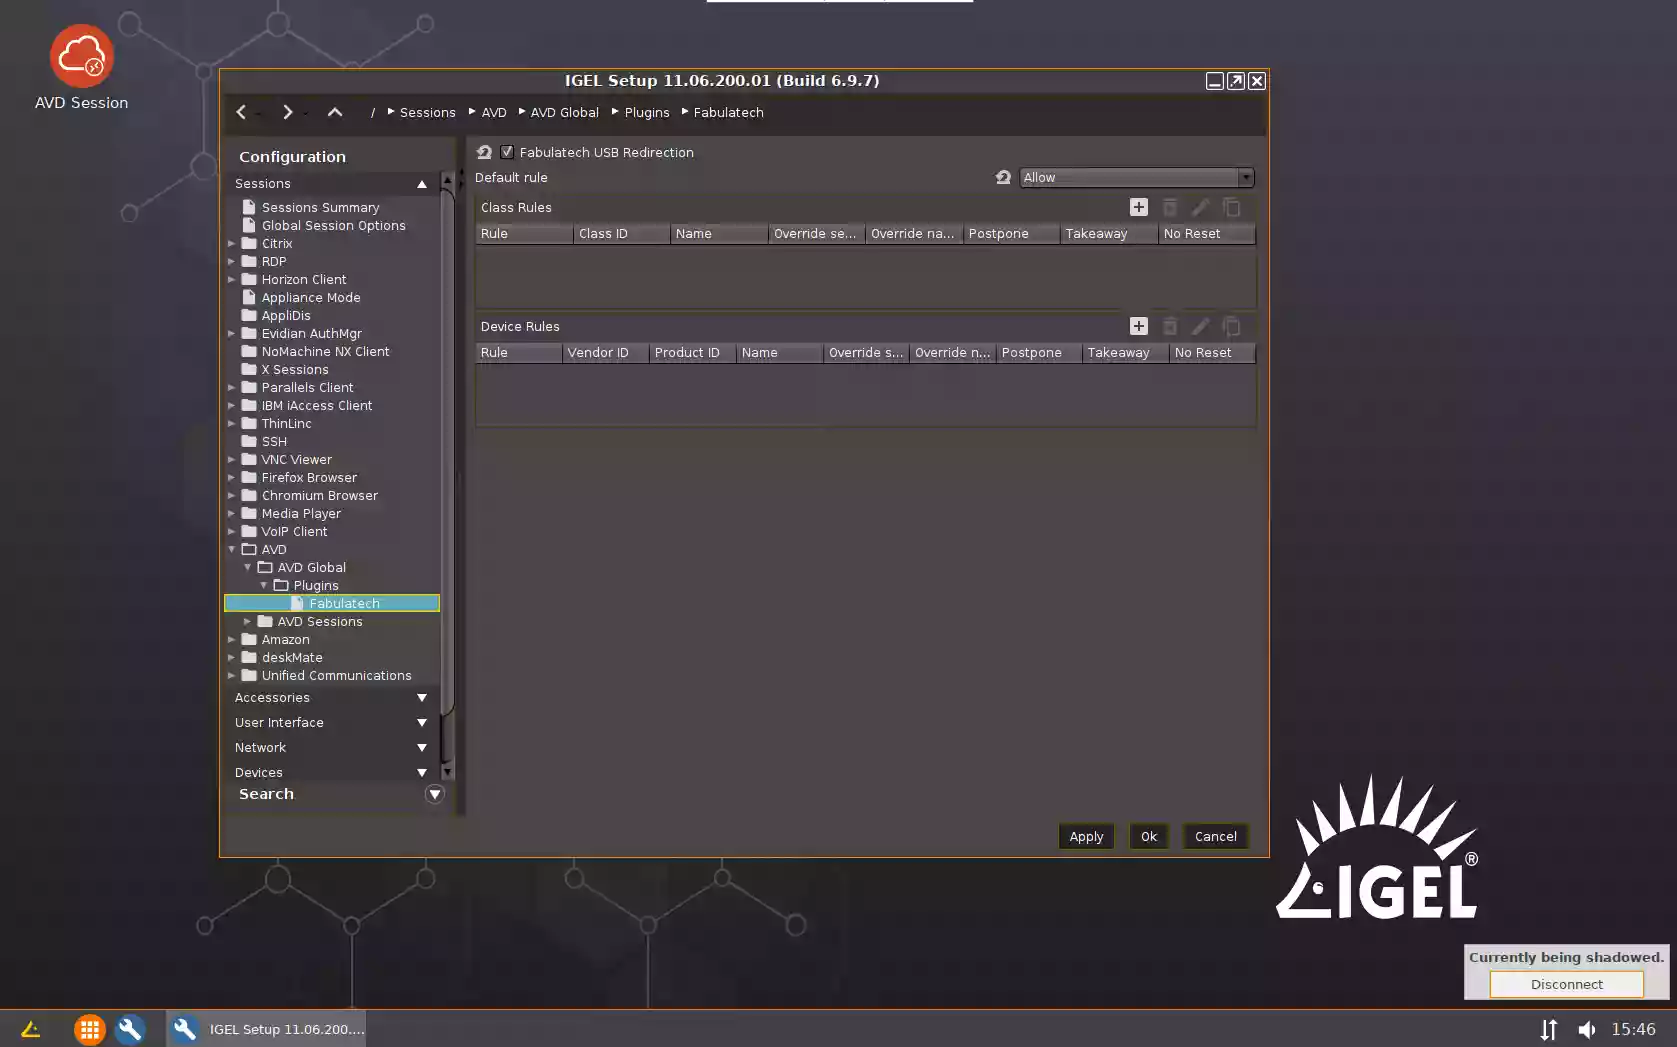
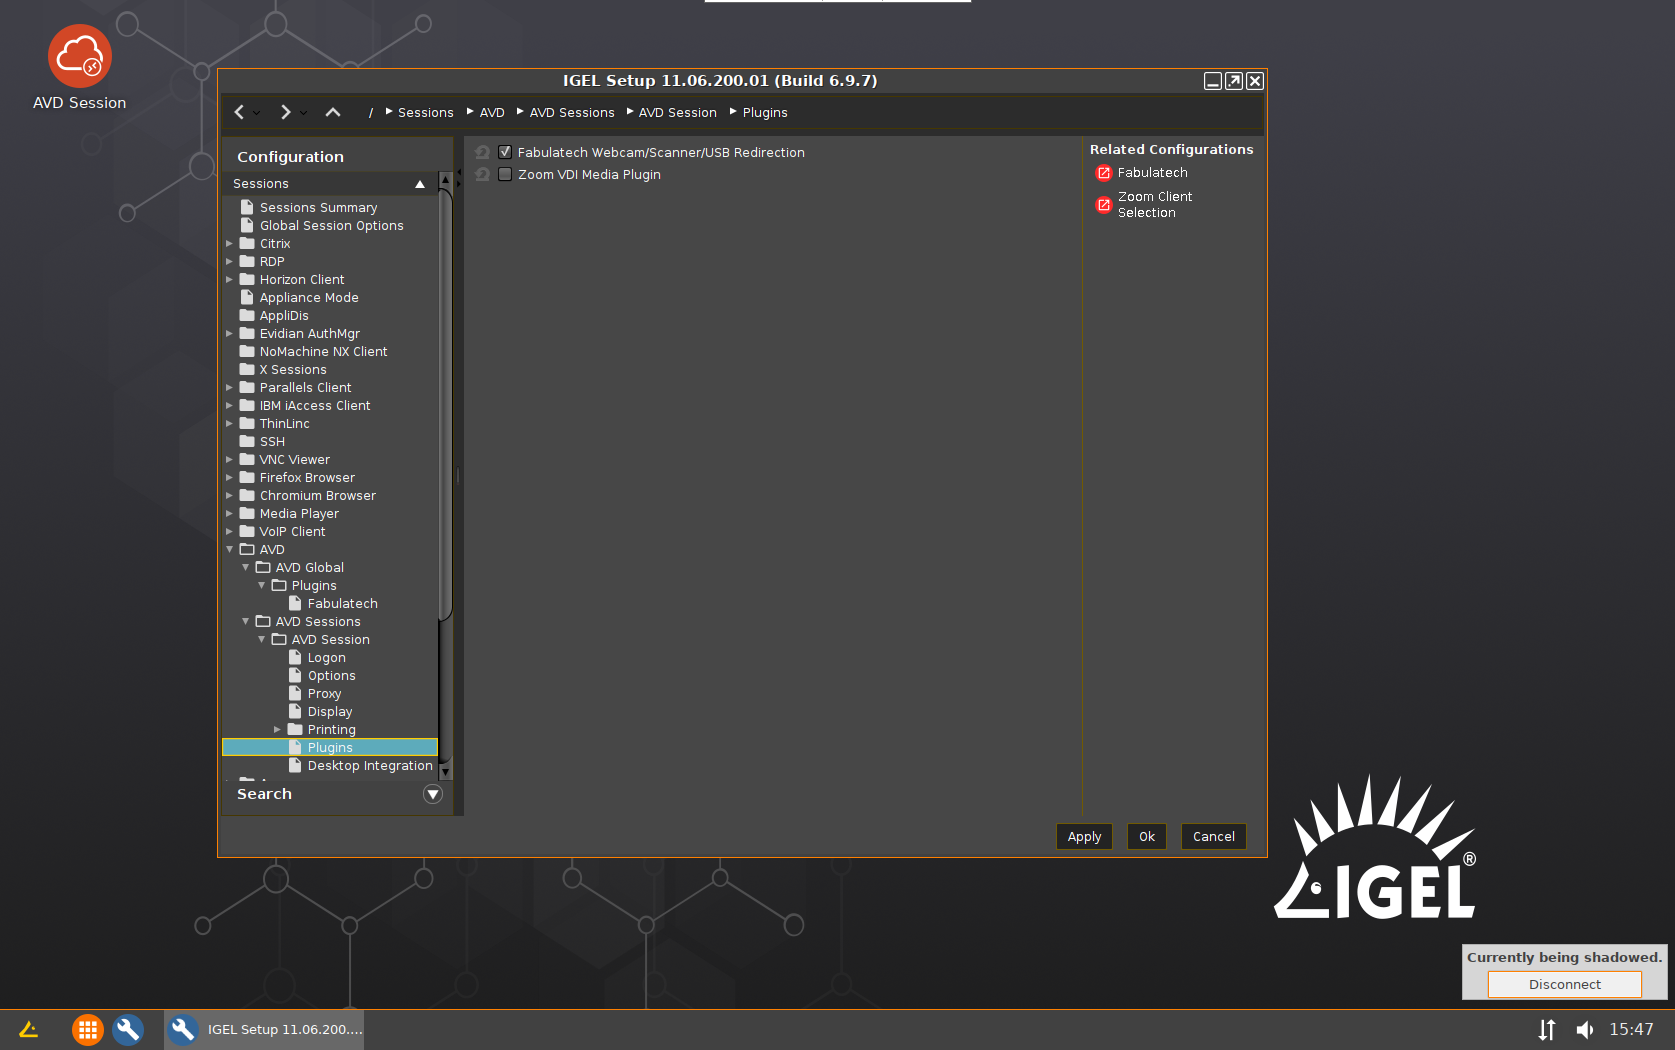
- Create a new AVD connection profile:
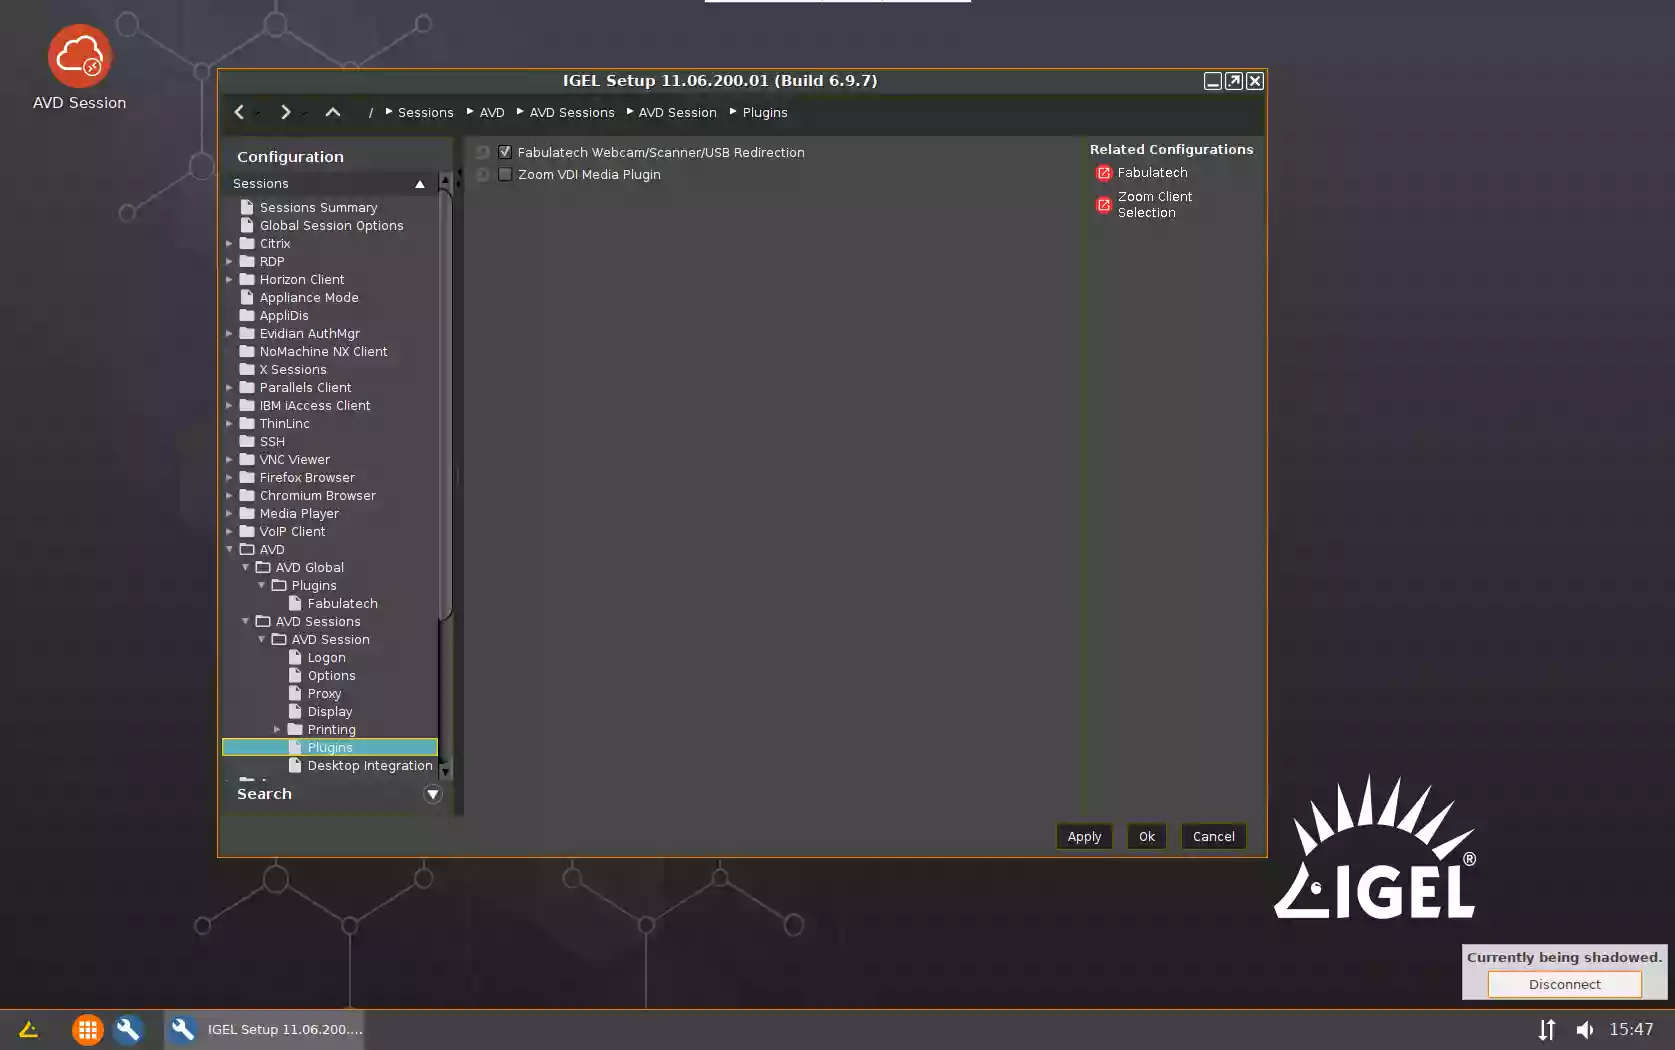
Configuration > Sessions > AVD > AVD Sessions - - Check FabulaTech Webcam/Scanner/USB Redirection checkbox:
Configuration > Sessions > AVD > AVD Sessions > [AVD_session_profile_name] > Plugins
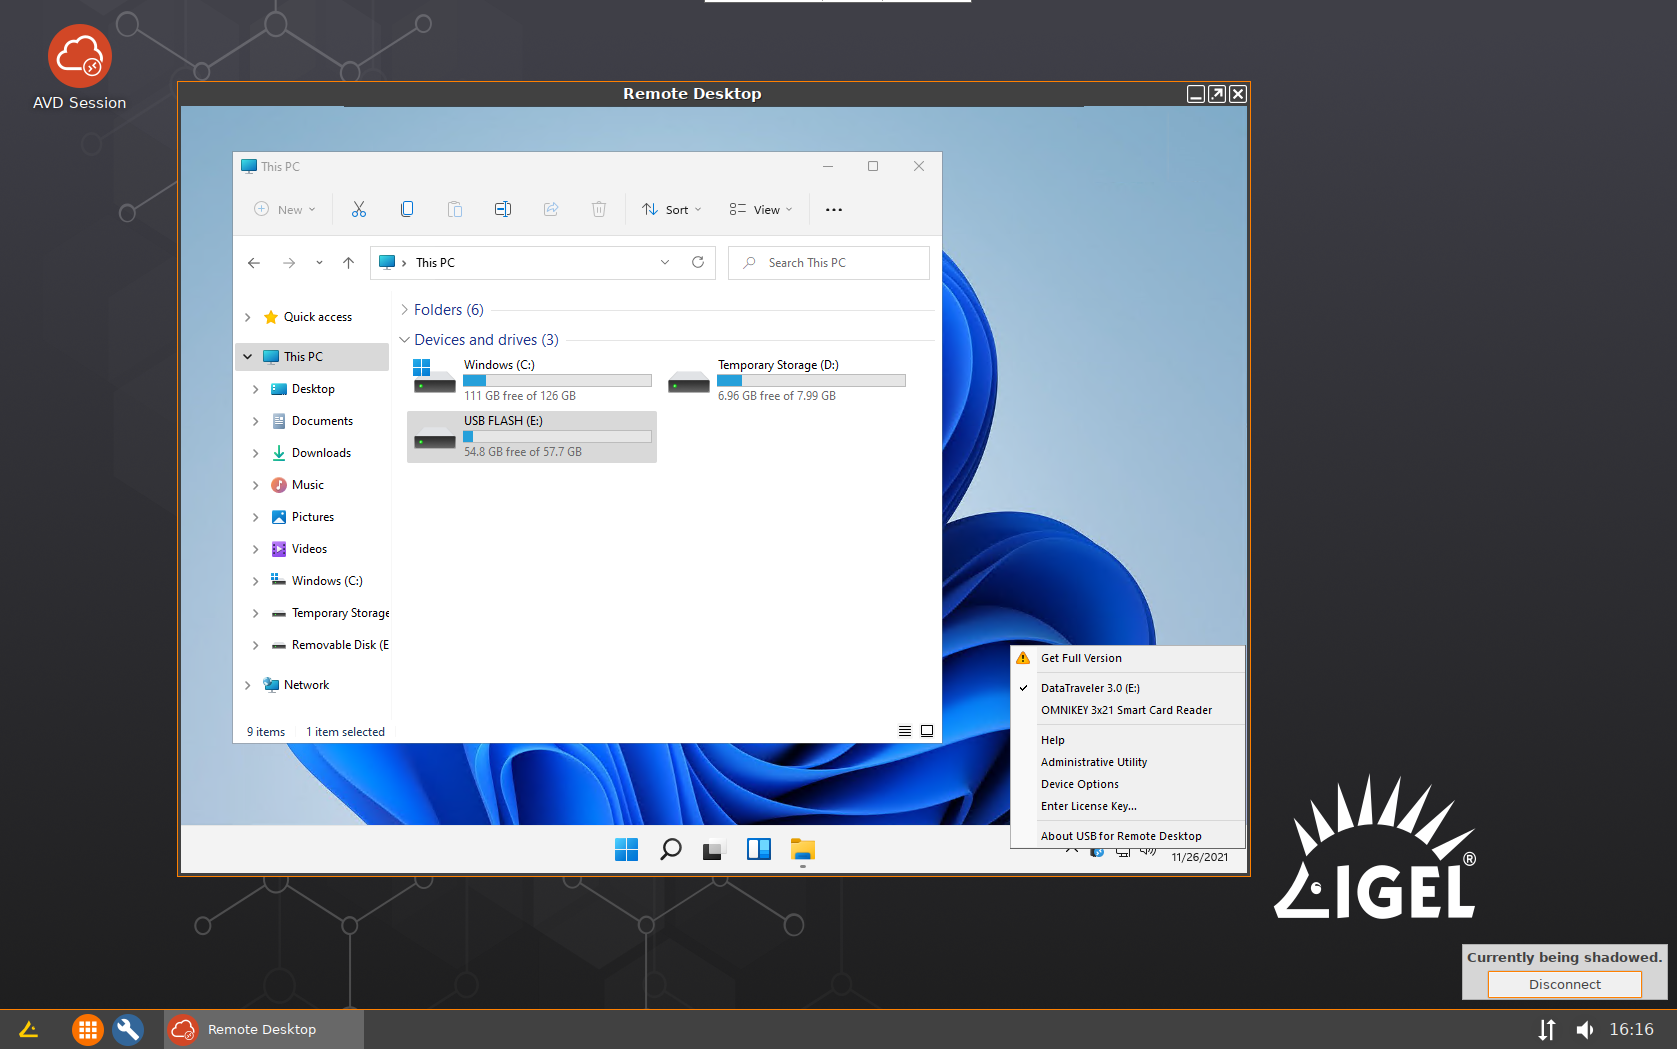
- Launch AVD Session and connect to the remote Windows PC. Devices available for redirection will appear in the taskbar menu under the USB for Remote Desktop icon.
- Check FabulaTech USB Redirection checkbox:
- Amazon
Please note! Fabulatech USB Redirection should be enabled in the Horizon Client session first.
- Check FabulaTech USB Redirection checkbox:
Configuration > Sessions > Horizon Client > Horizon Client Global > Fabulatech USB Redirection
and ensure that Default rule option is set to Allow
- Disable USB Redirection:
Configuration > Sessions > Horizon Client > Horizon Client Global > USB redirection
- Enable loading of our plugin (one time only). In the
Configuration > System > Firmware Customization > Custom Commands > Desktop > Final desktop command
add the command:
ln -sf /usr/lib/pcoip/vchan_plugins/libvchan-plugin-ftpcoipbr.so /usr/lib/x86_64-linux-gnu/pcoip-client/vchan_plugins/libvchan-plugin-ftpcoipbr.so
- Reboot the endpoint device.
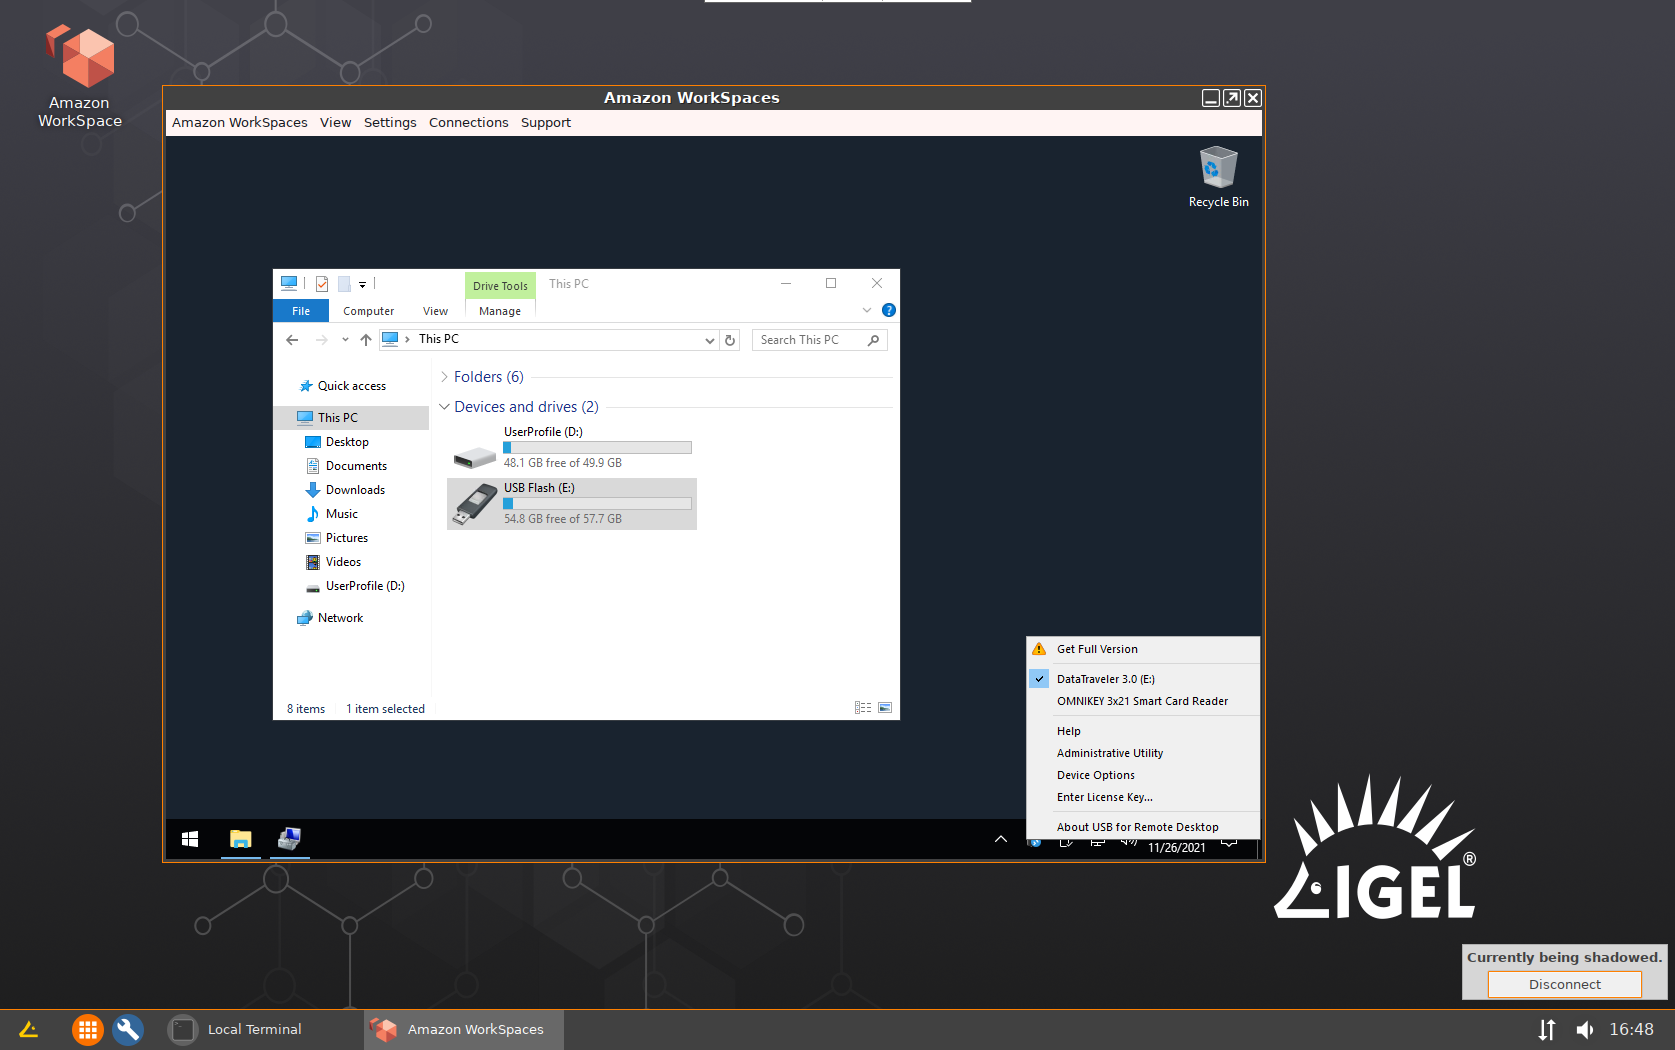
- Create a new Amazon WorkSpaces connection profile:
Configuration > Sessions > Amazon > WorkSpaces > Amazon WorkSpaces - - Launch Amazon Workspaces and connect to the remote Windows PC. Devices available for redirection will appear in the taskbar menu under the USB for Remote Desktop icon.
- Check FabulaTech USB Redirection checkbox:
- HP / Teradici PCoIP
Please note! Fabulatech USB Redirection should be enabled in the Horizon Client session first.
- Check FabulaTech USB Redirection checkbox:
Configuration > Sessions > Horizon Client > Horizon Client Global > Fabulatech USB Redirection
and ensure that Default rule option is set to Allow
- Disable USB Redirection:
Configuration > Sessions > Horizon Client > Horizon Client Global > USB redirection
- Enable loading of our plugin (one time only). In the
Configuration > System > Firmware Customization > Custom Commands > Desktop > Final desktop command
add the command:
ln -sf /usr/lib/pcoip/vchan_plugins/libvchan-plugin-ftpcoipbr.so /usr/lib/x86_64-linux-gnu/org.hp.pcoip-client/vchan_plugins/libvchan-plugin-ftpcoipbr.so
- Reboot the endpoint device.
- Create a new HP Anyware PCoIP connection profile:
Configuration > Sessions >HP Anyware PCoIP client > HP PCoIP Sessions > HP PCoIP Session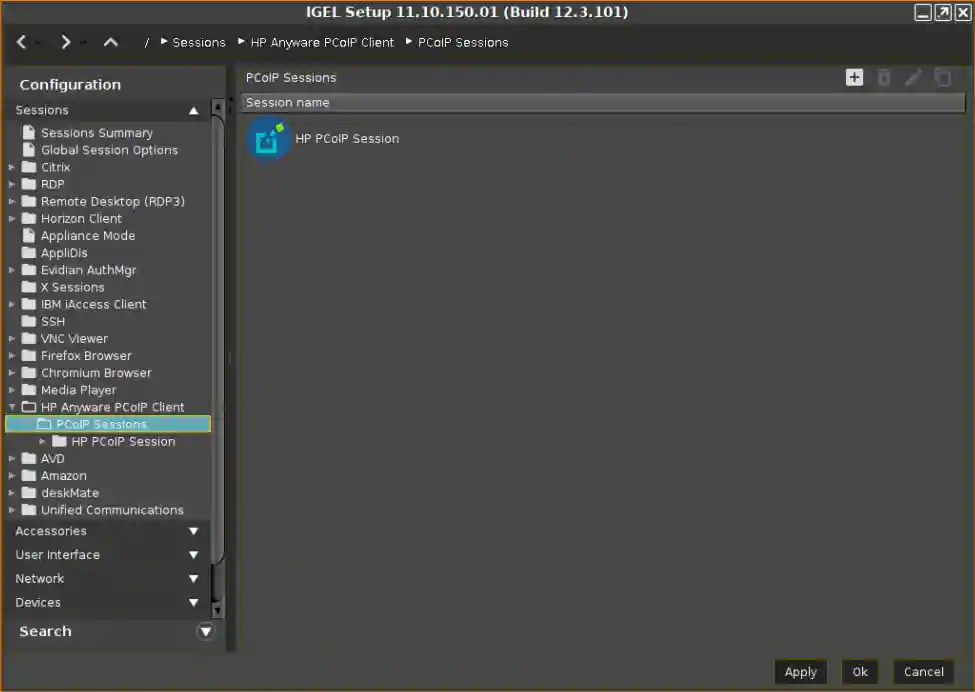
- Launch HP PCoIP Session and connect to the remote Windows PC. Devices available for redirection will appear in the taskbar menu under the USB for Remote Desktop icon.
- Check FabulaTech USB Redirection checkbox:
- RDP

Upgrading the Program on Thin Client
If necessary, USB for Remote Desktop Workstation can be upgraded or downgraded to another version using the tar.gz package of the Linux Workstation. You can obtain it from the product download page or from our support team. Please ensure you get the right package according to architecture of your device (64bit in most cases).
Upgrading Using Universal Management Suite
- Enable the FabulaTech USB Redirection feature and activate redirection in the Remote Desktop Connection configuration.
- Download the upgrade script.
- Add this script and the *.tar.gz archive with the required version of USB for Remote Desktop (Linux workstation) to the Universal Management Suite and assign to the Thin Client.
- Add the
/bin/sh /wfs/ftusb_upgrade_with_UMS.shcommand to the System - Firmware Customization - Custom Commands - Desktop - Final desktop command
Manual Upgrade
- Enable the FabulaTech USB Redirection feature and activate redirection in the Remote Desktop Connection configuration.
- Download the upgrade script, place it to the
/wfsfolder and make it executable withchmod +x ftusb_upgrade_without_UMS.shcommand - Place the *.tar.gz archive with the required version of USB for Remote Desktop (Linux workstation) to the
/wfsfolder. - Add the
/bin/sh /wfs/ftusb_upgrade_without_UMS.shcommand to the System - Firmware Customization - Custom Commands - Desktop - Final desktop command
Troubleshooting
Troubleshooting steps are the same as described in the USB for Remote Desktop (Linux version) User Manual. The only difference is location of Workstation daemon (ftusbrdpd) on IGEL thin clients: /usr/sbin/ (or /wfs/ftusbrdp/sbin/ if you have upgraded the product using the script as described above).